Kansas City PM38 Build [Splashed 2017]

pekstrom

Chief Petty Officer
Joined
Dec 31, 2015
Messages
490
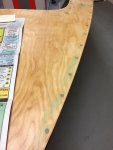
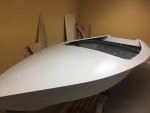
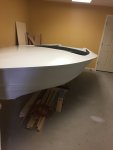
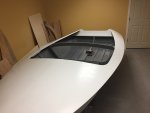
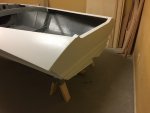
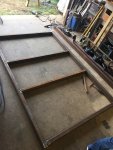
Got the boat flipped back over! Now I have begun working on filling and sanding the top deck. Going to take a little while but I am getting close to applying primer.

WoodonGlass, I have been looking at different paints. I am looking to stay with the orange/gray/white colors in the seats and probably add some black into the mix somewhere. I found Kubota Orange in Rustoleum Farm and Implement paint, is it safe to assume this would work with your paint mixing instructions? I found some of the Majic Hardener, just wanted to double check the mix would be compatible. Should I use mineral spirits as a thinner or buy the Majic Reducer?

Scott

This looks awesome! Judging by the green stuff along the edges of the deck I guess yours gets a little bubbly as well between the screws? I was pondering doing what I see you are doing to smooth it out with the filler. Very nice! I also like the colors you picked. Can't wait to see her painted. :)
 

pekstrom

Chief Petty Officer
Joined
Dec 31, 2015
Messages
490
Since the boat was right-side up, it was a good time to finish off the transom.

I added a second layer of 1/2" marine ply to the top section of the transom to add some thickness for the motor clamps. I extended the sides a little bit, the plan is to give the stern eyes some meat to grab on to. It's all glued, screwed, filled and glassed in place. There was also fiberglass cloth added to the top edge of the transom to insure the edge is sealed up good.

I still have another coat or 2 of epoxy to add for fill, weave has to have very light coats of fill due to being vertical.

The plans for the boat show a transom motor board, I am assuming this is simply to stiffen the transom where the motor actually mounts. It doesn't really say how this is attached to the transom. Should it be mounted permanently with epoxy, or something temporary so it could be replaced easily? Looking on the web some appear to be glassed in place, others are simply screwed on.

Another issue I noticed, the position of the transom brace is going to be very close to the outboard mounting bolts. Being I am using a Mercury 25hp, it only has 2 mounting bolts that are low on the mount, so it relies on the clamps and bolts. I haven't tried to position the motor yet, but the bolt holes may fall on the edge of the transom brace based on measurements. Any ideas on how to deal with that if it ends up that way? I double checked the position of the brace and it's per the plans.

PEK, you are using the same motor on your build, can you see if yours is the same way?

For that motor board I was just going to use some plywood and attach it with some 5200 sealer and screws like the skid rails. That should make it possible to replace it at some later date if needed.

I have to admit I hadn't thought of the transom beam being in the way of the motor bolts. Hmm... I'll have to do some measurements when I get home tonight and see. I am going to use a 1980 Mercury 25HP so I should be in the same boat as you, no pun intended. I will let you know what I find.
 

pekstrom

Chief Petty Officer
Joined
Dec 31, 2015
Messages
490
For that motor board I was just going to use some plywood and attach it with some 5200 sealer and screws like the skid rails. That should make it possible to replace it at some later date if needed.

I have to admit I hadn't thought of the transom beam being in the way of the motor bolts. Hmm... I'll have to do some measurements when I get home tonight and see. I am going to use a 1980 Mercury 25HP so I should be in the same boat as you, no pun intended. I will let you know what I find.

I have checked the transom clamp on my Mercury, which has two thumbscrew style bolts with big washer-type discs that presses against the inside of the transom. If I measure from the edge that will rest on top of the transom, down to the bottom of those discs on the bolts, I have 3 1/8 inches. Measuring that distance down from the top of the transom where the motor will hang, I have plenty of room between that point and the transom beam. I'd say about 2 inches. I didn't measure that part. What does the transom clamp look like on your motor?
 

Woodonglass

Supreme Mariner
Joined
Dec 29, 2009
Messages
25,924
Yup the Tractor Paint is Good stuff. Do NOT use their Primer. Use Rustoleum clean Metal Primer. Works great. The Hardener is OK Too. Depending on Temps, I use MS when it's in the 90's, a 50/50 mix of Xylene(Xylol) and MS when it's in the 80's and Straight Acetone when it's in the 60's and low 70's. This will allow the paint to settle and self Level. Are you spraying or Roll n' Roll?? If rolling then cut the thinner volume by 50% Roll multiple thin coats. Re coat in 2 hours. Use a Green 3m Scotch brite pad to wet sand between coats. Wipe down with MS and then re-coat
 

SGoergen

Petty Officer 3rd Class
Joined
Jul 12, 2016
Messages
91
No Title

I have checked the transom clamp on my Mercury, which has two thumbscrew style bolts with big washer-type discs that presses against the inside of the transom. If I measure from the edge that will rest on top of the transom, down to the bottom of those discs on the bolts, I have 3 1/8 inches. Measuring that distance down from the top of the transom where the motor will hang, I have plenty of room between that point and the transom beam. I'd say about 2 inches. I didn't measure that part. What does the transom clamp look like on your motor?


Yup, I agree, the clamps have plenty of room on the top of the transom. What I am seeing is a possible interference with the mounting bolt locations on the bottom of the motor mount. The bolt holes are 7 1/2" down from the top of the clamp mount on the motor. Looking at the plans for the transom, the top of the transom brace is located roughly 5 5/8" down from the clamp seating surface. The brace is 1 1/2" thick, so the bottom of the transom brace is right at 7 1/8", doesn't leave much room for any kind of large area washer on the inside of the transom. I am keeping my fingers crossed that I don't need to raise the motor up higher on the transom to get the height correct, if I do, it will put me into the brace.

Back when I was a teenager I had a memorable experience in a 12' aluminum boat, we had a 15hp mercury on it and we were having a bunch of fun, until we hit an underwater log! When the outboard caught the log, it kicked up with enough force to break the mounting clamps free from the transom and the motor then joined us in the boat. It actually landed on the seat between me and my best friend. It scared the crap out of us, especially since the prop had not finished turning yet ......... Nobody got hurt, but we both learned a valuable lesson ...... Don't rely on the clamps! One way or another, I'll figure out how to get the lower bolts installed :)

Scott
 

Attachments

  • photo261694.jpg
    photo261694.jpg
    185.1 KB · Views: 0
  • photo261695.jpg
    photo261695.jpg
    195.9 KB · Views: 0
  • photo261698.jpg
    photo261698.jpg
    177.1 KB · Views: 0

pekstrom

Chief Petty Officer
Joined
Dec 31, 2015
Messages
490
Yup, I agree, the clamps have plenty of room on the top of the transom. What I am seeing is a possible interference with the mounting bolt locations on the bottom of the motor mount. The bolt holes are 7 1/2" down from the top of the clamp mount on the motor. Looking at the plans for the transom, the top of the transom brace is located roughly 5 5/8" down from the clamp seating surface. The brace is 1 1/2" thick, so the bottom of the transom brace is right at 7 1/8", doesn't leave much room for any kind of large area washer on the inside of the transom. I am keeping my fingers crossed that I don't need to raise the motor up higher on the transom to get the height correct, if I do, it will put me into the brace.

Back when I was a teenager I had a memorable experience in a 12' aluminum boat, we had a 15hp mercury on it and we were having a bunch of fun, until we hit an underwater log! When the outboard caught the log, it kicked up with enough force to break the mounting clamps free from the transom and the motor then joined us in the boat. It actually landed on the seat between me and my best friend. It scared the crap out of us, especially since the prop had not finished turning yet ......... Nobody got hurt, but we both learned a valuable lesson ...... Don't rely on the clamps! One way or another, I'll figure out how to get the lower bolts installed :)

Scott

Oh wow, I see what you are talking about now. And quite honestly, I hadn't even noticed those on mine. But they sure are there. So thank you for pointing that out! As a teenager I grew up with a 10-foot inflatable with a 15HP Chrysler on it. I don't know if that one had this type of arrangement, I don't recall seeing any holes like that. We just relied on the clamps with it. We did stow that motor and also deflated and stowed the inflatable in our big boat when we were moving longer distances, so my dad may have opted to not use them. Now that you have pointed this out, I'll have to take a closer look at mine.
 

pekstrom

Chief Petty Officer
Joined
Dec 31, 2015
Messages
490
Btw, based on the numbers that are visible of the serial number in the picture, it looks like yours is a 1980/81 like mine?
 

SGoergen

Petty Officer 3rd Class
Joined
Jul 12, 2016
Messages
91
No Title

This looks awesome! Judging by the green stuff along the edges of the deck I guess yours gets a little bubbly as well between the screws? I was pondering doing what I see you are doing to smooth it out with the filler. Very nice! I also like the colors you picked. Can't wait to see her painted. :)


It wasn't too bad between the screws, I just needed a little more filler for the screws themselves and it was just as easy to smooth the filler along the edge with the spreader. The pic shows how it came out after final sanding.


Btw, based on the numbers that are visible of the serial number in the picture, it looks like yours is a 1980/81 like mine?

Yes, mine is a 1981 model. Mine came with manual start only, so I am adding the electric starter, voltage regulator, etc to convert it to electric start. I am also going to rebuild the carb and replace the water pump impeller. Haven't had a chance to get to the motor yet, but it won't take too long to get it in shape.

Scott
 

Attachments

  • photo261717.jpg
    photo261717.jpg
    126.9 KB · Views: 0

pekstrom

Chief Petty Officer
Joined
Dec 31, 2015
Messages
490
That looks really nice! I haven't started working on edges on mine yet but I will soon. Can't wait to see yours painted!

Sounds like you've got some work ahead of you on that motor. Sounds like fun though. Does it have a tiller arm as well? Are you going to keep it as a just-in-case? Mine doesn't have a tiller arm so I'll have to make do without one. Hope I'll never need one. :lol: Do you know how hard it is to replace the water pump impeller? I am wondering if I'll need to do that on mine. I noticed when I cranked it up last summer that no water came out the little whole from the cylinder head. I had to rev it up a bit before it started flowing. Once I had done that it kept flowing even at lower RPMs. I am wondering if that's due to a worn impeller maybe?
 

gm280

Supreme Mariner
Joined
Jun 26, 2011
Messages
14,590
That looks really nice! I haven't started working on edges on mine yet but I will soon. Can't wait to see yours painted!

Sounds like you've got some work ahead of you on that motor. Sounds like fun though. Does it have a tiller arm as well? Are you going to keep it as a just-in-case? Mine doesn't have a tiller arm so I'll have to make do without one. Hope I'll never need one. :lol: Do you know how hard it is to replace the water pump impeller? I am wondering if I'll need to do that on mine. I noticed when I cranked it up last summer that no water came out the little whole from the cylinder head. I had to rev it up a bit before it started flowing. Once I had done that it kept flowing even at lower RPMs. I am wondering if that's due to a worn impeller maybe?

I would absolutely change the impeller before using the engine. WHY? Because NOW is the perfect time to do that and then you can forget about it for a couple years. Do any of the engine services now before mounting the engine. It is easy now then waiting to remove it later to do. JMHO
 

archbuilder

Vice Admiral
Joined
Sep 12, 2009
Messages
5,697
I second changing it if you don't know when it was done. Mercs are usually pretty easy. My 115 takes about an hour. My guess is yours is similar.
 

SGoergen

Petty Officer 3rd Class
Joined
Jul 12, 2016
Messages
91
That looks really nice! I haven't started working on edges on mine yet but I will soon. Can't wait to see yours painted!

Sounds like you've got some work ahead of you on that motor. Sounds like fun though. Does it have a tiller arm as well? Are you going to keep it as a just-in-case? Mine doesn't have a tiller arm so I'll have to make do without one. Hope I'll never need one. :lol: Do you know how hard it is to replace the water pump impeller? I am wondering if I'll need to do that on mine. I noticed when I cranked it up last summer that no water came out the little whole from the cylinder head. I had to rev it up a bit before it started flowing. Once I had done that it kept flowing even at lower RPMs. I am wondering if that's due to a worn impeller maybe?


My motor does not have a tiller arm either, so just going to keep my fingers crossed that I never need one! I have never replaced a water pump impeller in one of these, looking at the manual, it shouldn't be too hard. The current pump impeller does appear to work, I ran the motor in the fall and had a decent stream of water coming out the hole. I am thinking along the same lines as GM and archbuilder, the motor is sitting in my garage on a stand, so now is the perfect time to replace it!

The rest of the outboard work shouldn't be too time consuming, I guessing about a day or so to get the carb rebuilt and install/wire all the electrical stuff. I am most likely going to repaint it too, that will take a little longer but still only a few days.

Scott
 

Patfromny

Lieutenant Junior Grade
Joined
Dec 2, 2012
Messages
1,197
I third or fourth the motion to replace the impeller. The old one will work fine until it doesn't. Then you run the risk of having small pieces of the old one lodged in water passages throughout the engine. Glad to see you're leaning in that direction. Superb work you're doing. You're getting close now.
 

SGoergen

Petty Officer 3rd Class
Joined
Jul 12, 2016
Messages
91
No Title

OK, update time ............. I have been super busy! The next few posts will explain everything.

The boat is coming along, I finished the transom work, sanded the hull and gave it a coat of primer! It's amazing what little imperfections you can see once the primer is applied. I have been reworking small sections and re-priming as needed. Can't wait to get this in the water :)

Scott
 

Attachments

  • photo263661.jpg
    photo263661.jpg
    70.1 KB · Views: 0
  • photo263662.jpg
    photo263662.jpg
    76.8 KB · Views: 0
  • photo263663.jpg
    photo263663.jpg
    77.2 KB · Views: 0
  • photo263664.jpg
    photo263664.jpg
    93.2 KB · Views: 0

SGoergen

Petty Officer 3rd Class
Joined
Jul 12, 2016
Messages
91
No Title

Now that the boat is getting closer to final paint, I needed to get started on the trailer! I looked at a few different used trailers, but all of them needed work and weren't quite as wide as I wanted, so the next best option was to just build one. Over the years I have built quite a few different trailers but this on will be my first boat trailer. I am planning on leaving the ends of the steel tubing open to promote drainage of water, don't want to get water trapped in there and have the trailer rust out from the inside. I am also hoping, with the tubing open, I will get a little drying action while on the highway on the way home from the lake!

I went with a 3000 lb axle with larger hubs so I could run 14" wheels and 2000 lb springs. With 14" wheels the trailer will share the same size as my travel trailer so the spare tire I carry in the truck will work no matter what I am pulling! I still need to get it finished welded and bunks built, but the good news is I have everything purchased and sitting in the garage. Some assembly required :lol:

Scott
 

Attachments

  • photo263668.jpg
    photo263668.jpg
    244 KB · Views: 0
  • photo263669.jpg
    photo263669.jpg
    354.3 KB · Views: 0
  • photo263671.jpg
    photo263671.jpg
    384.4 KB · Views: 0
  • photo263672.jpg
    photo263672.jpg
    359.9 KB · Views: 0
  • photo263673.jpg
    photo263673.jpg
    358.3 KB · Views: 0

SGoergen

Petty Officer 3rd Class
Joined
Jul 12, 2016
Messages
91
No Title

Ok, so now the boat and trailer are both being worked on ................ So once the boat comes out of the basement and on to the trailer where do I put it? I can't fit it in the garage, my current barn isn't big enough and I can't leave it outside in the weather ............... Now comes the next project....

Tear down the current small barn and build a bigger one! The old barn was 20 x 24 and the new one will be 32 x 32. It will be tall enough to fit my travel trailer and boat for winter storage. The first thing I needed to do was empty out the current barn so it could be torn down, I stacked a bunch of stuff on the boat trailer frame and my utility trailer for storage. The old barn was torn down over 3 days and I started setting posts for the new building.

Right now, I am about 2 weeks into the new building and fighting rain/wind to get the roof panels installed.

It's a little frustrating, it's raining so I can't work on the building, so I want to work on the boat stuff, but I am storing the stuff from the barn on the trailer frame and in the garage so I have no room to get to anything .............. but my bench is cleaned off, so I went to work re-wiring my outboard control and getting the new control cables installed and ready to go. Can't let the weather stop me :lol:

I am hoping to finish up the roof tomorrow and possibly get the doors installed over the weekend, so if all goes well I can get back to the boat stuff early next week :D

Scott
 

Attachments

  • photo263681.jpg
    photo263681.jpg
    193.1 KB · Views: 0

archbuilder

Vice Admiral
Joined
Sep 12, 2009
Messages
5,697
Looks like you have been busy! The boat is really taking shape now that you have the primer on it.....nice lines! I used Eastwood internal frame coating on my trailer when I boxed the c-channels. I don't know how well it will hold up, but seemed to go on great. It is a little pricey, but I figure its worth it if it slows down the rust. You can never have a big enough barn, mine is 4,000 S.F. and its still full! I'm not sure how it happens but it does!
 

52FordF2

Petty Officer 1st Class
Joined
May 31, 2013
Messages
372
Been following along on the build.

I like the Garage. Been thinking of building one myself. What height is the ceiling and doors?

Are you thinking of a concrete floor in the future?
 
Top