Kansas City PM38 Build [Splashed 2017]

gm280

Supreme Mariner
Joined
Jun 26, 2011
Messages
14,590
Is it sandable? Primers do a few things. First,it is the go between for the bare substrate (be it wood, fiberglass, metal or whatever) to the paint. Second it fills in minor imperfections. And it also seals other materials from bleeding through to the paint. But usually primers are sandable so you can sand it to a very smooth finish before applying the paint. But I don't know if this Rustoleum primer is sandable. :noidea:
 

Patfromny

Lieutenant Junior Grade
Joined
Dec 2, 2012
Messages
1,197
Rustoleum primer is Sandable. All oil Primers that I have come across dry to a hard surface. The difference between oil primer and oil paint is that the oil dries out of the primer so you can sand or top coat with water based paint or whatever as opposed to oil paint which can not be top coated with water based or "latex" paint. Oil paint retains some oil and is always slightly wet. This is what makes oil paint yellow over time. Either the Oil rises to the surface or the oil attracts dirt. The oil is also a contributor to the gloss in oil paint. I believe I used the clean metal primer when I painted some interior pieces for the boat in the spring as per WOG's advice and I always sand between coats. I don't remember it being a problem sanding.
 

Woodonglass

Supreme Mariner
Joined
Dec 29, 2009
Messages
25,924
Yup, the rustoleum primer Sands Like a dream. I used some of their High Build Primer too and it acted the same as the clean metal primer except it was a darker grey color. I just used a Green Scotchbrite pad to knock down the nubs between primer coats. After I was satisfied with the Final primer I wet sanded with 220 grit and then shot the First color coat. Some people go to 320 or 400 but my boat was NOT a Show Boat so 220 worked for me. I didn't notice any sanding line is the final product. An added benefit is that 220 gives the color coat a bit more to BITE into. But...I'm NOT a PRO Painter soooo, do what you think's best. I just know what's worked for me. In the end it's everyone's choice. I just like to spout off to relieve the pressure sometimes.:eek::D
 

Patfromny

Lieutenant Junior Grade
Joined
Dec 2, 2012
Messages
1,197
I would add that most primers are sealers. They are the go between between substrate and paint so that they can give you an even absorption or lack thereof of. I'm sure you have all primed one thing or another and noticed that it doesn't cover as well as paint. It has much less titanium dioxide or other cover or filler material than paint. it's job, unless it is a high hide primer, is to seal the substrate so you get an even finish with no shadows or flashing. To do this it only needs to seal and not cover. I've seen lots of people waste money and time two coating walls with primer because they can see lap marks and or the old color come through the primer. I tell people that you only need to wet the surface with the primer for it to work. The paint is loaded with a lot more volume solids and the covering is the job of the paint. I realize that auto paint is a bit different in that the color of primer sometimes alters the top color and therefore the primer should be even and uniform but we are talking about Rustoleum here which behaves like house paint and the top coats of color do the hiding. As long as the substrate is sealed, you will get an even finish. Oil or solvent based primer should always be used over new wood or problem areas like water stains or markers or other inks on the substrate.
 

gm280

Supreme Mariner
Joined
Jun 26, 2011
Messages
14,590
Actually the primer I am using states that it can be used as a high build primer OR a sealer. If you shoot it straight (with the hardener of course) it is a high build primer. If you shoot it with one part reducer in a 4 :1:1 (4 parts primer, one part hardener and one part reducer) mixture, then it is a sealer. And you probably could do the same with other primers as well. :noideas:
 

Patfromny

Lieutenant Junior Grade
Joined
Dec 2, 2012
Messages
1,197
Gm, I think you have it turned around. the primer is always sealing. by reducing it you are reducing it's high build properties thus using it only as a sealer and not a high build primer.
 

SGoergen

Petty Officer 3rd Class
Joined
Jul 12, 2016
Messages
91
No Title

Here are some updates. The stem band lamination seemed to work out great, matches the curve of the stem perfectly and laminated pieces seem to have a nice tight fit. I have it installed on the boat (more pics coming) but still need to shape it to match the hull.

Scott
 

Attachments

  • photo256002.jpg
    photo256002.jpg
    152 KB · Views: 0
  • photo256003.jpg
    photo256003.jpg
    101.8 KB · Views: 0

SGoergen

Petty Officer 3rd Class
Joined
Jul 12, 2016
Messages
91
No Title

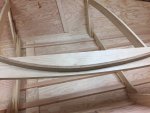
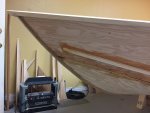
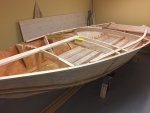
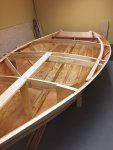
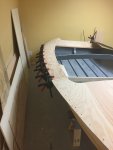
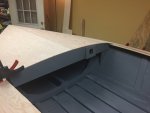
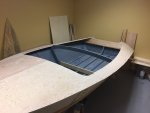
Next, I finished up the remaining frames/dash panel, These were fairly easy to install, the outer deck battens were a little tougher. They are 1 1/2" x 3/4" and didn't really want to make the bend nicely. The laminated stem band came out nice, so why not try that with the deck battens ...... I cut some new pieces 3/4" x 3/4" and laminated them together as they were installed. I actually worked pretty good and I used every single clamp I could find in the shop!

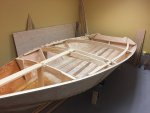
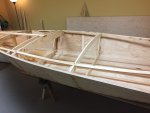
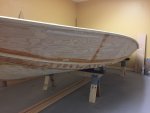
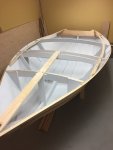
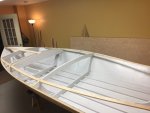
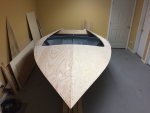
The next challenge was the spray rails, they are 3" above the chine line, so I made a small drill block I could run along the inside of the hull to located the holes correctly. That gave me a series of holes that matched the chine line perfectly. I then marked the outside of the hull so I could center the spray rails on the pre-drilled holes. My wife helped me hold the glue covered rails in place while I installed the screws from the inside of the hull. I held my breath as we made the bend around the bow, but they bent nicely.

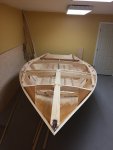
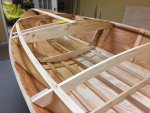
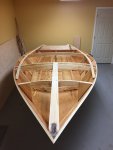
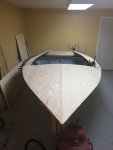
In the bow pic you can see the laminated stem band installed.

Scott
 

Attachments

  • photo256004.jpg
    photo256004.jpg
    138.1 KB · Views: 0
  • photo256005.jpg
    photo256005.jpg
    134.4 KB · Views: 0
  • photo256006.jpg
    photo256006.jpg
    109.6 KB · Views: 0
  • photo256007.jpg
    photo256007.jpg
    133.1 KB · Views: 0
  • photo256008.jpg
    photo256008.jpg
    99.8 KB · Views: 0

SGoergen

Petty Officer 3rd Class
Joined
Jul 12, 2016
Messages
91
No Title

With the framing complete it was time to put some epoxy on the inside of the hull.

Scott
 

Attachments

  • photo256009.jpg
    photo256009.jpg
    131.6 KB · Views: 0
  • photo256010.jpg
    photo256010.jpg
    185.7 KB · Views: 0
  • photo256011.jpg
    photo256011.jpg
    119.9 KB · Views: 0
  • photo256012.jpg
    photo256012.jpg
    139 KB · Views: 0

SGoergen

Petty Officer 3rd Class
Joined
Jul 12, 2016
Messages
91
No Title

Rustoleum Primer was the next step! I left epoxy and primer off the tops of the frames and deck battens. I still need to do some final shaping for the decking install and figured a bare wood to wood glue joint would be a little more solid.

I picked up some Rustoleum gray for the inside, so that will be the next step before the decking gets installed.

Once I flip the boat back over, I should be able to crawl under it and seal/paint the bottom side of the upper decking ........... or atleast I am going to try to do it that way.

Scott
 

Attachments

  • photo256015.jpg
    photo256015.jpg
    103.4 KB · Views: 0
  • photo256016.jpg
    photo256016.jpg
    114.9 KB · Views: 0

gm280

Supreme Mariner
Joined
Jun 26, 2011
Messages
14,590
You guys building these home made boats are gong to make me want to build one. Nice job. :thumb:
 

gomopar440

Petty Officer 1st Class
Joined
Nov 27, 2007
Messages
281
Your boat is looking great!:clap2: I've gotten a little case of shop envy from looking at those nice warm looking build pics of yours.:madgrin:

If there's one thing I've found out with my Laker build, it's that there's no such thing as "enough" when it comes to clamps. This was especially obvious when I glued the chines to the sponsons. I had to split the 1.5" x 3/4" x 16' chine in half from the tip to bulkhead #2 (about 4') in order to make that tight curve up front. Did it very similarly to your method, except I just didn't split it for the entire length. I had just about every clamp I owned holding the two halves together every 2-3" or so. It was a somewhat tricky procedure, but it came out fine from the looks of it. I would have had to triple my clamp inventory in order to clamp it together if I had to split that chine over it's entire length.:yield:
 

SGoergen

Petty Officer 3rd Class
Joined
Jul 12, 2016
Messages
91
No Title

Your boat is looking great!:clap2: I've gotten a little case of shop envy from looking at those nice warm looking build pics of yours.:madgrin:

If there's one thing I've found out with my Laker build, it's that there's no such thing as "enough" when it comes to clamps. This was especially obvious when I glued the chines to the sponsons. I had to split the 1.5" x 3/4" x 16' chine in half from the tip to bulkhead #2 (about 4') in order to make that tight curve up front. Did it very similarly to your method, except I just didn't split it for the entire length. I had just about every clamp I owned holding the two halves together every 2-3" or so. It was a somewhat tricky procedure, but it came out fine from the looks of it. I would have had to triple my clamp inventory in order to clamp it together if I had to split that chine over it's entire length.:yield:


I will admit it is nice being able to work in a heated room, especially when it's 25 degrees in the garage!

Not much progress this week on the boat, been working on a few Christmas gifts and doing some holiday shopping with my wife. I hope to get some time this coming weekend to get some paint on the inside of the hull, then I can figure out seat mounting.

I did receive the seats (see pic) they should look pretty good and seem to fit the style I am going for. They kind of give away my planned color scheme for the boat. The steering kit is on order and should be here next week. I am thinking it will be a little easier to mount the helm without the top decking in place.

Scott
 

Attachments

  • photo256322.jpg
    photo256322.jpg
    126.6 KB · Views: 0

pekstrom

Chief Petty Officer
Joined
Dec 31, 2015
Messages
490
Hey Scott, this is looking awesome! I have to admit I have some woodworking envy here. :lol: That is going to be one nice looking boat!
 

SGoergen

Petty Officer 3rd Class
Joined
Jul 12, 2016
Messages
91
No Title

Thanks Pek! As you know, I still have quite a ways to go.

I did make some more progress over the holidays and finished up the painting inside the hull. Then while everything was still open, I figured it would be a good time to work on the mount for the helm. I wanted it at slight angle instead of straight up and down, so I made a spacer block that put the wheel at a comfortable angle and gave me a little more room behind the dash for the steering box.
 

Attachments

  • photo257173.jpg
    photo257173.jpg
    144.3 KB · Views: 0
  • photo257174.jpg
    photo257174.jpg
    166.4 KB · Views: 0
  • photo257175.jpg
    photo257175.jpg
    159.3 KB · Views: 0

SGoergen

Petty Officer 3rd Class
Joined
Jul 12, 2016
Messages
91
No Title

I finished off the helm spacer with some epoxy and paint, then moved forward with the upper decking. After a few hours I had all the decking screwed in place. It's really starting to look like a boat! The shape of the hull really seems to come alive with the decking installed.

Scott
 

Attachments

  • photo257176.jpg
    photo257176.jpg
    88.5 KB · Views: 0
  • photo257177.jpg
    photo257177.jpg
    106.4 KB · Views: 0
  • photo257178.jpg
    photo257178.jpg
    100.4 KB · Views: 0
  • photo257179.jpg
    photo257179.jpg
    102.9 KB · Views: 0
  • photo257180.jpg
    photo257180.jpg
    106.9 KB · Views: 0
  • photo257181.jpg
    photo257181.jpg
    105.3 KB · Views: 0

gsxrdan

Petty Officer 1st Class
Joined
Aug 28, 2016
Messages
317
wowee, sure is lookin purdy! congrats on some super progress!!
 
Top