Kansas City PM38 Build [Splashed 2017]

SGoergen

Petty Officer 3rd Class
Joined
Jul 12, 2016
Messages
91
It all started while camping at Truman Lake, my wife suggested that we should get a boat. At that moment a new project was born. I have built a lot of things but I have never built a boat, so why not! I did some looking around the web for plans and came a crossed the Popular Mechanics article about the PM38. It looks like a cool little boat and just about the right size to take out on the weekends. Next thing you know I found the iBoats forum and Pekstrom's build thread! His boat looks like it's coming along great, so I am going to give one a shot.

The build will be similar to pekstrom's, planning on using a 25hp Mercury for power. I may end up changing the seating a little, thinking of using off the shelf boat seats and maybe creating a small step-through, then adding 2 aft facing seats behind that (4 seats total). It's just in the idea stage now, I'll see how it goes when that time comes.

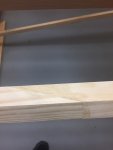
The first challenge was coming up with wood, but I found Douglas Fir locally and substituted a little clear pine where I needed. Clear pine is not optimum but I figure once its all coated in epoxy it should last quite a few years. Having access to a portable planer allowed me to buy larger boards and plane then down to the proper size.

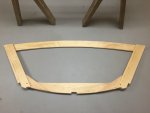
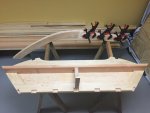
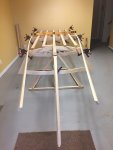
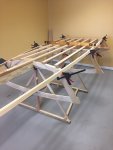
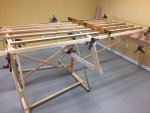
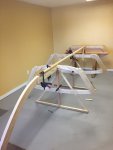
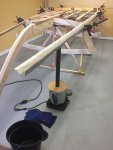
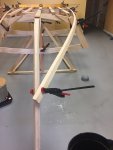
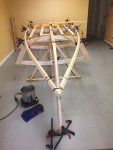
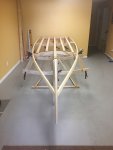
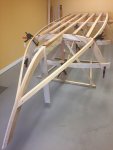
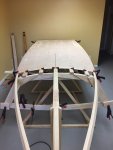
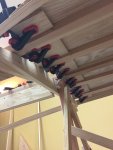
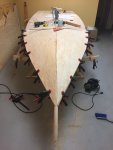
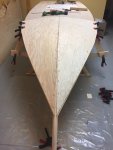
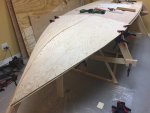
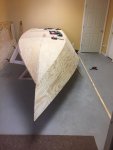
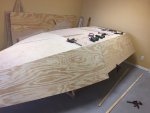
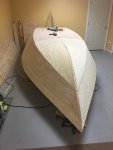
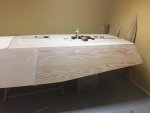
Since this build is already in progress, I'll make a few posts to get the thread caught up to where I am currently at in the project. Below are some pictures of the first 2 frames, transom and stem.
 

Attachments

  • photo254714.jpg
    photo254714.jpg
    84.2 KB · Views: 1
  • photo254715.jpg
    photo254715.jpg
    82.4 KB · Views: 1
  • photo254716.jpg
    photo254716.jpg
    123 KB · Views: 1

SGoergen

Petty Officer 3rd Class
Joined
Jul 12, 2016
Messages
91
No Title

With the frames built, the next step was to start putting them together. You might be able to tell from the pics, I am build this boat in my finished basement. It's a walk-out so getting the boat out at the end won't be too bad, I already measured the door!

The assembly was pretty smooth, everything seemed to fit pretty well. I added some additional bracing to the "A" frames shown in the plans, it really helped to keep everything straight and square.I also braced the transom so it would hold the 15 degree angle.

The chin joints were a challenge but I made a fixture to cut them on my table saw. The end result was a nice tight joint, should be plenty strong enough.
 

Attachments

  • photo254719.jpg
    photo254719.jpg
    125.2 KB · Views: 1
  • photo254720.jpg
    photo254720.jpg
    123.3 KB · Views: 1
  • photo254721.jpg
    photo254721.jpg
    75.3 KB · Views: 1
  • photo254724.jpg
    photo254724.jpg
    137.4 KB · Views: 1
  • photo254743.jpg
    photo254743.jpg
    101.4 KB · Views: 1
Last edited:

SGoergen

Petty Officer 3rd Class
Joined
Jul 12, 2016
Messages
91
No Title

Next step was to bend the chins, after reading a bunch of threads I put together my own little steam setup. With a $9 hotplate, $6 pot, some scrap ABS pipe and a piece of plywood, I was in business. I didn't order the full length bags, instead some clear plastic drop cloth material and duct tape seemed to work.

Once the steam was rolling, it took about 20 minutes per side to bend them into position. I tied them down and let them dry over night, the next day trimmed and screwed them in place. At this point I was very happy, they didn't break and the shape is starting to look like a boat!
 

Attachments

  • photo254735.jpg
    photo254735.jpg
    131.3 KB · Views: 1
  • photo254736.jpg
    photo254736.jpg
    121.9 KB · Views: 1
  • photo254737.jpg
    photo254737.jpg
    127.1 KB · Views: 1
  • photo254738.jpg
    photo254738.jpg
    105.2 KB · Views: 0
  • photo254739.jpg
    photo254739.jpg
    121.1 KB · Views: 1

SGoergen

Petty Officer 3rd Class
Joined
Jul 12, 2016
Messages
91
No Title

I was able to purchase marine plywood from Menard's here in Kansas City. They only stock 1/2" in the store, but I was able to order 1/4" and 3/8" from their website, with free shipping to the store.

The next step was to add the plywood bottom section. This is 3/8" plywwod and gets a 30" slit cut an the fore end, along the centerline to allow it to bend as it goes toward the bow. It went pretty smooth and really stiffened up the frame. The taper on the front for the seam was done with a belt sander, but still took quite a while to get it to look right.

The joint backers were cut from 1/2" marine ply and glued in place.

That should get everything up to where I am at now. This weekend I am working on the rest of the bottom planking, which is a little more challenging since it has to bend and create the shape of the bow.

I should also send a thank you out to Pekstrom, I have hit him with quite a few questions over the past month or so and he has really helped to clear up some minor issues with the plans.
 

Attachments

  • photo254740.jpg
    photo254740.jpg
    123.7 KB · Views: 1
  • photo254741.jpg
    photo254741.jpg
    170.5 KB · Views: 1
  • photo254742.jpg
    photo254742.jpg
    135.6 KB · Views: 1

gm280

Supreme Mariner
Joined
Jun 26, 2011
Messages
14,591
Bravo sir. How can you not like a home built boat? Seems you do very good woodworking. And that is what it takes to make such a hull. I would like to follow along, if that is okay with you.
 

jbcurt00

Moderator
Staff member
Joined
Oct 25, 2011
Messages
24,863
KC, look back, SG credits pekstrom for helping answer some questions..
 

kcassells

Fleet Admiral
Joined
Oct 16, 2012
Messages
8,598
Shoot let me find my glasses... that's better, yup I missed that,...............................Happy Halloween guys!
stock-photo-funny-man-with-watermelon-helmet-and-googles-looks-like-a-parasitic-caterpillar-157354478.jpg
 

gm280

Supreme Mariner
Joined
Jun 26, 2011
Messages
14,591
Yes KC, seems we now have two PM38 builds going on. How can you not love it? I am watching both. You just never know when you will decide to build one. :noidea:
 

SGoergen

Petty Officer 3rd Class
Joined
Jul 12, 2016
Messages
91
Very nice craftsmanship. Great attention to detail!!!

Thanks for the compliment! I am really learning a lot during this build. I have done some wood projects in the past, but nothing this large. I studied the plans, then measured everything about 3 times before cutting and assembling.

Bravo sir. How can you not like a home built boat? Seems you do very good woodworking. And that is what it takes to make such a hull. I would like to follow along, if that is okay with you.

Feel free to tag along! I can't really tell you if it's "good woodworking" or just my OCD! The boat really has me excited, it's starting to take shape and I can't wait to get it flipped right side up.
 

SGoergen

Petty Officer 3rd Class
Joined
Jul 12, 2016
Messages
91
No Title

Ok, time for an update. I had a 3 day weekend so got some more work done on the boat. The bottom planks on the bow went fairly easy, I did have to use a wet towel and a steam iron to get them bent into shape. I think they came out pretty good.

I ran to Home Depot and picked up a Dewalt pull saw, it worked great trimming the plywood to the chins. Once trimmed it sanded it flush with my belt sander.

Scott
 

Attachments

  • photo254861.jpg
    photo254861.jpg
    126.9 KB · Views: 2
  • photo254862.jpg
    photo254862.jpg
    141 KB · Views: 1
  • photo254863.jpg
    photo254863.jpg
    144.5 KB · Views: 1

SGoergen

Petty Officer 3rd Class
Joined
Jul 12, 2016
Messages
91
No Title

The next challenge was to make the side planks. These are made in 2 pieces with a joint in the middle. I scratched my head for a bit on this, I didn't want to mis-cut any of my good marine plywood..... That's when I remembered the marine ply came shipped between 2 pieces of 1/4' exterior ply for protection. I used the exterior plywood to make templates for the side planks, it also gave me a chance to make sure the template would work on both sides of the boat.

With the templates completed, I cut the marine ply and glued some side planks together. The side joints came out pretty good, a nice tight fit and feel strong. Now, I had to actually put them on the boat which was kind of a scramble, but the end result was well worth it, it actually looks like a boat now. I pre-drilled most of the screw holes so the final assembly wasn't too bad, besides chasing the glue drips!

I have the side planks trimmed to the bottom and have started filling the countersunk screws with epoxy mixed with sanding dust. Once I get most of the filling done on the bottom side, I'll get her flipped over to build the rest of the structure under the front deck. Looks like I need to get some saw horses built. Hoping to have it flipped over next weekend.

Scott
 

Attachments

  • photo254864.jpg
    photo254864.jpg
    121.9 KB · Views: 0
  • photo254865.jpg
    photo254865.jpg
    124.8 KB · Views: 0
  • photo254866.jpg
    photo254866.jpg
    118.7 KB · Views: 0
  • photo254867.jpg
    photo254867.jpg
    90.4 KB · Views: 0

SGoergen

Petty Officer 3rd Class
Joined
Jul 12, 2016
Messages
91
The plans call for "oak or other hardwood" for the stem band. I don't currently have any white oak but I do have a piece of mahogany. Do you think that will work?

Scott
 

SGoergen

Petty Officer 3rd Class
Joined
Jul 12, 2016
Messages
91
The stem band is initially ?" x 1⅛" x 4', once glued and screwed into position, gets faired to match side planks. It gets covered in fiberglass tape and epoxy prior to final paint/finishing.

Scott
 

gm280

Supreme Mariner
Joined
Jun 26, 2011
Messages
14,591
Looks really nice and a lot of progress as well. I subscribed to your project so I can keep up with your build. Looking really good.
 

SGoergen

Petty Officer 3rd Class
Joined
Jul 12, 2016
Messages
91
Well, best laid plans ................ I ended up breaking the mahogany. I must not have steamed it long enough, just as it got into position it snapped. So i ordered some white oak and should have it in a week or so.

The stem is shaped and ready for the band to be installed. So I flipped the boat over so I can start finishing the bow framing and sheer rails while I am waiting on wood to arrive. I can also start the epoxy coating process, I have plenty to keep me busy!

Scott
 
Top