Chaparral 2000 SL Sport floor, and more?? [SPLASHED Sept 2017]

Baylinerchuck

Commander
Joined
Jul 29, 2016
Messages
2,726
Thanks everyone, it really felt good getting that engine bolted down.

On Sunday I located the bench seat and figured out how I would secure it. I placed some composite angles strategically in key areas to keep it from sliding around. The bench will be bolted into the angles thus securing it in all directions. I used PL to glue the angles, and stainless steel screws to secure them. The PL will provide protection from water intrusion. I used 6 angles total. I'll bolt the bench down after I'm done with the motor.

Click image for larger version  Name:	IMG_0141.JPG Views:	1 Size:	57.5 KB ID:	10525209

Click image for larger version  Name:	IMG_0142.JPG Views:	1 Size:	49.9 KB ID:	10525210


I also cut and installed a couple dividers to better utilize space under the helms. This will make 10" pockets for storage.

Click image for larger version  Name:	IMG_0143.JPG Views:	1 Size:	81.5 KB ID:	10525211


The pocket walls are glued in using thickened resin with chopped strands. I won't be tabbing these in since they are not structural.
 

Attachments

  • IMG_0143.JPG
    IMG_0143.JPG
    81.5 KB · Views: 9
Last edited:

Baylinerchuck

Commander
Joined
Jul 29, 2016
Messages
2,726
I decided to start finishing the bow area this evening. I sanded the gelcoat from the holes I patched a few weeks ago. These holes were used to attach head rests the PO had custom made. The pads ere in bad shape, and not really my thing. Sanded and buffed out, it's hard to tell where the patches are. I'm very pleased with the results.

Click image for larger version  Name:	IMG_0148.JPG Views:	1 Size:	40.8 KB ID:	10525216

Click image for larger version  Name:	IMG_0150.JPG Views:	1 Size:	74.4 KB ID:	10525217

Click image for larger version  Name:	IMG_0149.JPG Views:	1 Size:	41.4 KB ID:	10525218
 
Last edited:

rad1026

Chief Petty Officer
Joined
May 1, 2006
Messages
443
Really looking great! Yeah, getting the engine back in is a major step. But the best part is when that alignment bar slides in and out easily. That's when you know all your measurements were done right.
 

Baylinerchuck

Commander
Joined
Jul 29, 2016
Messages
2,726
Psychologically speaking I needed to get something completed. So many things left open at this point, and one task waits on another. I decided to install the bow pads just to get one thing looking finished. I spent a couple hours on these. Honestly, they're not in the best shape. I think they'll be good enough to get me through the year. I definitely have some plywood backers to change out soon.
Click image for larger version  Name:	IMG_0152.JPG Views:	1 Size:	57.5 KB ID:	10525225

Click image for larger version  Name:	IMG_0153.JPG Views:	1 Size:	77.5 KB ID:	10525226


Aside from that I cleaned up a little and started sorting the wiring to better organize it.

Click image for larger version  Name:	IMG_0158.JPG Views:	1 Size:	113.3 KB ID:	10525227
 
Last edited:

Baylinerchuck

Commander
Joined
Jul 29, 2016
Messages
2,726
I added some Bondo to the joints of the storage pockets I built to smooth out the hairy PB. After a bit of sanding they were ready for gel coat.

Click image for larger version  Name:	IMG_0155.JPG Views:	1 Size:	42.6 KB ID:	10525229


After a coat of gel things looked better.

Click image for larger version  Name:	IMG_0157.JPG Views:	1 Size:	71.1 KB ID:	10525230


Started working on getting the engine running. Throttle cable, exhaust manifolds, and new water line hooked up.

Click image for larger version  Name:	IMG_0156.JPG Views:	1 Size:	61.0 KB ID:	10525231


I'm still waiting on the 1/4" NPT brass plugs for the block. As luck would have it no one carried those plugs locally. I've heard from a plumbing supply co., it's due to fines imposed on distributors for selling brass, which contains lead, that gets used in potable water systems. They can sell other brass items, just are limited on NPT fittings. Fines can be up to 10k for the installer and whoever sold it. NICE.
 
Last edited:

89 resorter

Petty Officer 1st Class
Joined
Oct 3, 2013
Messages
287
Chuck, the gel coating looks great! Can't wait to see the pics of the splash ..... funny how something as small as a couple NPT fittings can grind progress to a halt like that.

Keep up the great work.... getting real close now
 

Baylinerchuck

Commander
Joined
Jul 29, 2016
Messages
2,726
Chuck, the gel coating looks great! Can't wait to see the pics of the splash ..... funny how something as small as a couple NPT fittings can grind progress to a halt like that.

Keep up the great work.... getting real close now

Thanks sir. I have to admit I was pretty dumbfounded to not be able to find these fittings locally, lowes, HD, Napa, TSC, and a major plumbing distributor. Unreal. I couldn't even find a tap to chase the threads in the block. All I can say is thank goodness for the wild wild web!!
 

Baylinerchuck

Commander
Joined
Jul 29, 2016
Messages
2,726
Great progress today. Had about 12 hours of uninterrupted work. I got the outdrive on. This was a real pain getting everything lined up by myself. I eventually got it to slide in perfectly. Cleaned up and installed the trim cylinders. Used thread sealant on the hydraulic fittings to hopefully stop them from seizing.
IMG_0161.JPG


I also cleaned up a lot of wiring. I soldered a lot of connections and placed stray wires into the loom. I installed the bilge pump and soldered in the blower. There is still more to do, but this is a good start.
IMG_0162.JPG


I also took the tank off the hydraulic reservoir and cleaned all the gunk out of it. Also cleaned the pickup tube screens. I cleaned the o-ring and reassembled. I should be able to hook up the trim pump tomorrow.
IMG_0163.JPG


I'm beat......more tomorrow.
 

Attachments

  • IMG_0159.JPG
    IMG_0159.JPG
    74.3 KB · Views: 9
  • IMG_0160.JPG
    IMG_0160.JPG
    57.9 KB · Views: 10
Last edited:

Baylinerchuck

Commander
Joined
Jul 29, 2016
Messages
2,726
Had about half a day to work today. I went to Lowes to get connectors for my trim limit and trim senders. I tinned the wires before crimping, then applied liquid electrical tape, then heat shrink.

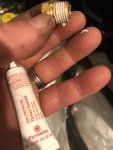
I made a huge mistake yesterday in applying gel coat. I went to my work table this morning and there was exactly 6.2cc of MEKP. Sure enough, I added wax, but no catalyst. To fix this I made a quick kick batch of gel coat with wax, rolled it on vigorously, then added heat. Worked like a charm, gelcoat kicked great.

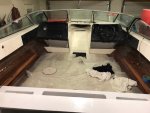
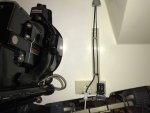
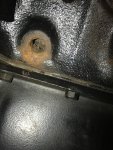
After that fiasco, I mounted the blower, and hydraulic pump. I mounted these to the deck using rubber feet, stainless screws, and 5200. I connected the hydraulics and all wiring.

I used my jump pack battery to test the trim, blower, and bilge pump. Everything worked well, no vibration.

IMG_0164.JPG
 
Last edited:

Baylinerchuck

Commander
Joined
Jul 29, 2016
Messages
2,726
I received the illusive 1/4"NPT plugs for the block and elbows from amazon. I'm a bit concerned for how deep the plugs thread in, and hope I don't have leaks. They are not sloppy, but with NPT tapers, the more shallow the fitting goes in, the tighter the seal as the fitting is turned in. I used thread sealer to stave off any additional corrosion.
IMG_0175.JPG
 

Attachments

  • IMG_0174.JPG
    IMG_0174.JPG
    60.9 KB · Views: 4
  • IMG_0170.JPG
    IMG_0170.JPG
    136.5 KB · Views: 4
  • IMG_0173.JPG
    IMG_0173.JPG
    86.2 KB · Views: 4
Last edited:

Mad Props

Lieutenant Commander
Joined
Jul 8, 2016
Messages
1,766
I can't believe you had to order those parts! I live in PA as well and can find brass plugs at ACE hardware, lowes, homedepot, etc... not sure whats going on in Chambersburg, lol...
 
Top