Looking good!
Where did you find that blower? I need one aswell.
Looking good!
Where did you find that blower? I need one as well.

They sell them here on iBoats.
Look inside the box . . . :noidea: . . . .

maybe its glass bubbles that you used? Says glass bubbles are for minor surface filling of small scratches and holes though, that doesn't sound like the right stuff?
Chuck,
This thing is looking awesome... I'm late to the game but I've read through all the posts and this has been a great one to follow thusfar. Also, just realized I don't live too far away. I'm in York Co near Pinchot. I see your in Chambersburg, I spent 2 years of my life down at PSU Mont Alto. I love it down there. My family and I love going to Caledonia and Michaux to go for hikes. We were just down there last weekend to go for a hike at Long Pine Run Reservoir.
Well howdy neighbor. I used to live in York Springs and worked in Lewisberry, so I know exactly where you are. Though the Pinchot lake is electric only right? Where do you run the StingRay?
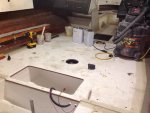
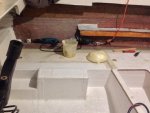
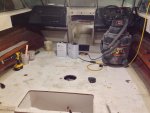
Finally can post more progress. Was vacationing on a big ship in the carribean. I did get to see some really amazing off shore racing boats in Cocoa Beach Florida which was really cool. Any way, I had a foam order come in while I was away. I got cracking on the foaming this morning. I tried to minimize the amount of 2" holes in the deck by adding 1/2" relief holes. I was thinking the relief holes would allow the foam to expand into all the corners since any trapped air could get out. That idea flopped, and I ended up drilling a few more pour holes. The second side I only drilled pour holes up the center. This seemed to be the best method. I have two more small cavities to fill in the bow. I used the 4 pound foam.....this stuff is very rigid. I got a little carried away on one pour, and got a huge mushroom.
That is the idea that we talked about via PM, right? I think in order for the 'air relief' holes to work, you have to pour in the center of the cavity, have the relief holes at the corners of the cavity and plug the 'pour' hole right after you pour.
Trying to minimize the number of pour holes probably defeated the purpose since you were not pouring in the middle of the cavities.