Chaparral 2000 SL Sport floor, and more?? [SPLASHED Sept 2017]

Baylinerchuck

Commander
Joined
Jul 29, 2016
Messages
2,726
No Title

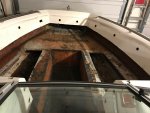
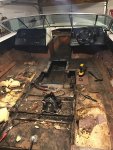
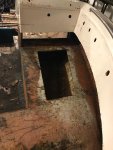
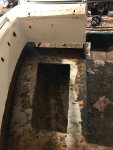
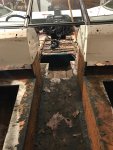
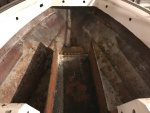
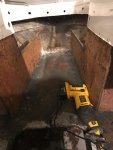
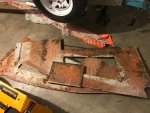
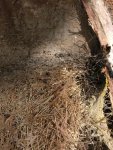
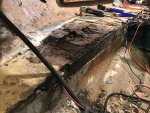
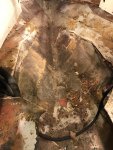
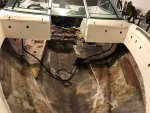
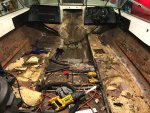
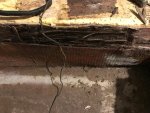
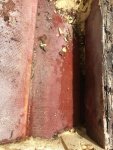
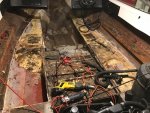
Did a little bit more tonight. Got the rest of the pads out of the bow, and the rest of the carpet is history. I took a lot of measurements and pictures. I'm not sure why the bow box in the center was not set up as storage. I'll be changing that as I rebuild the bow. I'm going to carefully remove these pieces so I have a good pattern for reconstruction.
 

Attachments

  • photo254447.JPG
    photo254447.JPG
    374.6 KB · Views: 26
  • photo254448.jpg
    photo254448.jpg
    156.6 KB · Views: 27
  • photo254449.jpg
    photo254449.jpg
    189 KB · Views: 23
  • photo254450.jpg
    photo254450.jpg
    186.1 KB · Views: 22
  • photo254451.jpg
    photo254451.jpg
    177.1 KB · Views: 28

Baylinerchuck

Commander
Joined
Jul 29, 2016
Messages
2,726
No Title

I had about an hour and some change to do some work on the Chap tonight. I wanted to use a new power tool I picked up from HF. I wasn't sure if the plunge blades would work on fiberglass. All in all the oscillating tool did well. I used it to separate the bow seat frame from the hull. This was really tricky when I restored by Capri, but this plunge cutter really did a nice job. It was slow, but precise. I wanted to keep as many of the pieces of the Chap in tact so I have good patterns to build from.
 

Attachments

  • photo254531.jpg
    photo254531.jpg
    172.5 KB · Views: 29
  • photo254532.jpg
    photo254532.jpg
    183.5 KB · Views: 28
  • photo254533.jpg
    photo254533.jpg
    159.1 KB · Views: 27
  • photo254534.jpg
    photo254534.jpg
    173.1 KB · Views: 28

drewm3i

Petty Officer 1st Class
Joined
Dec 31, 1969
Messages
279
That wood you removed from the bow section looks good? Why not replace parts that need it only? I am shocked your deck didn't have glass over it. Every other Chap I've seen does...
 

Baylinerchuck

Commander
Joined
Jul 29, 2016
Messages
2,726
That wood you removed from the bow section looks good? Why not replace parts that need it only? I am shocked your deck didn't have glass over it. Every other Chap I've seen does...

Trust me, the wood is not in good shape at all. The bench top in the bow was cracked and rotted, the pictures are deceiving due to the resolution. Even if it was in good shape I still need to remove it in order to replace the deck. And my deck was glassed at one time. I guess years of water exposure rotted the wood under it and the fiberglass just deteriorated. In the areas that were protected from exposure, the fiberglass was 3/32 thick top and bottom. I think the real issue was it wasn't sealed, and thus porous. The material I am replacing this with is fiberglassed and gel coated, both sides.
 

airdvr1227

Lieutenant Commander
Joined
Jul 15, 2009
Messages
1,666
Looks like you've got things well in hand. Tagging along for moral support.
 

Baylinerchuck

Commander
Joined
Jul 29, 2016
Messages
2,726
No Title

It was 79 degrees in South Central PA today. I was really kicking myself in the butt for tearing my boat apart, lol. Oh well, the damage was done....

Today I finished taking apart the bow seating structure. I used the oscillating tool to save the pieces for patterns. I got a good look at the backside of the bow hook. As you see in the picture, it will need reinforced. Seems to me it would take an awful lot of force to pull that through fiberglass.

I started removing some sections of the deck in the bow. It really slows down over the stringers. Although the deck and stringers are rotted the fiberglass still holds amazingly well. I have just about all the foam exposed on the starboard side. It's wet enough to pool water when I press on it.

I need to remove the foam on both sides of the fuel tank in order to get it out. The tank is wedged pretty tight by the stringers. I would like to try and move the thank a little farther forward. We'll see if I can do it when I do some layout.

More to come!!
 

Attachments

  • photo254805.jpg
    photo254805.jpg
    145.1 KB · Views: 26
  • photo254806.jpg
    photo254806.jpg
    149 KB · Views: 24
  • photo254807.jpg
    photo254807.jpg
    163.9 KB · Views: 23
  • photo254808.jpg
    photo254808.jpg
    150.6 KB · Views: 22
  • photo254809.jpg
    photo254809.jpg
    138.5 KB · Views: 24
  • photo254810.jpg
    photo254810.jpg
    158.9 KB · Views: 24
  • photo254811.jpg
    photo254811.jpg
    140.3 KB · Views: 25

Baylinerchuck

Commander
Joined
Jul 29, 2016
Messages
2,726
No Title

Had a couple of hours while the Admiral was feasting her eyes on The Voice to sneak into the garage and get some work done. The hardest part of this demo so far was the removal of the fuel fill hose. Sheesh that thing was adhered to the tank and fill cap!! I didn't realize this stuff had steel wire inside it.

So any way, removed the fuel fill and vent lines. Removed more of the plywood deck from the port side and started removing wet foam exposing more of the stringer.
 

Attachments

  • photo254870.jpg
    photo254870.jpg
    133.8 KB · Views: 19
  • photo254871.jpg
    photo254871.jpg
    148.2 KB · Views: 19
  • photo254872.jpg
    photo254872.jpg
    138.6 KB · Views: 19

79_banshee

Petty Officer 2nd Class
Joined
Sep 2, 2016
Messages
176
Almost down to bare hull. Won't be long and you will be there. Love all the pics
 

52FordF2

Petty Officer 1st Class
Joined
May 31, 2013
Messages
372
Did I miss something? Did someone else talk about this? :confused:

Your boat is on a wobble trailer, have you shored / brace it so the rollers will not put imprints into your hull.

From the inside on my hull after tear out, I could see every keel roller imprints. I removed the keel rollers to let my hull relax before the build up. I'm on a bunk trailer though.

May want to build something to take the load off the rollers.
 

Baylinerchuck

Commander
Joined
Jul 29, 2016
Messages
2,726
Nope, you haven't missed a thing. She is still on the trailer and I haven't added any other support. There are 32 rollers under her so she's well supported. I have been checking to make sure what you describe is not occurring. When I restored my bayliner I kept it on the roller trailer with 16 rollers and had no deforming of the hull. As rotted as the Chap is, if the rollers haven't left an impression from sitting on the trailer all these years I doubt it will now. Definitely a good heads up though 52FordF2. Something to certainly keep an eye on and re support if necessary.
 

tpenfield

Moderator
Staff member
Joined
Jul 18, 2011
Messages
17,705
Keep in mind that once you pull the foam out of the hull chambers the rollers are more likely to cause indentations in the hull. Then when you re-foam the hull those indentations could become permanent. So, like you said, something to keep in mind and check along the way.
 

Baylinerchuck

Commander
Joined
Jul 29, 2016
Messages
2,726
No Title

Keep in mind that once you pull the foam out of the hull chambers the rollers are more likely to cause indentations in the hull. Then when you re-foam the hull those indentations could become permanent. So, like you said, something to keep in mind and check along the way.

I guess it's pretty easy to place wood planks between the rollers and the hull. Just to be 100%. Thanks for the advice guys. I just figured the rollers were close enough to the chines that disfiguration wouldn't occur. But, an ounce of prevention.....

If you look at past posts you'll see there is very little foam in this boat. I really did not want to put any back in. I can guess what the thoughts would be on this, but can I have difinitive reasons for the foam? Can I add a few more bulkheads instead? The material I am using to do this rebuild is glassed and gel coated on both sides. This stuff is amazing....and I get it for free!!
 

Attachments

  • photo254927.JPG
    photo254927.JPG
    388.3 KB · Views: 6
  • photo254928.jpg
    photo254928.jpg
    165.1 KB · Views: 6
  • photo254929.jpg
    photo254929.jpg
    165.6 KB · Views: 6

JASinIL2006

Vice Admiral
Joined
Feb 10, 2012
Messages
5,545
If you look at past posts you'll see there is very little foam in this boat. I really did not want to put any back in. I can guess what the thoughts would be on this, but can I have difinitive reasons for the foam? Can I add a few more bulkheads instead?

The amount of foam doesn't look too out of the ordinary, based on the pictures...

In addition to providing some extra buoyancy in the unfortunate event your boat capsizes, the foam really stiffen things up. When I put in my new deck, I thought it was pretty solid even before I foamed it. I was really surprised at how much more solid it was after foaming. It was really noticeable.

Foam will also make your boat quieter when you're running at speed and hitting chop.
 

tpenfield

Moderator
Staff member
Joined
Jul 18, 2011
Messages
17,705
+1 on the foam. Folks think that the foam is soft and pliable. It is actually very rigid and will stiffen up the boat more than a lot of things that you can do otherwise. Flotation is also a good thing to have.
 

Baylinerchuck

Commander
Joined
Jul 29, 2016
Messages
2,726
The reason I wanted to negate the foam was that I haven't been able come up with a good drainage strategy in the event water gets into those cavities again. I know that the best plan is to ensure it doesn't get in there. But what if it does? I'm thinking there is no good answer other than foam it and forget it.
 

79_banshee

Petty Officer 2nd Class
Joined
Sep 2, 2016
Messages
176
I'm pondering the same thing. I didn't have expanding foam in the bottom of mine it was just the flotation foam 2x4s. There's no way they made it quite or stiffer. And I doubt it would of helped it float if somthing ever happened cause they was soaked. I do like the idea of putting expanding foam in it of coarse (the floatation stuff of course) to make it stiffer and quite but I don't like the idea of water getting trapped in there if it ever got in. Tuff choice man tuff choice.
 
Top