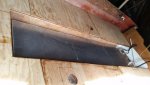
I glued and screwed my deck , i also predrilled and filled the screw holes then screwed in as to keep from having any wood exposed because of screws , then i coated over the screws and the entire deck with a layer of 1708 because well we heavy guys down here and i didn't want a thin layer to crack and ruin all my hard work , used pb to fill sides , just no way around it where i felt safe, and structural.
I'll be doing what the the mickyryan did and most others. When I first got into this I was flabbergasted/spooked to think of screws...wood...boat...water. It all makes sense now and is common practice. I will be doing pb on all tops of wood stringers and biulkheads prior to setting and screwing down deck.
BTW... you have some serious wood there too!. You can add cleats also to take the screws. I'll be doing that cause mostly I want to make sre my screw sinks into something.
Time for another update. I was going to update sooner, but every time was going to, the server was down. So Here goes.
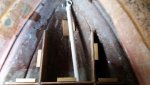
I added a pvc pipe running from the trolling battery compartment up to the front for the trolling motor. I tacked in place with some peanut butter and then moved on to the deck.
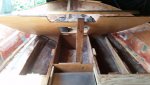
I reinforced under where the seat pedestals will mount. I thought long and hard about whether to put the reinforcement on top of the deck or underneath. Because the pedestals I have are the taper lock kind, I was going to have to raise them up about 2.5 inches to prevent drilling into the main deck, which I didn't want to do. So I added a piece of 3/4" ply underneath each mounting location and drilled a hole through the whole thickness. That allowed me to do a good job waterproofing with peanut butter while the piece of wood was still out of the boat. I'm not sure if I'll over drill the screw holes and fill with thickened resin, or just use epoxy or 5200 to seal them.
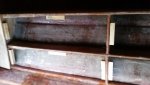
I decided to add a minimal amount of cleats to screw the deck to and then I had about 400 lbs of batteries to use for extra clamping if needed. The main source of rot in the original setup was from water getting into the deck from the seat pedestals and then moving down the screws that went into the stringers. I decided that I didn't want the stringers compromised in anyway, so I only drilled into the cleats that were glued to the stringers. I ended up only using 4 batteries, the screws did most of the clamping. I mixed very hairy peanut butter for the glue.
I painted my bilge area with some white rustoleum professional enamel. I also cleaned up the gas tank and prepared it for installation. I decided to leave it bare aluminum set up off the floor on 1/4 in PVC strips glued to the bottom of the tank with a bunch of 3M 5200.
I am in the process of drilling holes in the deck to pour in foam. I'm hoping to pour the foam in a day or two once it heats up. Forecast in the mid 80s for Monday.
I'm hoping to splash by the end of September or early October, so I'm pushing ahead as much as I can.
I got the foaming done. It went very well. I used the pour foam on my Sylvan, so I had some experience already which helped. I went with the calculate volume and then pour slightly more route. I had to sit down and do a bunch of math, but it worked very well (I didn't go as far as doing calculus but felt like it was close). I only had to do a second pour on 4 of the 15 different compartments. I did try and use a piece of pvc to form a radius in the foam along the edge of the hull, but the hull to deck gap varied a bit, so it only formed a good radius on a small portion. It did help push the foam out to the corners of the compartments. I ended up grinding most of the pushed out foam off and it will be a good base for my pb fillet. I still need to grind the foam down more in the pour holes and reinstall the wood cutouts.
For anyone else doing this, I highly recommend one of these for mixing the foam. It is made for mixing drywall mud. The paint mixers get clogged up with foam too quickly and are a pain to clean out. It was fairly easy to cut excess foam off this after every few pours.
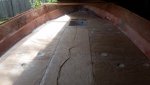
The deck is glassed in. I had a few holdups along the way, I ran out of resin and had to wait for more. I was just 1500 mL short of finishing it. Since I ran out of resin partway through, I had to grind the surface of the first layer to rough it up for the next layer. I put down a layer of 1.5 oz CSM and a layer of 6 oz cloth. It came out pretty good. I had a couple spots with bigger bubbles that I ground out and put more csm and cloth over. There were a few smaler bubbles in the top layer of 6 oz cloth that I just ground smooth. the ground down bubbles are the white spots in these pictures.
For those that have removed and replaced their cap or anyone that knows. Is it better to rivet first and then caulk the joint, or to caulk the joint and then rivet the cap to the hull?
I used almost 2 gallons of contact cement to glue the carpet down. Nice and fast, but high risk. I applied the cement to the deck and carpet backing. After it tacked up, I draped the carpet over the boards. I had a couple helpers to pull the carpet tight and pull the boards out from underneath it while I smoothed it down. I glued the sides after the deck. I had to cut a couple strips to cover the sides as high as I wanted them. The seam will only be visible from inside the rod lockers that are incorporated into the cap.
I used a 8x20 ft 20 oz carpet in smoke color. Its not a perfect match to what was in the boat. The carpet on the cap will be a little different than the floor. I may eventually redo the hatch lids on the cap, but for now I'm going to leave them.
I'm a little bummed, I won't be able to go put the cap back on for a couple weeks. I still have a few small things to do. I need to put the tow eyes back in, put a couple through hulls back and install the bilge and live well pumps.
I forgot to mention that after the carpet was down, I used the roller to apply pressure.
Over the last two weeks I put in as much of the plumbing and hardware as I could. This weekend, I was able to haul the hull to where I had the cap stored. Putting the cap on went about as well as could be expected. It fit pretty well. I caulked the seam on the hull piece, then lowered the cap down. I had to have a helper with the initial fit because every time I would get one side fit right, the other side would pull up and get stuck. I used a couple straps to pull the two halves together. I would tighten up an area, then put in a few rivets and then move the strap back a few a few feet. After the cap was on, I mounted the motors too. I was really happy with the final result.
I still have a bit of work before it's fish ready. I still have to put the rod lockers back in, install a couple more seat pedasteIs, install the rub rail and do a bit of wiring. I also realized the drain on one of the live wells is broken, I was able to get the old one out, now just have to order a replacement. Putting it back is going to be a real bear. There are a few wiring things I wish I had dobe before dropping the cap, working through the access portals is a real pain. I also had one of the mounting bolts on the kicker motor gall, so I have to pull the kicker to install a new one. I really just wanted to get everything home so I can work on it here. It feels so close to being water ready!
I got the rub rail back on. I started by lining up the the bend for the bow with the nose and working my way down one side, then the other side. It has a few minor waves in it. I didn't figure out how to get it real straight until the second side. It came out about an inch shorter on each side than it was before. Is that normal? Hopefully it won't cause any problems in the future.
I also noticed that pretty much everything electric in the back of the boat was not working. Live well fill pump, re-circulation pump, and various lights. It took me a bit of time to hunt down the three wires that had disconnected. I think I got it all working except the live well re-circulation pump, which I can live without. I also fixed the live well drain, and tightened a bunch of hose clamps that were loose. I hope to install the rod lockers and last two seat pedestal bases tomorrow.


") , used pb to fill sides , just no way around it where i felt safe, and structural.
, used pb to fill sides , just no way around it where i felt safe, and structural.