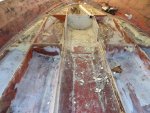
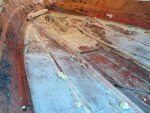
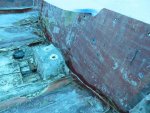
2001 Yar-Craft 1895 Storm Cap-Off Rebuild

Slager

Petty Officer 2nd Class
Joined
Apr 30, 2014
Messages
189
Hey, so I decided to jump in head first on rebuilding this Yar-Craft. My Dad bought this shortly before he passed away thinking it was in excellent condition, but the seller misrepresented it. The second time I used it, I discovered that the deck was rotten. Its no fun to have your seat pedestals bolts loosening and coming off the floor when your out on Lake Erie! On further inspection, I found that the stringers were rotten, at least the last couple feet I could see in the bilge. I put it back in my Mom's shed for a couple years, while I rebuilt and used a different boat (a small aluminum sylvan). Well, the bigger water is calling, so I decided it was time to rebuild this one.

Here are a couple pictures of the boat from then. IMG_0539_1.jpg
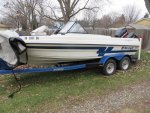
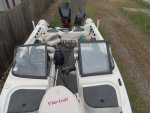
IMG_0546_1.jpg
 
Last edited:

Slager

Petty Officer 2nd Class
Joined
Apr 30, 2014
Messages
189
Well, like I said, I jumped in already, and decided that the best way to do this would be to take the cap off. I was a little worried because the newer Yar-Crafts are more of a tub style, where the deck and cap are one piece, but when I looked closer, I found it is normal where the deck isn't part of the cap. So I started by removing a couple side panels that formed the rod lockers and under dash storage.

I started by removing the ouboards. I layed the 9.9 kicker on a coupled tires on the floor. Do I need to place it in any specific orientation?

If anyone has any question about the ability of the outboard stand that is in the stickies, here it is holding the Optimax quite nicely. I put 200 lb casters on the stand when I built it for my aluminum rebuild.
IMAG0370_1.jpg

Then I removed the rub rail, and found aluminum pop rivets holding the cap to the hull. I drilled those out. I had some issues with them wanting to spin instead of drill, but as long as I had a fresh battery in the drill, they would come.
IMAG0361_1.jpg

Removing the glue/caulk went better than I expected. I used this handy tool to remove the bead.
IMAG0372_1.jpg

And then cut the rest with a utility knife.
IMAG0375_11.jpg

I attached a Come-along to the front cleats and a chain hoist to the rear cleats and started to lift.
IMAG0380_1.jpg
 
Last edited:

Slager

Petty Officer 2nd Class
Joined
Apr 30, 2014
Messages
189
The cap separated really easily everywhere, but at the transom. There was a little bit of tabbing under the consoles that ripped up, but the transom was stuck tight. I removed the transom cover trim and chipped away at the glue attaching the splash-well to the transom. I found some old rail-road ties and pry-bars in the shed and used them to help pry. I lifted with the hoist until I could just start to hear some tearing sounds, and then would pry with the bars. Then I would added a bit more pressure and pry more. Eventually, it popped free without any significant damage to the cap or outer transom skin. The cap jumped up about 6 inches above the hull when it gave. Then I detached all the plumbing/wiring/gas connections between the cap and hull, lifted it up and pulled the hull out.

IMAG0382_1.jpg

IMAG0384_1.jpg

IMAG0421_1.jpg

IMAG0465_1.jpg

IMAG0469_1.jpg
 
Last edited:

Slager

Petty Officer 2nd Class
Joined
Apr 30, 2014
Messages
189
The first internal component I could get a better look at was the transom. The inner skin was delaminated from the wood and the wood was dry-rotting. I also decided that I needed to haul it to my house to be able to really work, driving 3 hours every time I wanted to do anything with the boat wasn't working. So I left the cap and engines in my Mom's shed and hauled the hull home. If anyone is curious, the tongue weight was right at 250 lbs with a couple of the batteries still in the back. Now it is sitting in my yard waiting for me to do more. I jumped right in the the decapitation, but the rest of the project is intimidating. I live in Michigan, so the warm weather will be ending soon. I hope to have it completely gutted and ground before winter, then haul it back to my Mom's for winter and haul it back here in the spring to start rebuilding the internals. Does anyone have any recommendations for preparing it for travel once the transom and stringers are removed? I plan on leaving it on the trailer, so I'll have to come up with some sort of additional structure on the trailer to hold the shape too.

Transom condition.
IMAG0449_1.jpg
 
Last edited:

Teamster

Lieutenant Commander
Joined
Nov 8, 2010
Messages
1,923
I love Yar-Craft boats,....

Looking forward to following this,....
 

Slager

Petty Officer 2nd Class
Joined
Apr 30, 2014
Messages
189
Glad to have you along Teamster. I love these boats. Nice ride dry ride, great to fish out of, and it wouldn't take much to set it up for pulling a tube or skier. This is the second boat of the same year that my Dad bought, the other one was stored indoors the entire time we had it and it still got a cracked transom. It's really unfortunate that at the time Yar-Craft didn't do a better job isolating the wood from water. In this one I found exposed wood at the limber holes which I'm sure didn't help. My Dad was told it was stored indoors, but I found a bunch of pine needles in several different locations, so it must have spent a significant amount of time outdoors.
 

Slager

Petty Officer 2nd Class
Joined
Apr 30, 2014
Messages
189
So, looking at buying some power tools to allow me to continue. I currently only have a circular saw and a cheap jigsaw. Any recommendations on a reciprocating saw and grinder? Would cheap harbour freight tools be adequate, or should I look for something with more quality and power, such as Dewalt or Hitachi? Is it worthwhile to get a reciprocating saw that can make flush cuts? Should I get a 4.5 or 7 inch grinder? What kind and where do you get your grinder disks from?
 

Teamster

Lieutenant Commander
Joined
Nov 8, 2010
Messages
1,923
I've never rehabbed a glasser, So I'm not much help in the regard,..

Hopefully one of the expert grinder guys swings through and has some answers for ya,...

2001 was near the end of Yar-Craft in Menominee, MI,.....

They were bought and the factory moved to Wausau, WI,..in 2004 or 2005,..

A couple of years ago they were bought by Bass Cat and moved down south,...
 

Slager

Petty Officer 2nd Class
Joined
Apr 30, 2014
Messages
189
Thanks for the info WOG.

Here is a quick update of progress. I started cutting out the deck and pulling the flotation foam out. The foam wasn't very wet, but there was a puddle of water in each of the foam compartments, eventually the foam would have become compromised and saturated. Some parts of the deck were so rotten it was like wood slime. It looks like they may have used foam for the fillets on the stringers.

IMAG0505_zpskeygojyz.jpg

IMAG0515_zpsdo4ictji.jpg
 
Last edited:

Slager

Petty Officer 2nd Class
Joined
Apr 30, 2014
Messages
189
Haven't made a lot of progress lately, just pulled out a couple more pieces of foam. I do have a few questions now. The stringers are not continues front to back, they are separate pieces of wood that run between the bulkheads.

1. When I rebuild, should i keep the structure like that, or make a continuous stringer?

2. Is it worth the time to try and keep the stingers whole to use for a template?

3. Is it better to just cut them out with a Saw or use cutoff wheel to cut the fiberglass and try and pry them out?


Also, I got lucky I think. A local sporting goods store was having a moving sale and I picked up a couple of these fuel filter kits for $7.50 each, anyone know how good they are? I also got some through-hulls, and live well tubing super cheap.

IMAG0524_zpsbfgjlzde.jpg

IMAG0534_zpseeta9bw0.jpg
 
Last edited:

Slager

Petty Officer 2nd Class
Joined
Apr 30, 2014
Messages
189
Thought of one more question. Should I focus on replacing the transom before winter to make it easier to move (tie downs in back) or just continue removing everything? I'm planning on hauling it back to my mom's shed to store before winter sets in and finish rebuilding in the spring.
 

Slager

Petty Officer 2nd Class
Joined
Apr 30, 2014
Messages
189
I'm still working on the tear down. I've been working a bit here and there removing a little at a time. I'm finally down to having not much more to do before the dreaded grinding begins. Progress has slowed lately because I caught a cold. I finished cutting out the stringers and transom. The transom wood was in good enough condition to make removing it a pain, but not good enough to keep. I ran my circular saw in a cross hatch pattern, leaving about 2-3 inches between cuts and then chipped away at it with some chisels and pry bars. The wood was damp throughout, which tended to make it bend instead of breaking off. When I cut to the bottom of the inner skin, a bunch of water came out, it was sitting in a void under the transom. I don't have as many pictures of the sequential steps because my phone camera died, so I have to remember to go grab the camera from the house.

I'm thinking about leaving the lip of the deck in place until after I install the new stringers in the spring. Anyone have input on whether it is worth it to put off grinding the lip until after? It could make getting the height of the stringers correct easier, but then I'll have to grind some in warm weather. Also I'm thinking about leaving the false floor in the middle alone that the fuel tank and trolling batteries sit on alone. What do you think, should I leave it in place? Here are a couple pictures:

IMG_0838_1.jpg
IMG_0854_1.jpg
IMG_0857_1.jpg
 
Last edited:

ezmobee

Supreme Mariner
Joined
Mar 26, 2007
Messages
23,767
I'm thinking about leaving the lip of the deck in place until after I install the new stringers in the spring. Anyone have input on whether it is worth it to put off grinding the lip until after? It could make getting the height of the stringers correct easier, but then I'll have to grind some in warm weather. Also I'm thinking about leaving the false floor in the middle alone that the fuel tank and trolling batteries sit on alone. What do you think, should I leave it in place?

Both of these sound reasonable to me. If the glass around that false floor all looks good then it's probably dry inside and would be way more trouble than it's worth to mess with.

You're doing a textbook job on this restore so far. Great work!
 

Slager

Petty Officer 2nd Class
Joined
Apr 30, 2014
Messages
189
Thanks for the input Ezmobee. I'll plan on leaving the deck lip and false floor alone for now. I started grinding the transom yesterday, but only put in an hour. I probably won't have time to do much this weekend, so grinding will continue next week.
 

Slager

Petty Officer 2nd Class
Joined
Apr 30, 2014
Messages
189
So I'm still in the process of grinding. I noticed some places where the dust was forming a spider crack pattern. Is this ok, or does it mean I need to grind more off?
IMAG0553_zpsjsqtu3zf.jpg
 
Last edited:

gsxrdan

Petty Officer 1st Class
Joined
Aug 28, 2016
Messages
317
I think thats pooled resin without glass fibers (and assuming thats behind the transom) the classic case of more resin = less strength. I ground it all away on my boat to leave proper hull laminate to pb the new transom to. but those with more exp will hopefully chime in...
 
Top