04 Four Winns I/O Rotted Motor Mount Repair Without Wood

670hoth

Cadet
Joined
Aug 10, 2016
Messages
26
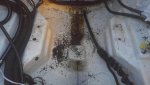
I have an 04 Four Winns Freedom 180 43 V6 with rotted motor mounts. In this boat the motor mounts seem to be just 2"x4" 12" long on the short sides as shown in the attached pic. Below the small motor mount cavity on each side there seems to be separate chambers/cavities that appear to be sealed separately and are unlikely to have any rotted wood in them. I believe this because when I drill down through a mount hole the bit hits something that I am sure is the top fiberglass of the bottom chamber.

I am hoping to permanently repair these two mounts with composite materials without completely removing the rotted wood and without any fiberglass work and would like opinions. My plan is as follows:

1. Drill at least three large (at least 1") holes in the top surface of the mount. One between the existing bolt holes and one each a bit outside the bolt holes. (Leave bolt holes sizes as they currently are. I already drilled them out a little.)
2. Drill three 1" holes into the side near the bottom of the cavity and passing through the bottom of the vertical drilled holes.
3. Possibly drill a 1" hole into the beveled (front/rear) sides of the cavity interconnecting with the other drilled holes
4. Use drill bits, tools, vacuum, compressed air, etc... to extract as much rotted wood as possible from original mount holes and all drilled holes
5. Tape or wedge something over the side holes to seal then such as Teflon sheets, etc... to temporarily seal of the side holes
6. Pour/push some sort of epoxy material such as the West Marine product possibly with some sort of fillers added into the top holes until level
7. Allow to dry
8. Remove materials from side holes
9. Sand/clean up hole areas as needed for cosmetics
10. Drill new bolt holes
11. Cover the area with new white paint

My thoughts are that the remaining wood will eventually rot to nothing and there will be some voids in the cavity but it should be very strong with good load distribution across the area and immune to rot in the future.

Your thought and comments would be greatly appreciated.

Thanks,
Brian
 

Attachments

  • photo251077.jpg
    photo251077.jpg
    353.1 KB · Views: 6

DeepBlue2010

Lieutenant
Joined
Aug 19, 2010
Messages
1,304
If the motor mounts are connected to the stringers, and most likely they are as you can see in the picture, the rot will continue to spread to the stringers and then to the transom (the stringers and the transom are also connected most likely).

The engine is out and you have access, I would open her up, extract the mounts properly, make sure the stringers are still uninfected and do a proper repair based on what I find; but this is just what I would so. Your boat, your call
 

670hoth

Cadet
Joined
Aug 10, 2016
Messages
26
Hello Deep Blue, Thanks very much for your thoughts. The thing is, it does not seem like the motor mount wood is connected to anything below it. They seem to be encapsulated in their own fiberglass chambers. If they were connected to the wood below I would not think I would run into what I am quite sure is fiberglass when I put a drill bit down into the holes. Otherwise, I would agree with you if I thought they were connected but they don't seem to be. They seem to be separated by fiberglass. Cutting those boxes open, replacing the wood, and building new fiberglass tops up is still a much larger job. It is difficult to maintain exact level, duplicate the factory look, and reposition the engine. I just paid a boat shop to align the motor/drive and then had to remove the motor due to a trim hose fitting leak. I have excellent marks and picture and should be able to reposition the motor exactly as it was and not pay for another alignment with my method at least long enough to use the boat a few more times this year. Also, I would not do the wood/fiberglass work myself and would have to farm it out at great money and time expense.

If someone has some knowledge that indicates the motor mount cavity is connected to the wood below in this boat and therefore the wood below may have rot I definitely would like to know. It just seems like if this was the case my drill bit would not hit what I am quite sure is fiberglass (which I did not penetrate) and would keep going into the wood below. If my assumption is wrong about these cavities being separate I would really like to know.

Thanks
 

JASinIL2006

Vice Admiral
Joined
Feb 10, 2012
Messages
5,545
Personally, I would never pull a motor and then replace it and skip the alignment. It's too easy too align the motor and the consequences of misalignment are too expensive to skip.
 

Rick Stephens

Admiral
Joined
Aug 13, 2013
Messages
6,118
Appear to be separate. Easy peasy to make sure, drill some core holes into the lower mounts, stringers and transom and be certain. It is a snap to fill the holes with either peanut butter or even just 3M 5200. Then you know. Anything short of that is pure guesswork.
 

Scott Danforth

Grumpy Vintage Moderator still playing with boats
Staff member
Joined
Jul 23, 2011
Messages
47,527
any time you move the motor you need to align it. PERIOD. no way around it

the wood in the motor mounts is not a 2x4, however should be laminated plywood.

easy job, however pe prepared to find the stringers and floatation boxes full of wet wood as well.
 

Scott Danforth

Grumpy Vintage Moderator still playing with boats
Staff member
Joined
Jul 23, 2011
Messages
47,527
this would be a job for seacast if you wanted to simply cut the outer fiberglass off, remove the wood, place the fiberglass back and lay 2 layers of cloth. however this is also the point in your boat that the motor torques against. I myself would want something solid.

simply filling with epoxy isnt going to cut it. epoxy is only a glue that binds glass or carbon together to make GRP. properly used, in a composite, its extrememly strong. by itself it has no strength. same with resin.
 

Grub54891

Vice Admiral
Joined
Jun 17, 2012
Messages
5,913
That repair should be fairly easy, if nothing else is rotted. I'd lay a tape measure across, at all possible angles, and take lots of pics, Then cut the tops off, leaving a small lip on top for the height. Then inspect/clean up, and see what you have. If the box's have to come off, refer to the pics and build new ones. Just filling and hoping it works...you will be pulling the motor again. An alignment bar is a lot cheaper than a mechanic, Just get one and you can be on your way to learning more about maintain your own boat, with our help.
 

tpenfield

Moderator
Staff member
Joined
Jul 18, 2011
Messages
17,705
I think that you should be able to verify some of your assumptions on the engine mount and stringer by drilling a few more test holes. Even if you make the local area of the engine mount solid again, if what is around it is rotting, it all will eventually give way causing the mounts to sink a bit and resulting in a huge engine alignment issue.

So, a few test holes in the lower part of the engine mount, the stringer that the mounts are attached to, and even a hole right where you believe there is a fiberglass barrier between the upper and lower engine mount core, those will help validate or give light to the viability of your repair idea.
 

DeepBlue2010

Lieutenant
Joined
Aug 19, 2010
Messages
1,304
Hello Deep Blue, Thanks very much for your thoughts. The thing is, it does not seem like the motor mount wood is connected to anything below it. They seem to be encapsulated in their own fiberglass chambers. If they were connected to the wood below I would not think I would run into what I am quite sure is fiberglass when I put a drill bit down into the holes. Otherwise, I would agree with you if I thought they were connected but they don't seem to be. They seem to be separated by fiberglass. Cutting those boxes open, replacing the wood, and building new fiberglass tops up is still a much larger job. It is difficult to maintain exact level, duplicate the factory look, and reposition the engine. I just paid a boat shop to align the motor/drive and then had to remove the motor due to a trim hose fitting leak. I have excellent marks and picture and should be able to reposition the motor exactly as it was and not pay for another alignment with my method at least long enough to use the boat a few more times this year. Also, I would not do the wood/fiberglass work myself and would have to farm it out at great money and time expense.

If someone has some knowledge that indicates the motor mount cavity is connected to the wood below in this boat and therefore the wood below may have rot I definitely would like to know. It just seems like if this was the case my drill bit would not hit what I am quite sure is fiberglass (which I did not penetrate) and would keep going into the wood below. If my assumption is wrong about these cavities being separate I would really like to know.

Thanks


The stringer is not on the bottom, it is the element that is on the side of each motor mount (the red areas in the picture) I never saw the stringers glassed in fully and then the motor mount glassed next to them separately. They are always connected (on the sides).

There is no skipping of alignment no matter what you do. Don't even think about it. The engine was taken out so it has to be aligned back even if nothing at all in the engine mounts has changed and you have a perfect marks, etc. Engine alignment is within fraction of millimeter, it has to be done.

If you say you will not be doing this yourself because you are not handy with tools or this is not something you are comfortable doing yourself, I totally understand. But if your major concern is the know-how then be assured that glassing - on this scale - is not a rocket science m8, if you can follow few simple instructions, you can get it done.

But even if you will have it done, this should be a very simple job, not sure why reputable shop would charge great expense for it. I would try to explore what is in there with an inspection camera at least. If unsuccessful I would cut the top of the motor mound only (the area inside the blue marks in the picture)- or instruct the shop to do so

If the chamber inside is isolated from the stringers and from the support underneath, I would start cleaning up with Aceton and then pouring in SeaCast not epoxy. and glass the top back in.

SeaCast is a pourable structural core; thickened epoxy is not.

You can modify this plan a little by cutting only a small rectangle from the top instead of removing the whole top glass of the engine mount. Barely enough to explore what is inside and get all the rotted wood out. After you pour in the seacast, put the cut area back and glass it in.

The area underneath (the second compartment under the engine mount) must also be core sampled. It is the area that the engine mount is restring on. If it is compromised, the engine mount will gave in and sink down sooner or latter. Just a core sample to be sure.

This way the repair is based on facts not speculations
motor mount.jpg
 
Last edited:

670hoth

Cadet
Joined
Aug 10, 2016
Messages
26
Thanks for all of the excellent info. I guess I have no choice but to dig into this deeper than I had hoped.
 

Scott Danforth

Grumpy Vintage Moderator still playing with boats
Staff member
Joined
Jul 23, 2011
Messages
47,527
the only shortcut is to do it correctly.
 

JASinIL2006

Vice Admiral
Joined
Feb 10, 2012
Messages
5,545
Crossing my fingers for you, hoping you find that the damage is limited to the mounts...
 

kcassells

Fleet Admiral
Joined
Oct 16, 2012
Messages
8,598
Yup what DB said. Chop the Top. Dremmel, grinder...I would use a grinder with a metal cutting wheel. Whichever you feel more comfortable with. Open the lid, explore and make determinations from there if you have to go further. It really is that cut and dry...excuse the pun.
KC
 

670hoth

Cadet
Joined
Aug 10, 2016
Messages
26
Well, I took it to an experienced boat/fiberglass repair shop. He is cutting out the motor mount fiberglass 'boxes' replacing the wood, and reglassing. He said they are completely isolated pieces of wood in their own fiberglass boxes. One side was rotted quite badly and the other just around the bolt holes. As much as I wanted to do a cheap and quick repair I could not do it. B-O-A-T does indeed equal Break Out Another Thousand! $1015 in this case! Thanks,
 
Top