Solo Skiff Build

snowman246

Petty Officer 2nd Class
Joined
Oct 13, 2015
Messages
193
After I finished my Glastron X-19, I keep thinking about my next project. I wanted a smaller boat that I could use in all water types for fishing. After much research and consideration, I decided to build a 14' solo skiff from plans I got from Bateau. I am only using the plans for the general shape but the boat itself will have my own twists on it. I want to use this in the bay's and inner coastal water that is too shallow for bigger boats. Also, at 48" wide, 14' long and 125 lbs it can be slid into the bed of my truck for transport. I plan on installing either a 2.5 or 5 hp Suzuki outboard. I started assembly this morning and got lots done. Here are some progress photos and a similar style I'm using as guide.
 

Attachments

  • photo247353.png
    photo247353.png
    1.5 MB · Views: 0
  • photo247354.png
    photo247354.png
    1.5 MB · Views: 0
  • photo247355.png
    photo247355.png
    1.3 MB · Views: 0
Last edited:

snowman246

Petty Officer 2nd Class
Joined
Oct 13, 2015
Messages
193
No Title

Today I got the seams of the floor and bow taped and glassed up along with the side joints. Unfortunately, I ran out of the left over resin from the Glastron build so I'll have to wait to order more.
 

Attachments

  • photo247466.png
    photo247466.png
    1.3 MB · Views: 0

snowman246

Petty Officer 2nd Class
Joined
Oct 13, 2015
Messages
193
No Title

This evening, I got a few small details finished. First, I installed 3/4" PVC into the bow bulkhead that will be used as rod tip holders. These pipes will be capped off on the inside and held securely with the buoyancy foam once it is poured in. Second, I cut out the transom notch for the outboard to travel thru. This notch will allow the outboard to be raised up without adding to the length of the hull and also will help distribute the engine weight more evenly. This will allow easier planing and a smoother ride.
 

Attachments

  • photo247557.png
    photo247557.png
    1.4 MB · Views: 0
  • photo247558.png
    photo247558.png
    1.1 MB · Views: 0
Last edited:

snowman246

Petty Officer 2nd Class
Joined
Oct 13, 2015
Messages
193
No Title

Today, I cut out the pieces to make the transom. Using a 2x6, I cut out the lower piece to fit the edges of the boat sides. This board will be notched along the bottom to allow the self bailing feature to work without issue. The middle and top pieces were shaped and designed to give more than enough strength but still provide a clean and sleek look. All three pieces were then glued to a piece of 1/4" plywood cut to the same shape. These pieces will sit for 24 hours with weight holding them in place to ensure a good bond.
 

Attachments

  • photo247595.png
    photo247595.png
    745.5 KB · Views: 0
  • photo247596.png
    photo247596.png
    1.3 MB · Views: 0

Mikeopsycho

Senior Chief Petty Officer
Joined
Feb 6, 2014
Messages
738
Interesting skiff build. Is the transom notch your own design or was this on the plans?
 

snowman246

Petty Officer 2nd Class
Joined
Oct 13, 2015
Messages
193
No Title

The transom notch is a design I am borrowing from another manufacturer. I have watched videos of the handling and user friendliness of this versus a full transom and couldn't avoid trying it myself.
 

Attachments

  • photo247658.png
    photo247658.png
    1.2 MB · Views: 0

snowman246

Petty Officer 2nd Class
Joined
Oct 13, 2015
Messages
193
No Title

I have gotten the framing and stingers installed. I went with 1/2" material instead of 1/4" for strength and durability. I am not worried about the extra 2-3 lbs of extra weight. This weekend I'll start glassing and prepping for foam install. My goal is to have the boat finished by September 1 so I can enjoy some fall fishing using my trolling motor.
 

Attachments

  • photo248097.png
    photo248097.png
    1.6 MB · Views: 0
  • photo248098.png
    photo248098.png
    1.5 MB · Views: 7

snowman246

Petty Officer 2nd Class
Joined
Oct 13, 2015
Messages
193
No Title

All of the below sole framing and stingers have been glasses into place. I have also drilled out holes and placed the conduit for the electrical passages below the sole. For use along with the 6 hp outboard I plan on running next spring, I have added a trolling motor transom on the left rear of the boat. This will allow both motors on the boat and still be out of my way when they need to be. More photos to come in a few days.
 

Attachments

  • photo248511.png
    photo248511.png
    1.4 MB · Views: 0
  • photo248512.png
    photo248512.png
    1.5 MB · Views: 0
  • photo248513.png
    photo248513.png
    1.5 MB · Views: 0

snowman246

Petty Officer 2nd Class
Joined
Oct 13, 2015
Messages
193
No Title

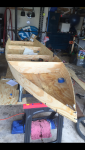
I got a little behind on the build when I came home to a flooded house thanks to a busted water line. Still finishing that up but in spare time I have worked on the boat.

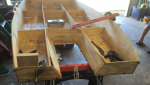
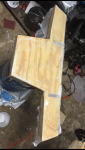
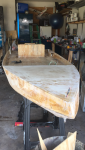
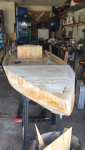
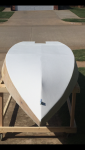
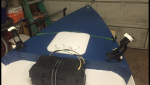
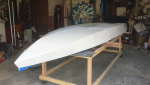
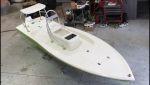
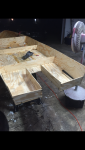
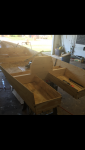
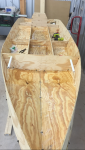
1. Foam is installed (approximately 1000 lbs of buoyancy foam support), deck is in place and bow platform also installed.

2. I installed two stern eyes on the rear and one up front for strapping down during transport and storage.

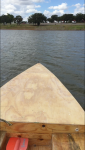
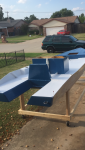
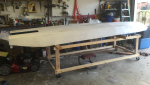
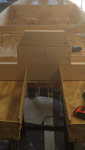
3. The main compartment of the bow is approximately 48"x36" and will have an marine access door installed that is 14"x14" to allow plenty of storage space for life jacket, anchor, tackle bag etc.

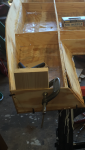
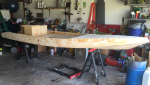
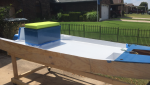
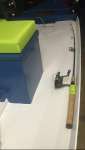
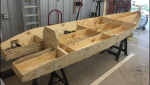
4. I built a 13"x24" storage/driving seat in front of the transom. The top will be padded and covered with vinyl and connected with a stainless piano hinge. Inside the box will be a place for my cooler bag for water and beer in one compartment and my 2 gallon bait bucket on the other. I placed the box 12 inches in front of the transom for easy access to the engine and also allow me to have a nice "hidden" area to place the 3 gallon gas can for those longer trips. There is nothing worse than fumbling over a gas can.

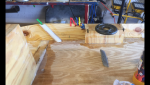
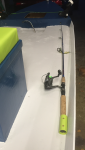
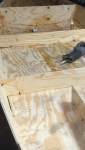
5. Using 1" PVC pipe, I cut the angles needed to give me 45 degree (rear facing) rod holders. These were mounted with resin (very solid final bond). These rod holders will allow me to keep the rods off of the floor while running across the water and also allow me to do some trolling with live or artificial bait.

6. If you look close, you will see a rectangular hole in the deck towards the bow. This is the recessed battery box location. I wanted the battery to stay as low as possible and in the front of the boat to help with balancing the load (assist in planing).

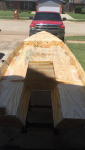
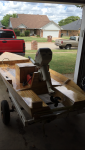
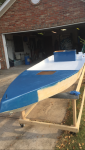
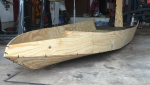
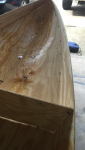
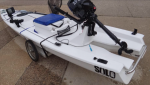
The skiff is sanded and ready to be sealed up all over with cloth and resin. I will begin glassing the hull first (hopefully sunday morning) and then flip over and glass the deck and bow. Once glass work is done, I'm going to let it cure for about 3 days in the sun and then load it up and water test this thing. My neighbor has a 5 hp Mercury I will test with. I have made the final decision to install a 2017 Suzuki 6hp 4 stroke outboard motor on this boat when completed. It will also be fitted with my Minn Kota 55lb thrust trolling motor on the left rear of the boat.

Once the initial test is complete, I will begin primering, wetsanding, painting, wetsanding, painting etc.

The color scheme is going to be a Rustoleum Oil based enamel color scheme: flat white hull coming up about even with the water line, sides will be gloss sail blue, top of bow and seat box will be lime green. The deck will be painted flat white and topped off with lime green stripes or some other design (margaritas and miller 64 have alot of input) mixed with non slip additive. The colors will all be seperated with 3/8" bright orange pinstriping. I want this boat to stand out on any water I put it in.

This is the first boat I have build from scratch. Every day has given me a new set of challenges but all were manageable. Without a doubt, this build has been one of the funnest projects I have done to date. Also, I have already named the boat, but like before, I can't reveal the name until the boat is complete.

I have spent hours upon hours, designing and laying out the floorplan the way I wanted it to be. I wanted enough storage space for all of my fishing gear but also give me plenty of room to move around the boat without tripping over stuff.

STAY TUNED!!!!!
 

Attachments

  • photo249928.png
    photo249928.png
    677.6 KB · Views: 0
  • photo249929.png
    photo249929.png
    1.4 MB · Views: 0
  • photo249930.png
    photo249930.png
    1.6 MB · Views: 0
  • photo249931.png
    photo249931.png
    1.6 MB · Views: 0
  • photo249932.png
    photo249932.png
    1.6 MB · Views: 0
Last edited:

snowman246

Petty Officer 2nd Class
Joined
Oct 13, 2015
Messages
193
No Title

Here is the photo of the rod holders installed. The small box to the right is the control panel for the boat. It will have a switch to control the running lights, a 12 volt power plug, a dual usb charger and digital volt meter.

I also want to brag on a product I found on Amazon. I was wanting a waterproof speaker to use in the boat while fishing/cruising. This is a Soundbot Bluetooth speaker system $13 online. This speaker sounds really clear and also allows you to answer your phone if it rings by a touch of a button. Now my phone can stay in the waterproof box I'll install and I can have my tunes/phone calls without risking damage to my phone. If you are looking for something like this, give it a try. I was really impressed.
 

Attachments

  • photo249933.png
    photo249933.png
    1.4 MB · Views: 0
  • photo249934.png
    photo249934.png
    1.5 MB · Views: 0

scoutabout

Lieutenant Commander
Joined
Oct 14, 2006
Messages
1,568
Very impressive design and build, snowman - can't wait to see the final fully rigged result!
 

snowman246

Petty Officer 2nd Class
Joined
Oct 13, 2015
Messages
193
No Title

The last few days, I glassed the hull, primered and put the first coat of paint on. The paint, mixed with hardener, will be applied once daily allowing plenty of dry time. I plan on at least 3 coats of paint on the hull. Once that is complete, I'll flip the boat over and begin this process on the topside. I am seriously considering painting the boat sides white and applying a boat wrap. For the price of decals etc, I can have a custom wrap made and installed for under $100. Stay tuned for more progress.
 

Attachments

  • photo250357.png
    photo250357.png
    1.2 MB · Views: 0
  • photo250358.png
    photo250358.png
    1.4 MB · Views: 0

snowman246

Petty Officer 2nd Class
Joined
Oct 13, 2015
Messages
193
No Title

Since the boat was all coated and sealed with glass, I decided to put it on the water and test it out. This boat performed flawlessly. Very stable, very smooth in the water and the self bailing hull lived up to its end of the job. Time for final body work and paint.
 

Attachments

  • photo250786.png
    photo250786.png
    1.3 MB · Views: 0
  • photo250787.png
    photo250787.png
    1.3 MB · Views: 0
  • photo250788.png
    photo250788.png
    1.5 MB · Views: 0

snowman246

Petty Officer 2nd Class
Joined
Oct 13, 2015
Messages
193
No Title

Been really busy. The topside of the boat is painted (two coats of paint and two more coats mixed with anti-skid additive) and some accessories have been installed. 1. I installed flush mount rod holders on top of the bow in the near corners. 2. Nylon cleats were installed just in front of the rod holders. 3. My storage lid is exactly what I was looking for: waterproof and a clean look to compliment the blue paint. 4. The bow and stern light have been installed as well. Tomorrow night, I'll flip the boat and do some final sanding and prep for paint. The hull already has two coats of primer and one coat of paint but it has some scuffs from moving around. I plan on two full coats of gloss white paint on the hull and sides to finish the boat off. I plan on painting the battery box lime green to compliment the seat fabric.
 

Attachments

  • photo251004.png
    photo251004.png
    1.4 MB · Views: 0
  • photo251005.png
    photo251005.png
    1.5 MB · Views: 0
  • photo251006.png
    photo251006.png
    1.5 MB · Views: 0
  • photo251007.png
    photo251007.png
    1.4 MB · Views: 0
Last edited:

snowman246

Petty Officer 2nd Class
Joined
Oct 13, 2015
Messages
193
No Title

A few pictures of the rod holders in action.

Primer is on and the first coat of gloss white will be layed down in the morning.
 

Attachments

  • photo251179.png
    photo251179.png
    1.4 MB · Views: 0
  • photo251180.png
    photo251180.png
    1.2 MB · Views: 0
  • photo251181.png
    photo251181.png
    1.5 MB · Views: 0
  • photo251182.png
    photo251182.png
    1.2 MB · Views: 0

snowman246

Petty Officer 2nd Class
Joined
Oct 13, 2015
Messages
193
No Title

Battery box has three coats of Krylon Plastic Fusion paint applied. This came out very nice and seems durable enough. Rod holders got a few coats as well.
 

Attachments

  • photo251183.png
    photo251183.png
    1.5 MB · Views: 0

Pusher

Lieutenant
Joined
Sep 2, 2014
Messages
1,273
I really like this boat build. I'm going to follow on this one if that's alright.

The self-bailing stern is pretty interesting. How fast did it go with that 4 horse?

I'm tempted to try this in a couple years and throw in an airliner style throttle and foot pedals for steering :)

You said it was stable. Were you able to stand up and move side-to-side pretty comfortably?

One other question if you don't mind. How much does this guy weigh at this point?
 

snowman246

Petty Officer 2nd Class
Joined
Oct 13, 2015
Messages
193
Pusher-
The boat handles very well. The 4 hp Johnson moves the boat 9.7-10 mph per my gps. My 55 lb trolling motor pushed my 2 man boat with two guys approx 225 each at 5 mph so I have plenty of moving power from both motors. The boat weighs about 140 lbs with no gear. My son and I flip it over regularly while I build it and he is 16. I moved around on it a lot and was comfortable. It's much more stable than I expected it to be. Without the outboard on the boat, it was very tipsy but once I put the battery in the front and outboard and gas tank in place it was very stable. I plan on casting from it while standing up most of the time (bass fishing). The transom is my design that I added to the self bailing hull. Overall I love this boat so far.
 

Pusher

Lieutenant
Joined
Sep 2, 2014
Messages
1,273
I was thinking bass fishing too:)


That's all good to hear. I look forward to a splash video (and some fish pictures).
 
Top