1978 Sea Ray SRV-260 with twin I/O Mercruisers, cleanup and replace whats needed...

White90GT

Petty Officer 2nd Class
Joined
Jul 5, 2011
Messages
161
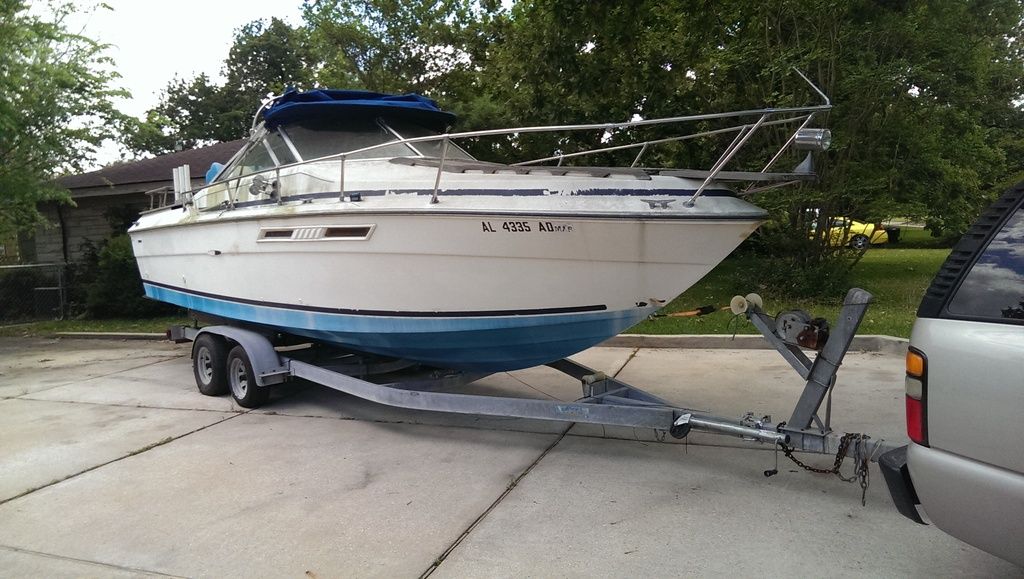
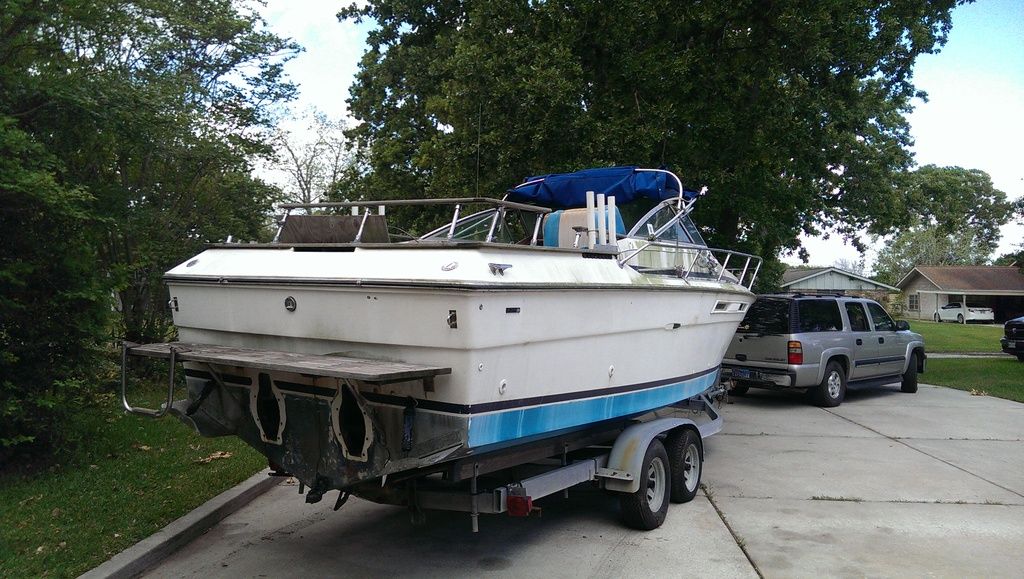
My daughter's Sea Scout Ship in Baytown TX just received this 1978 Sea Ray SRV-260 as a donation boat. The previous owner had it 5-6 years and bought a lot of parts, rebuilt the shortblocks, rebuilt the outdrives, and more, but ended up buying a 34' boat that they keep at the marina and stopped working on this one. So his loss is my/our gain. I and the Skipper of our ship went and looked at it a few weeks ago and our initial thought was it was going to be too much work. It was going to need everything mechanical done and we weren't initially sure about the transom. It had 8" of water inside the cabin from rain and the motors/outdrives had been off it for quite a long time with an exposed transom/keyhole. The owner wanted to see her cleaned up and being used/enjoyed, so we initially declined that offer. Then he said he would keep the motors/drives if we just hauled off the boat/trailer. We thought that one over and figured the trailer should bring $1500 since it was in good shape. We started thinking about another vessel that was more/less offered to us that was similar in size, but did not have a trailer. We figure if we could go get the other boat and this one we could determine which was in the best shape and take parts from both to make one good boat, then scrap the other. Problem is that Skipper was in no hurry to do this and the more I thought about this Sea Ray and the more I looked up info on it, the more I started to like it and think it would make a good boat for me and my family. That said, I went ahead and picked it up last weekend regardless of what we as a ship decide to do with it.

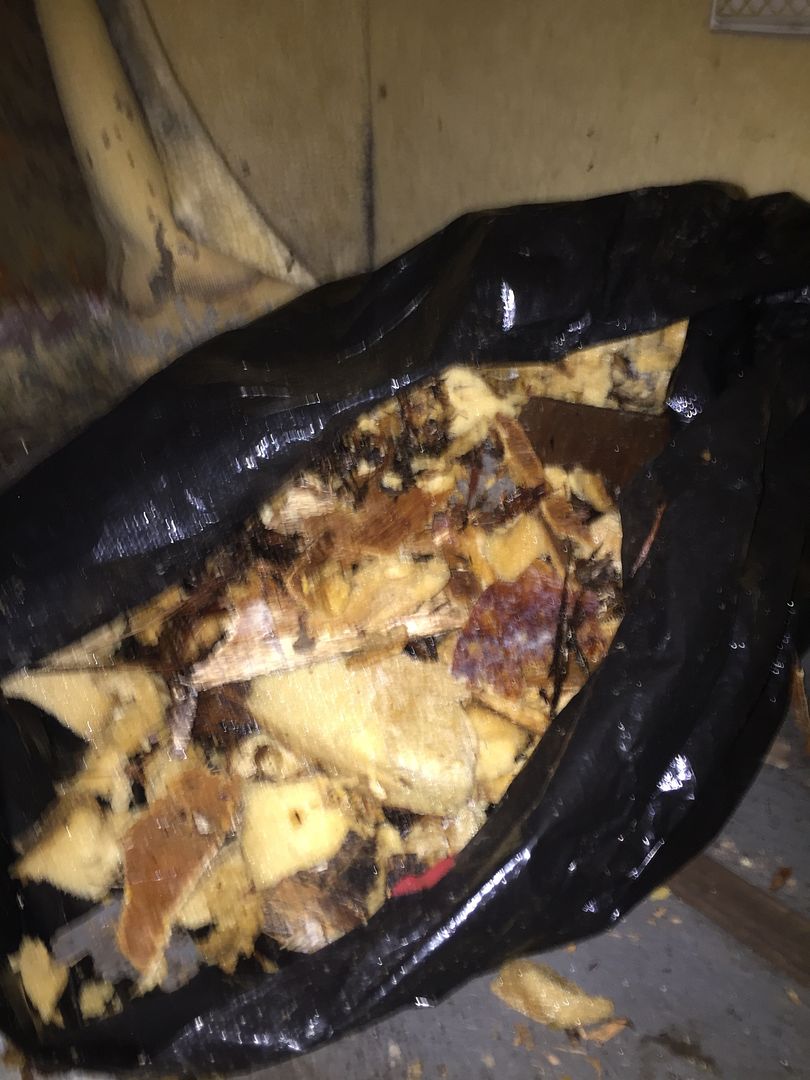
I started cleaning her out this week, maybe 30 minutes to an hour a day to pump the water out and clean out the leaves/trash that has accumulated over the years. I've got it to a point where I can either use my blower or vacuum cleaner to get the rest of the leaves/debris out and got a good cleaned up area to work with and get a few pictures.

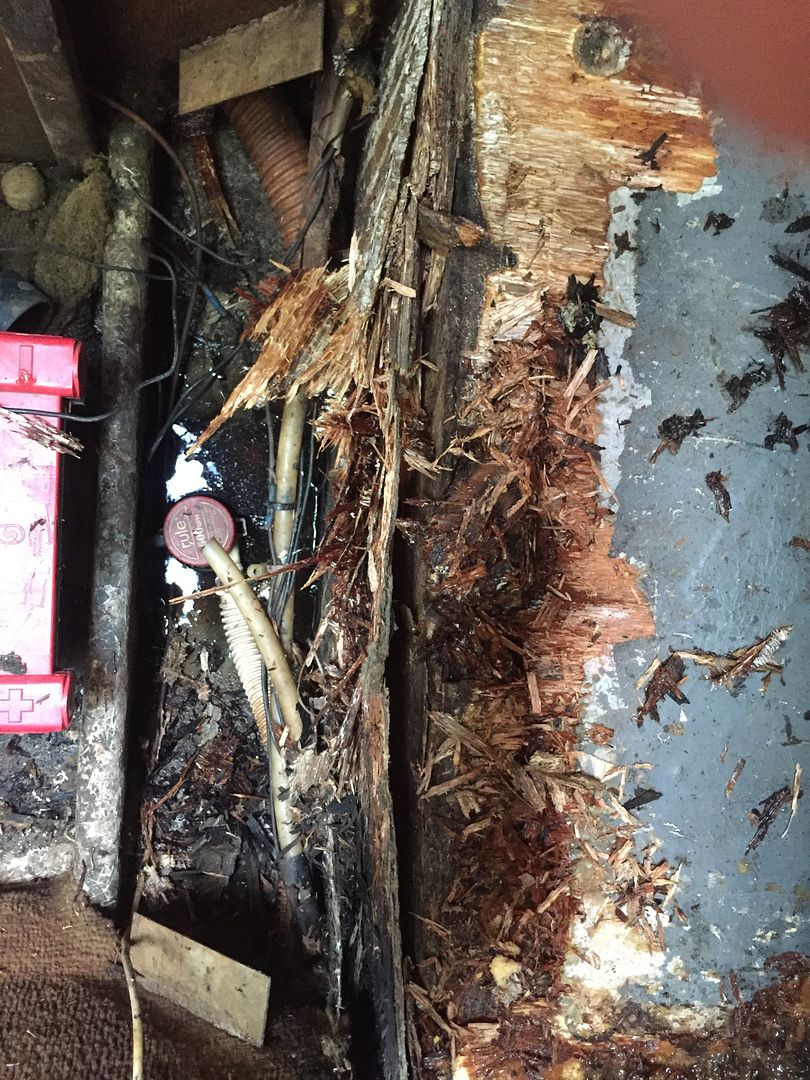
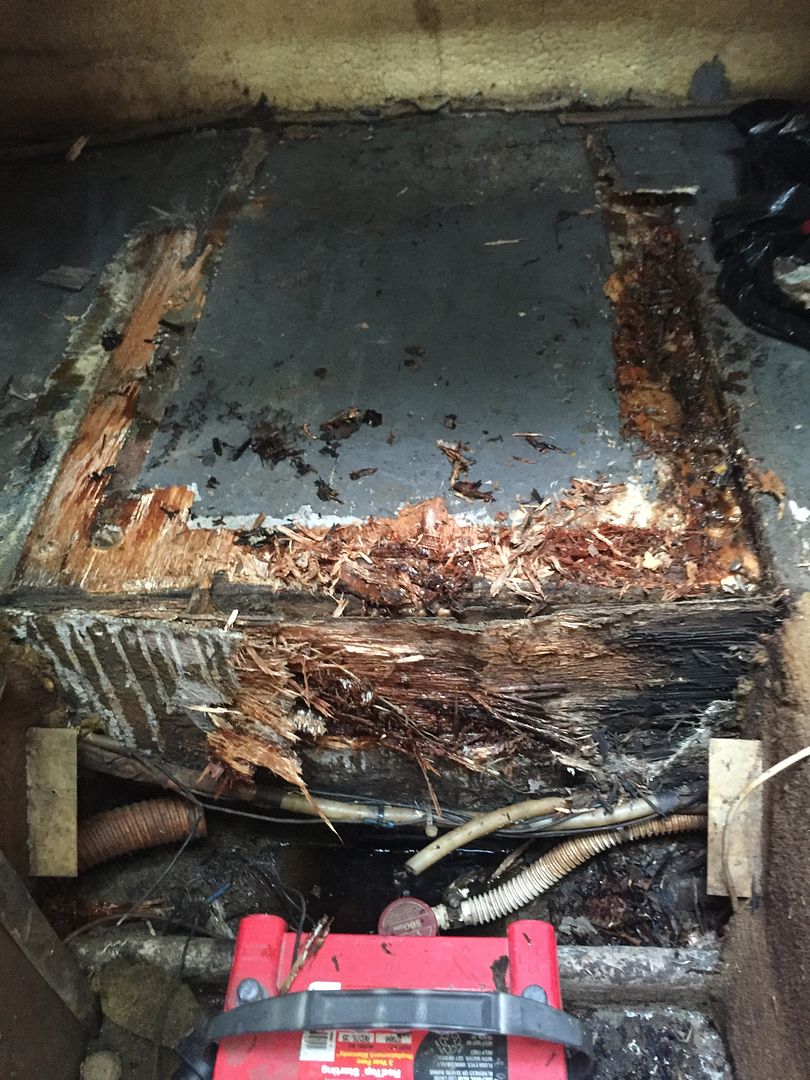
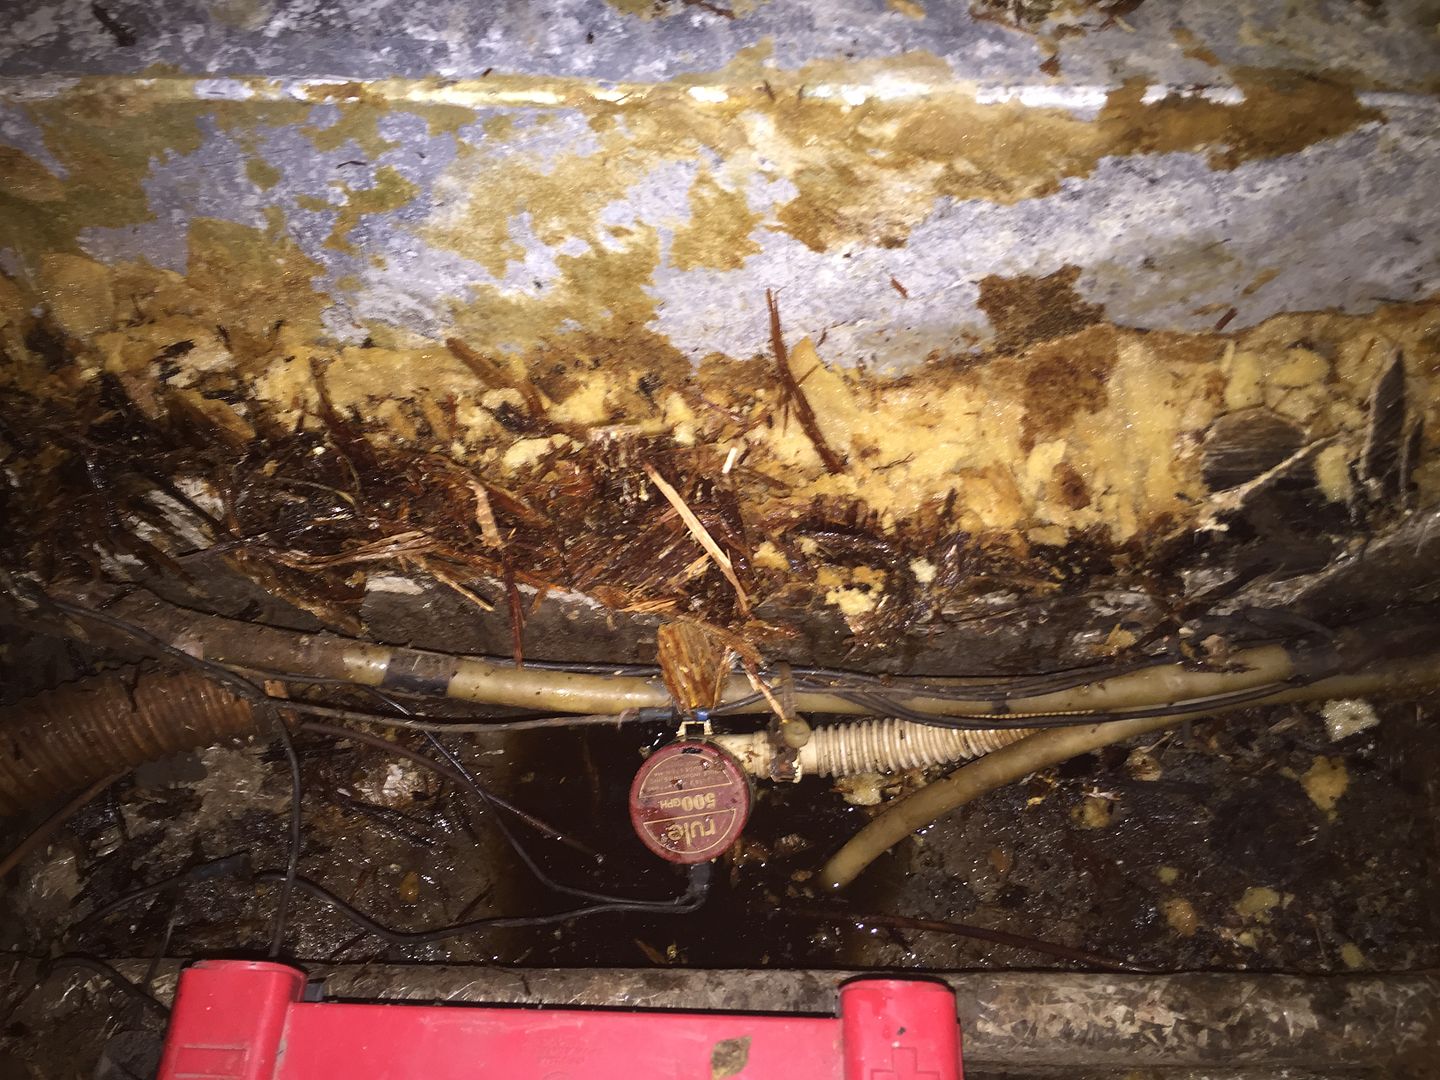
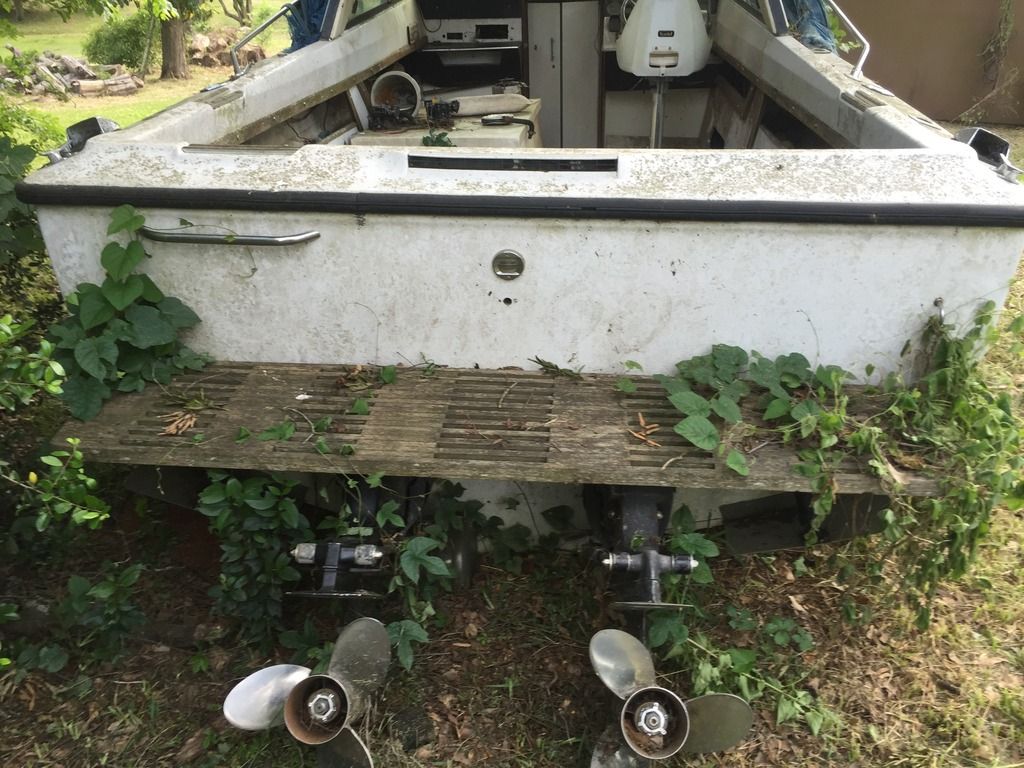
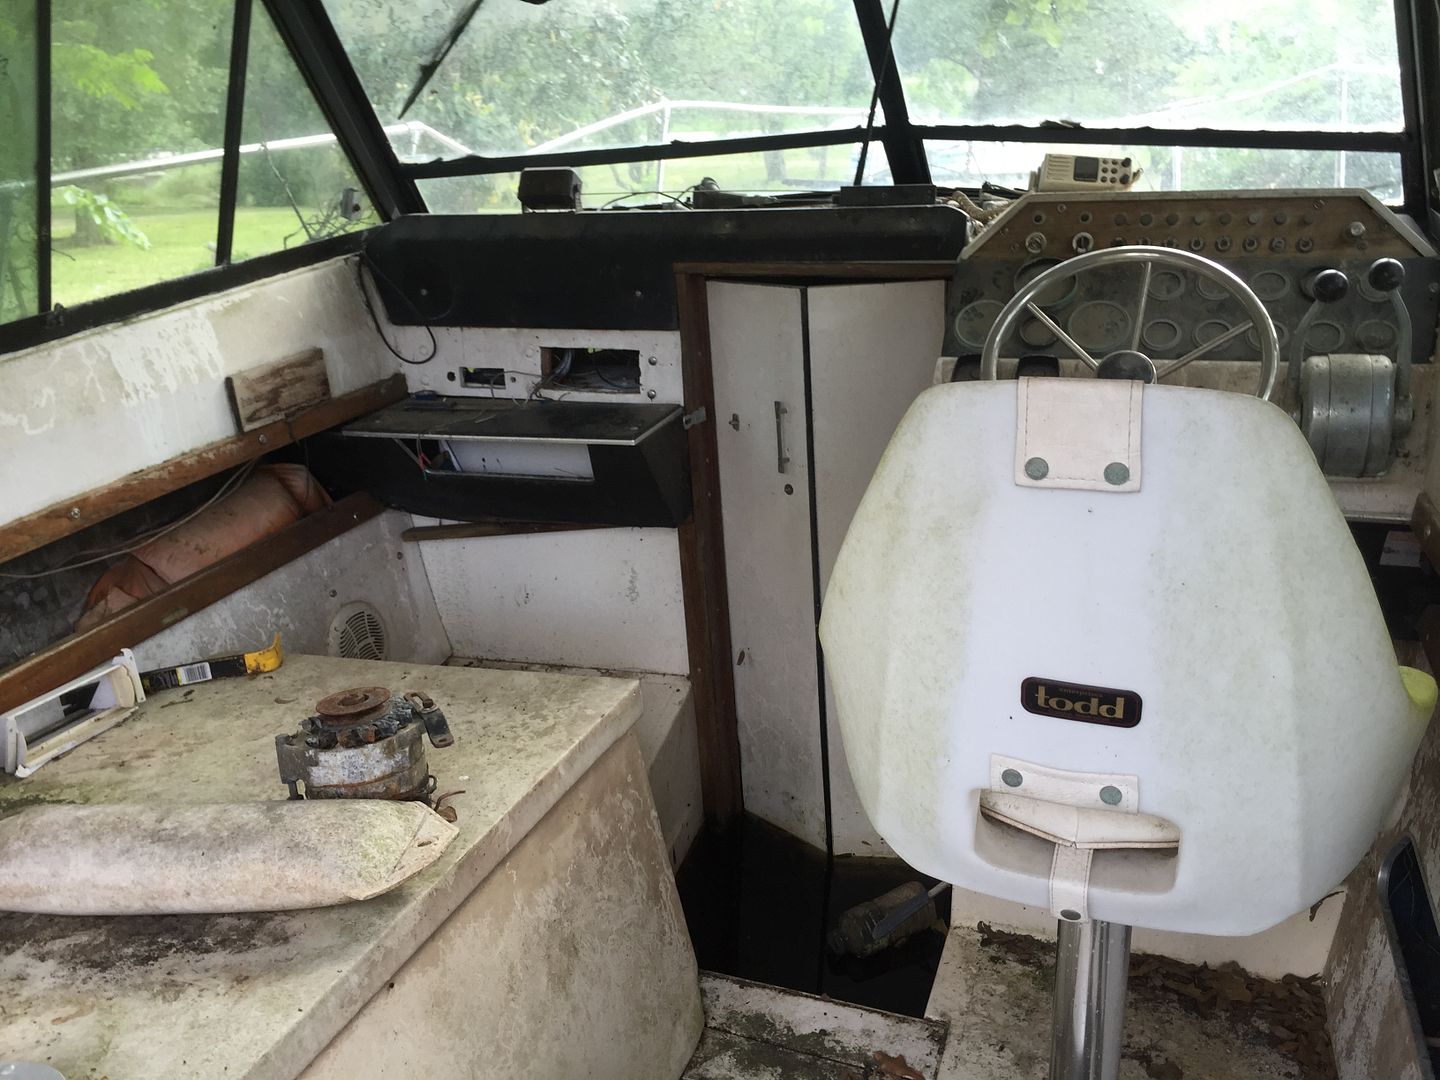
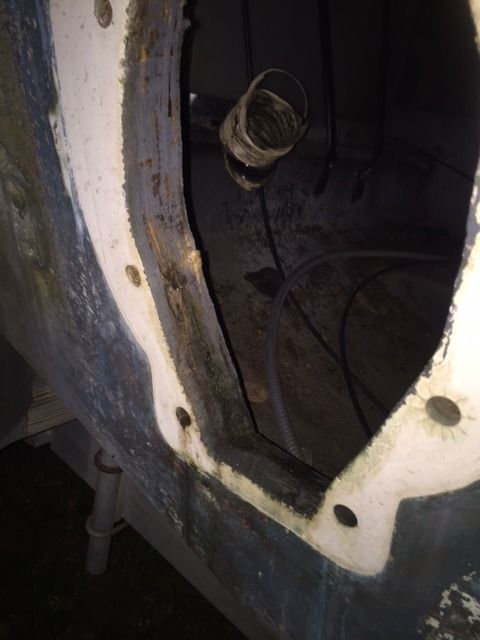
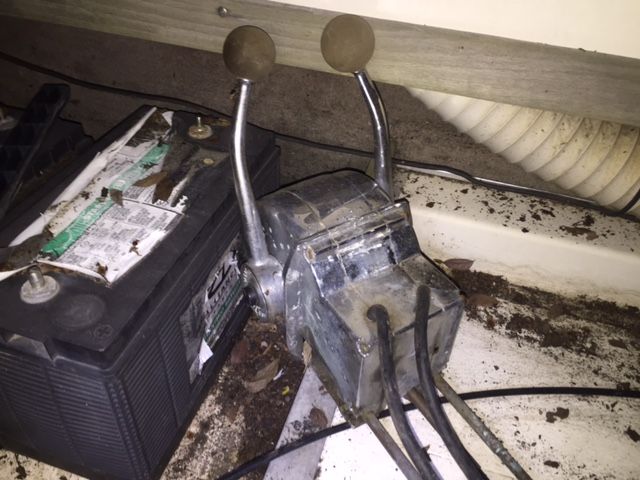
I've been reading iBoats off and on for a few years now. I started reading when I figured out that my 97 Chris Craft 170 ski boat was going to need a transom. I decided that job was too tough for me to tackle at the time and took the boat to a local fiberglass shop to get it done and he did a great job. The boat is solid and doesn't get a drop of water in it unless the kids get in soaking/dripping wet LOL. That said I know I need to drill a few core samples of the transom and stringers. From what I've found online the 1978 Sea Ray was the last year that Sea Ray used the extra thick fiberglass method to build the boat. So it is considered to be pretty heavy duty in terms of construction. I'm really hoping the stringers are OK and honestly hope the transom is OK too because that's a big transom and a lot of work on top of having to potentially rewire, replace the steering, replace the engine cover floor door, replace the throttle assembly, replace all carpeting/padding below, and who knows what else. At this point, I just want a good dependable boat that I can take a couple miles off shore and go scuba dive some rigs in the gulf. The cosmetics can be done later as time/money permits. I just need the drivetrain to be solid first.

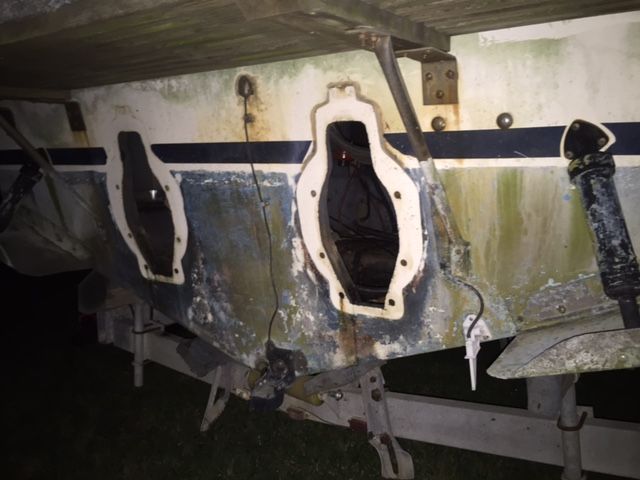
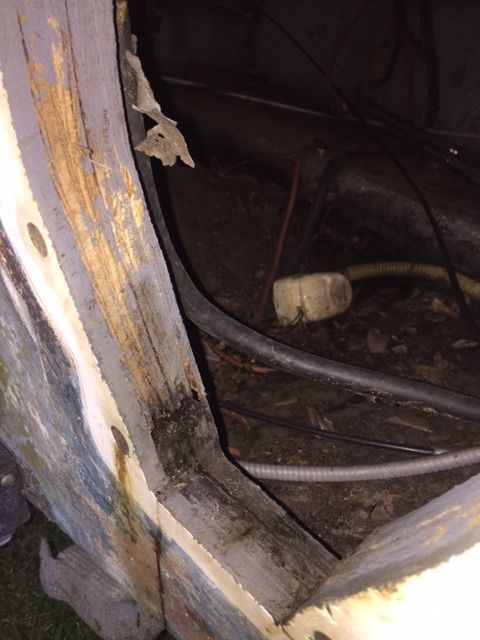
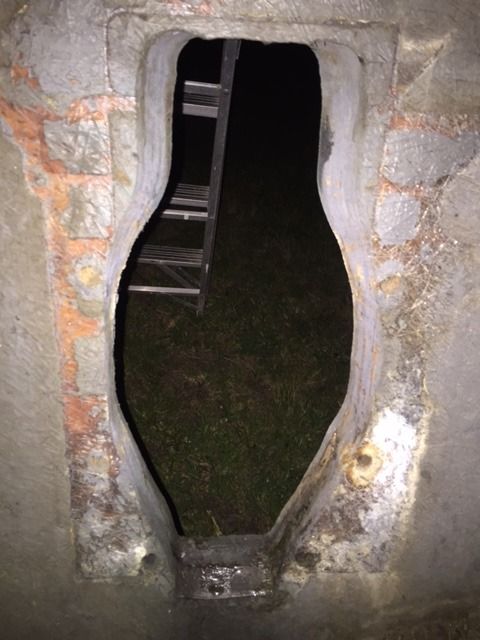
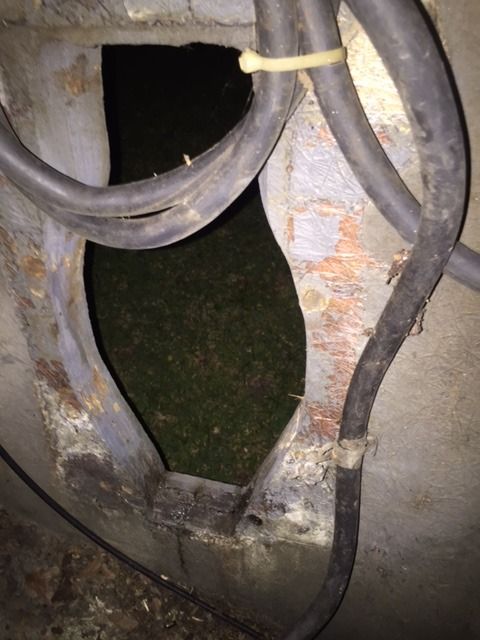
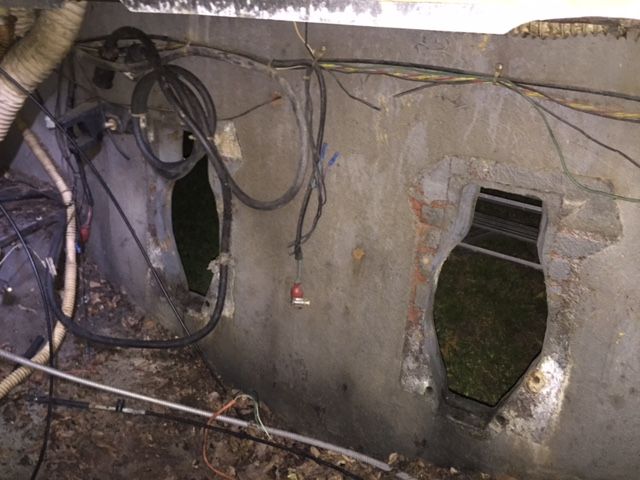
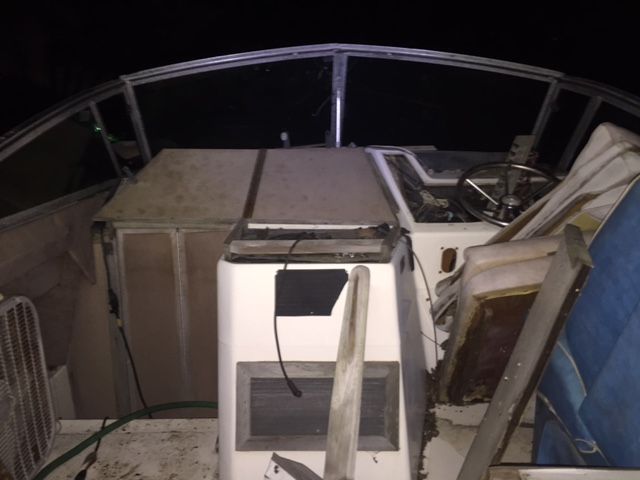
I haven't snapped any pics in the cabin area yet, but I'll get those and post them eventually. The few pics I have were mostly taken in the evening after I cleaned out a bunch of trash. I just wanted to get some shots of the engine bay and key holes up here so you guys could take a look and give me your thoughts.

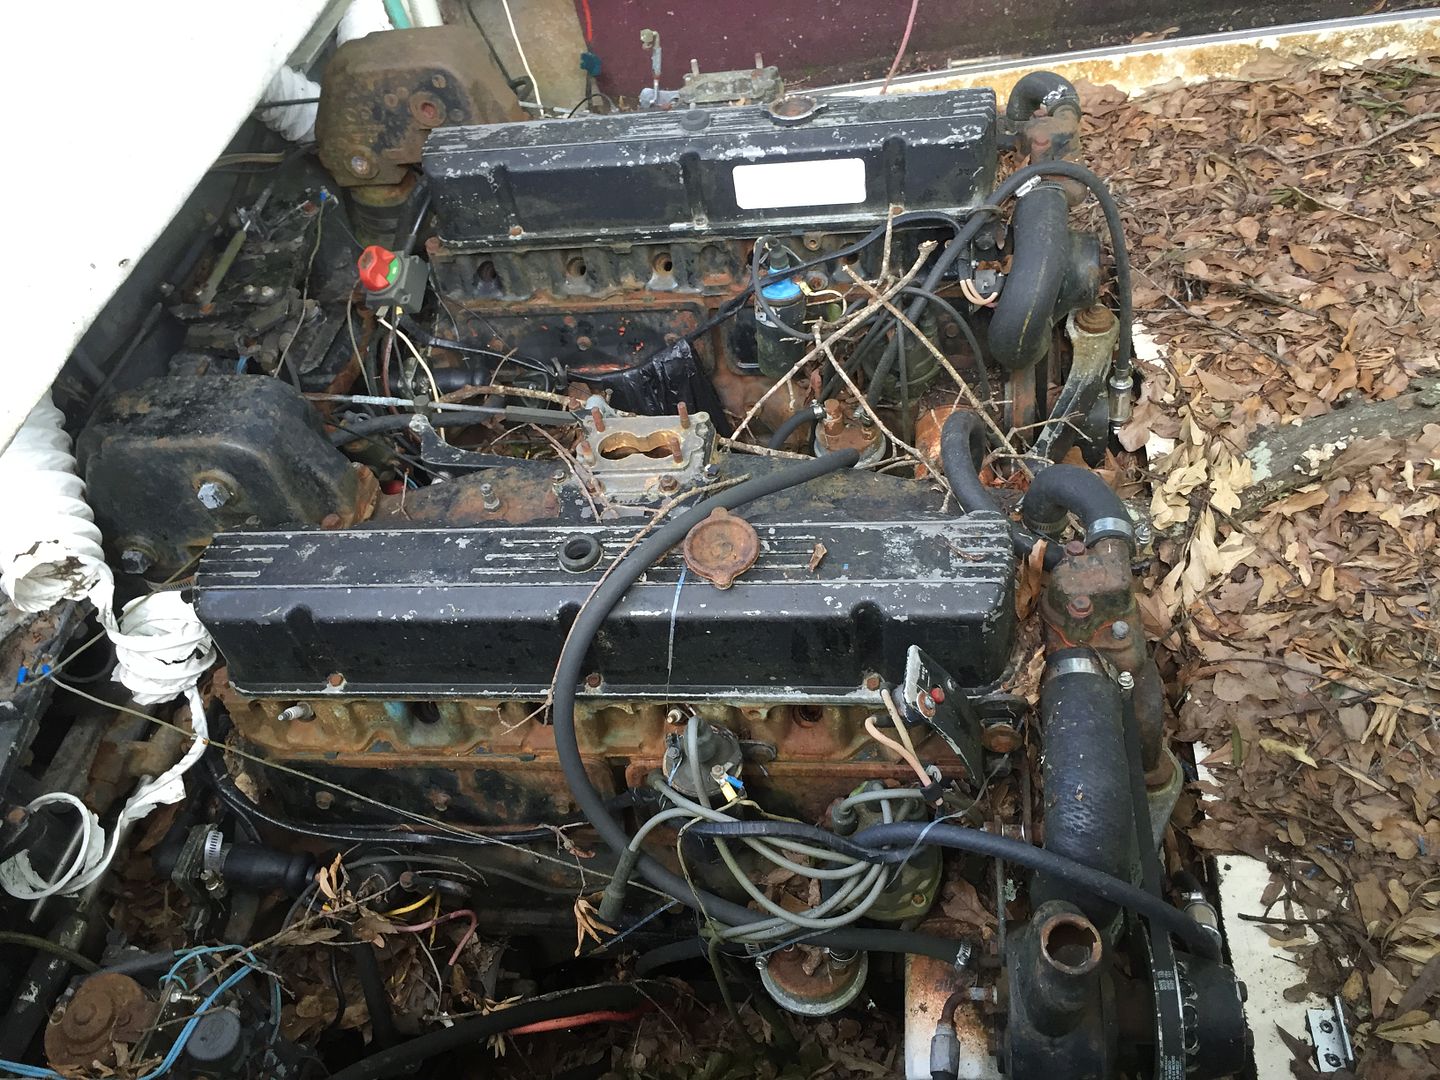
The engines I'm told are straight 6 cylinders with Mercruiser out drives. Previous owner had the shortblocks rebuilt and a good valve job put on the heads, but didn't reassemble. Then he said he had both out drives "rebuilt" but I'll have to get further details on what was done there. I've replaced driveshaft u-joints, gimble bearings, and everything that goes around/seals the outdrive. It was work, but I got it done on my old Chris Craft so I'm sure I could do it on these if need be.

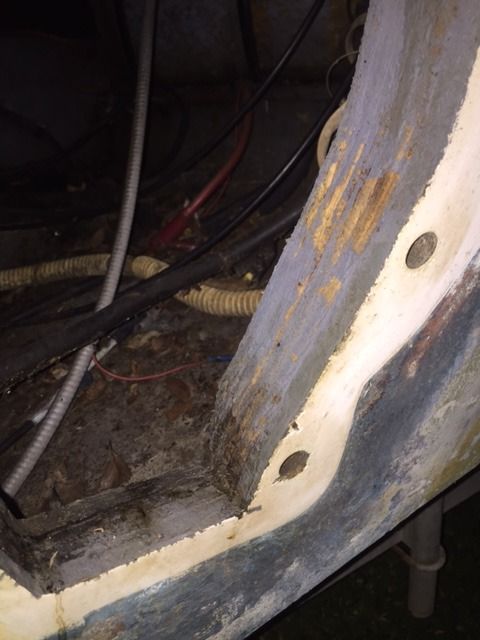
If anyone has any pictures of a Straight 6 cylinder mercruiser setup in an engine bay that can show me where the motor mounts go, that would be appreciated. I'm assuming from what I found that it has a single motor mount at the very front of the motor considering there are no mounts/holes on the sides of either engine. I haven't seen the engines yet, but am supposed to go pick them up this Friday if time permits. The guy lives in my neighborhood.

IMAG5447_zpst0gkahcf.jpg


IMAG5446_zpspgo4g3yw.jpg


IMG_0314-20160413-101636127_zpslikq6z8s.jpg


IMG_0312-20160413-101636377_zpsjx1z14x2.jpg


IMG_0310-20160413-101636659_zps3mdazujo.jpg


IMG_0309-20160413-101636739_zpsshwpjqbx.jpg


IMG_0301-20160413-101637690_zpseyv7gabz.jpg


IMG_0302-20160413-101637545_zps7ttoredl.jpg


IMG_0295-20160413-101641290_zpszqdruarj.jpg


IMG_0306-20160413-101637189_zpshmeiuj07.jpg


IMG_0307-20160413-101636955_zpscq1is83t.jpg


IMG_0308-20160413-101636796_zpse2mraneq.jpg
 
Last edited:

White90GT

Petty Officer 2nd Class
Joined
Jul 5, 2011
Messages
161
Once I get the boat in useable condition, the trailer will get new tires and wiring. This trailer being from the 70s does not have any breaks. Since its a boat trailer I'm assuming electric breaks are out of the question for it? What are the options here? Its a 5100 lbs boat dry weight. Very borderline on weight for my suburban and I doubt I would be able to pull it out of the water without a 4x4 and granny gear.
 

WOEISMEIGOTTA470

Petty Officer 1st Class
Joined
Aug 31, 2012
Messages
375
White90 - looks like quite the undertaking!! Cool to see another guy here in the straight 6 club! I'll be following along for sure. Definitely take some core samples of the transom, stringers, and engine mounts as you said. Not having the engine and transom assembly in the way gives you great access at least to perform an inspection.

Here is a picture of my engine in it's house...


Only thing is I'm using a more modern drive setup, an Alpha 1 gen 1. But basically they mount up the same for the most part - you have your two rear mounts off the flywheel cover that attach to the inner transom bracket, and then a single front mount that's lag bolted to the hull.

You may want to check out Mark72/233's thread on a '72 Formula he's been building also with twin i6's. Here's his thread: http://forums.iboats.com/forum/boat...896-72-thunderbird-formula-w-twin-165hp-mercs

Should you need any vintage mercruiser parts, I may have some stuff which could be useful that I no longer need.

Good luck!!!
 

Rick Stephens

Admiral
Joined
Aug 13, 2013
Messages
6,118
Agree with WOE, grab a drill, stick a 1/2 inch bit in it and drill some holes in the transom low down, make them 3/4" deep - I usually wrap a piece of tape around the drill to set my target depth. It is very easy to plug the holes as long as they aren't right next to a mounting hole for the outdrive. You might get lucky on stringers since they don't have motor mount screws in them allowing water to get in. But drill a few holes and see what you get. Cross members at the front of the engines is where the motor mounts are. There you will also need to get samples, especially as those were probably in water much of the time with standing water in the boat.

Rick
 

White90GT

Petty Officer 2nd Class
Joined
Jul 5, 2011
Messages
161
FWIW the standing water was only inside the cabin and just under the cockpit. It wasn't draining to the rear of the boat. I haven't quite dug in down there yet as the pump I was using to drain the cabin water is too big to fit in the little area where water remains. All the wood that I've seen so far looks great with no rot to be found aside from the steps down into the cabin which is just wood planks laying on top of fiberglass.
 

White90GT

Petty Officer 2nd Class
Joined
Jul 5, 2011
Messages
161
Bad news...as I suspected the transom is toast. I drilled a few holes right below the engine keyholes and got black wood out of the holes, one of the holes started draining a little water out of it.

Worse news, I drilled two holes in each stringer, one about 4" from the transom/rear and one about 4" from the bulkhead for the engine compartment. The rear holes were just black wood, the front holes were worse. Once the drill bit broke through the fiberglass shell, it pretty much slipped right in as if there was no wood there at all. The front hole on the starboard side immediately started draining water.

So the big question at this point is do I scrap this hull and try to find another to put all this fresh drivetrain in, or do I invest the time/money into rebuilding from the bottom up. Its obviously a big boat and I have no idea how much will have to be ripped out to get to the stringers and whether its a full stringer replacement job or if its just the rear area. I can't easily get to the front stringers due to other framework and the cabin area to contend with.

I really like the looks of this old boat and know that if I do stringers and transom that she could potentially last another 20+ years. But I don't know what the cost would be and I really don't have the time to do it myself. I can do the mechanic work, but full stringers on something like this I'm leaning towards a professional.

My other options:
There is another big boat, about 26' sitting in the back of my neighborhood without a trailer. We spoke with the owner last year and he said he may be willing to donate it to us. Said one of the engines was burning oil, but that he had both outdrives rebuilt not long before he parked it. He got a bigger boat and sold the aluminum trailer that he had under this boat. I haven't looked at it close enough to get the condition, but it may be an option and does use twin I/O motors as well. I'm sure he said they were also 6 cylinder motors, but don't recall the details.

Both motors and outdrives on this Sea Ray have been rebuilt and not even installed in the boat since. The motors are the original Mercruiser 165s with original Mercruiser 1 outdrives. The engines were bored .040, heads have bigger valves and hardened valve seats, carburetors rebuilt, and he bought new Mallory distributors for both motors. Both outdrives rebuilt by Palmer Power marine in Houston. New hydraulic pump for the tilt/trim, new hydraulic pump for the stabilizer/trim tabs, all new white face gauges for the driver console. So needless to say there is a lot of new parts here that could go either with this Sea Ray, or on another boat if I had one that has a better hull.

Decisions decisions...
 

Rick Stephens

Admiral
Joined
Aug 13, 2013
Messages
6,118
That's a bummer. Unless you have the passion and the time to do the rebuild, it would be a nightmare. Big job. Owning the power makes looking for a hull a lot of fun though :D
 

White90GT

Petty Officer 2nd Class
Joined
Jul 5, 2011
Messages
161
Well, I like the design of this hull and from what I hear this was the last year that Sea Ray used extra thick fiberglass in their building. So the hull should be sound. I guess I should try to make my way along the stringers and drill some more samples to see how far forward they go and how hard they are to get to. I don't really want to have to tear out all the cabin to get to the stringers to rebuild, but again I like the boat and have a solid drivetrain to stick back in it.

I started imagining trips with the family out on her where I can actually go cruise across Galveston bay to the Kemah boardwalk and into Clear Lake with the family. My wife doesn't like going out on our little 17' Chris Craft much because if you get into any kind of choppy water you get beat to death. I suspect this big boat would hardly even feel 2'-3' choppy waves and considering its a cruiser I wouldn't be hitting them at 40 mph either. So she I think would be way more comfortable and relaxed on a bigger boat like this.
 

GWPSR

Senior Chief Petty Officer
Joined
Jul 25, 2012
Messages
758
It would be cruel for me to suggest that you're likely in for a project similar in some ways to mine. Cruel, but probably accurate. Good luck with whatever you decide.
 

White90GT

Petty Officer 2nd Class
Joined
Jul 5, 2011
Messages
161
Found more rot in the bulkhead just under the aft bunk (which is right under the cockpit. I was pumping out more rain water from our Houston floods Monday last night and saw some clump of stuff that looked like it could be mud or some kind of puddy on the back side of the bulkhead. Scraped it with my knife and punched right through the fiberglass skin on this small bulkhead and got nothing but soggy wet wood out of it. This is a small bulkhead that is right in front of the cabin bilge pump. I was told the cabin doesn't drain to the rear of the boat by design, that this bilge pump was there to pump any water out of the cabin.
 

zool

Captain
Joined
Aug 19, 2012
Messages
3,432
That's common 90gt, to have a pump forward of the cabin wall bulkhead for just that reason...there may even be a plug to manually drain water to the stern, in case of pump failure in a catastrophic situation....you are probably gonna have to cut into the cabin sole to check the forward stringers and bulkheads too.

As far as performance goes, I ran a 1980 SR 26sl with twin 5.7 mercs a while back for a few years....the boat was a rocket offshore and had no problem running in 2-3 at high speeds.....I could get 30 miles offshore in under an hour no problem....
 

WOEISMEIGOTTA470

Petty Officer 1st Class
Joined
Aug 31, 2012
Messages
375
Sorry to hear that the stringers/bulkheads are soft. Honestly I can't say I'm surprised given the age of the boat and the fact that it was stored for long periods exposed to rain & the elements. Doesn't matter really that they used extra thick 'glass if the coring is all shot, I mean it helps but...
If it were me, I'd cut losses on that sea ray, keep that nice trailer and engines and start looking for another hull to work with. That boat you got needs EVERYTHING done to it, not just mechanical, but your talking electrical, fuel tanks, interior, controls, basically like starting from scratch. It's totally cool if you are really dedicated to making something your own and want that experience, and all of us on iboats will be here cheering you on. But realize the time and money investment is going to be HUGE on a boat of this scale, in the end when you come out of it you better hope it's really the perfect boat for you. 'Cause no matter how well the boat is restored, at the end of the day it's still a 38yr old boat and its resale value will always be much much much lower than what you've invested (your heart & soul, oh and a few $$ lol).

I personally would look at it as you paid for a great set of engines, a solid trailer, and the boat was a free bonus/crap-shoot. There are plenty of good I/O hulls out there to work with which have blown engines, but decades newer with good interiors and updated modern perks, that I'm sure you could steal away for far less than what you'd be investing into your current hull. You'll be way ahead of the game and on the water faster! Plus the cool thing about those inline 6's, is that you can swap a few parts from a gm 4 banger (3.0L), and mate 'em up to the modern alpha 1 drives which are much easier to maintain and find parts for.
In the end it's totally up to you!! Good luck!
 
Last edited:

White90GT

Petty Officer 2nd Class
Joined
Jul 5, 2011
Messages
161
Thanks guys. I'm going to try to talk to a guy in our neighborhood that has a similar sized boat without trailer and twin I/O setup. He said one of the engines was burning oil, but I want to say he had mentioned putting a transom in it and rebuilding the outdrives at some point. I still like the looks of the old Sea Ray, but if I'm going to be $6k into it, it probably isn't worth it. FWIW the boat and trailer were free, a donation initially for our sea scouts, but me and skipper decided it was too much work to put on the kids.
 

White90GT

Petty Officer 2nd Class
Joined
Jul 5, 2011
Messages
161
I looked a little deeper yesterday when I had some spare time. I started a little deconstruction. All of the foam around the fuel tank is full of water, therefore all the wood/bulkheads around it are rotted. I can't tell at this point how far forward the stringers go. If they stop basically under the cockpit, before the inside cabinetry and lavatory, it may be a project I will tackle. If I have to remove the cabinetry and lavatory I'm leaning towards finding another hull.

There is a bulkhead in the cabin just under the aft birth that is built for a bilge pump. A small bulkhead in front and a larger one that butts up against the fuel tank foam behind the bilge. Both of those are rotted as I poked through the fiberglass with my knife and just peeled out soaking wet wood.

But I drilled a couple of samples inside the cabin from the walls on either side of the floor and they were dry about 2" above the cabin floor. So thats a good sign to me. It could just be that everything from the fuel tank back needs to come out. Its a 100 gal tank, but sure doesn't look like it to me. It must be pretty deep because it doesn't seem very long. I haven't whipped out a measuring tape though. It looks to be the original alluminum tank. I pulled the plywood cover off the top of it and saw the label on it.
 

White90GT

Petty Officer 2nd Class
Joined
Jul 5, 2011
Messages
161
I've visited the Club SeaRay site. I'm trying to find some kind of diagram/layout of the hull to see where the stringers go. I'm hoping its just the rear area under the cockpit and back. If anyone can find anything, please post up.
 

White90GT

Petty Officer 2nd Class
Joined
Jul 5, 2011
Messages
161
A couple of pics of the other boat I'm considering instead of this one, if the hull/transom/stringers are solid. The motors are obviously junk, but its the same motors that came with the SeaRay. I prefer the look/design of the SeaRay to this other big boat, but the other boat would be more ideal for our Sea Scouts and SCUBA diving with its deeper floor and more space in the cockpit...

A5AD7724-CF22-41C4-8BB3-660E3F8EF853_zpsynzh6509.jpg


C1D464F8-E615-43F8-A7D2-BB0CA7075D41_zpsshizvgjq.jpg


63485C3B-995B-4DF2-BB8E-747F314D1E40_zpsdi0tvbvj.jpg


BC92EC5F-18C7-4E8D-8B6E-4F0835FBADF6_zpspw8dclln.jpg
 

Mark72233

Ensign
Joined
Jul 11, 2014
Messages
926
White90GT, I subscribed to your thread earlier this week and finally got a chance to look it over. That's a lot of work on either boat but it can be done. They remind me of my project. I have the 165hp Mercs and the same controls. I have been working on mine since July 2014 and hope to splash it in a month or so. Anyway I will be tagging along and if you need anything just ask.
 

White90GT

Petty Officer 2nd Class
Joined
Jul 5, 2011
Messages
161
Thanks Mark. i'm slowly digging into things to see how far forward i have to go to clear the rot. I don't think the stringers stretch all the way to the front. I know everything around the fuel tank is junk, but I've got to cut some panels out on the sides of the tank to see if the stringers are up there. the boat narrows quite a bit in the front and I see a very short piece on each side under the front births and under the restroom area that could be stringer frame, but those are dry.

Next step is to remove a foam block on the starboard side of the engine bay and take off the plywood cover its sitting on. then Ican follow the stringer further forward. Guess the skillsaw will be coming out soon.
 

White90GT

Petty Officer 2nd Class
Joined
Jul 5, 2011
Messages
161
Dug a little further around the sides of the fuel tank in the cabin and so far it looks like all the wetness is just the wood immediately around the tank. There is another box/bulkhead port of the tank that is full of foam and its bone dry. Starboard side wood looks dry too. So it may not be too bad. Still looking at several sheets of plywood to rebuild around the tank and do the transom and stringers. plus all the fiberglass supplies. How much you all think I'm going to need in supplies and approximate cost for just the building materials (not wiring and boat parts)?
 
Top