'82 Bayliner Liberty floor replacment

JAMN' Mantis

Seaman Apprentice
Joined
Feb 2, 2016
Messages
31
Hello , I have a Bay liner liberty that has been neglected let un covered in the rain for years
I got the boat for free so I am doing the replacement .
This the first time I am working on a boat so I'm just leaning now what to do
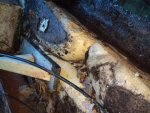
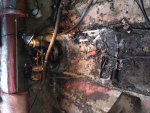
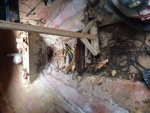
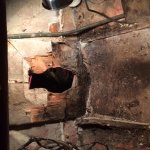
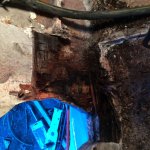
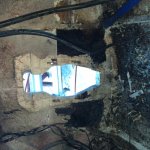
I started ripping out the wood floor I have already removed the motor and gas tank
most of the floor is wood that is pulling up in pieces because it is so rotted.
however I have a few questions
Does anyone know what the layout of the floor is suppose to be I am concerned about the forward bulk head I
don't want to break anything I need later.
Also I have water trapped under the gas tank the area in the middle doesn't drain the bilge I thought there was a tunnel or something so when I raise the Bow up
everything should drain out ?
Please let me know if anyone has any ideas
Thanks
 

gm280

Supreme Mariner
Joined
Jun 26, 2011
Messages
14,590
JAMN'Mantis, :welcome: to iboats. Nice to have you aboard...

You've come to the best place to gain info and knowledge on doing a boat project. First thing I would absolutely recommend is to take tons of picture now. And take pictures from every angle, area, inside and out of the boat before doing anything else. Then take lots of measurements as well and even sketch a drawing and plot them on that drawing. Reason for that it two fold. First it will allow you the option to post pictures of what you are dealing with for us to see. That way the ideas and suggestions are directed towards your efforts. Secondly those pictures and measurement will absolutely come in handy down the road to show you how things were originally laid out. So that is a must do.

So post away those pictures and ask your questions as you go. I will say that there is never supposed to be any water trapped inside any area and not drain out. JMHO!
 

JAMN' Mantis

Seaman Apprentice
Joined
Feb 2, 2016
Messages
31
OK ,thanks for the info
I will post some pictures . I had problems posting pictures on the motor thread it keep saying the picture was too big
What size should the picture be ?
 

JAMN' Mantis

Seaman Apprentice
Joined
Feb 2, 2016
Messages
31
No Title

I want to start off by saying sorry I called it a floor replacement ,it should say Deck replacement .
Here are some pictures of the deck and things . I got a lot to do.
I have 2 questions . Where should I drill to see if the transom has water in it ?
I took off the out drive and also pulled on the gimbal ring ( if I'm saying that right) and the transom didn't move at all
Also most of the wood is completely destroyed so it comes up by hand some with a pry bar .I'm pretty handy and have the time
How can I remove the fiberglass and resin layer from the wood and the hull without breaking the hull ?
 

Attachments

  • photo239229.JPG
    photo239229.JPG
    110.4 KB · Views: 0
  • photo239230.JPG
    photo239230.JPG
    151.9 KB · Views: 0
  • photo239231.JPG
    photo239231.JPG
    160.6 KB · Views: 0
  • photo239232.JPG
    photo239232.JPG
    132 KB · Views: 0
  • photo239233.JPG
    photo239233.JPG
    129.5 KB · Views: 0
  • photo239234.JPG
    photo239234.JPG
    142.8 KB · Views: 0

Mark72233

Ensign
Joined
Jul 11, 2014
Messages
926
After looking at those pics I would assume your transom doesn't look much better. I drilled holes down low, also near the drain plug and on mine around both engine key holes and up high where I could see where when they built the boat there was a spot that wasn't sealed with clothe. Some spots the wood shaving looked ok, some looked dark and or felt wet. It wasn't until I cut the inner layer of fiberglass that I saw where the rot was and I am glad I decided to not take a chance and went ahead and replaced the transom. I have also seen some folks take a hole saw about a 1".


and cut away just that out layer of fiberglass and get a real good look at the wood. If you are fairly certain you will have to replace it this is a good way to get a real good look before you start ripping it all out. The negative side would be if by some boat miracle you don't have to replace the transom you have more work to cover those spots back up with CSM. versus if it is just drill holes you can fill them back in with thicken resin or epoxy or 3M 4200 or 5200.
 

JAMN' Mantis

Seaman Apprentice
Joined
Feb 2, 2016
Messages
31
No Title

Hello
Here is some more picture of the damage
I was able to tear all the deck out this weekend and felt around the inside fiberglass and transom feels wet .
I will remove the inside fiberglass any try and figure if it reeds to be replaced or repaired . This is the first time this boat has been out of the rain in many years
so things are starting to dry out and I will start the rebuild
Does anyone know how big the transom is ? ,some boats are the full length this Bay liner Liberty 1982? seems like it has just a small area for the motor
I also read some where that the Liberty only has a 2 ply 2'x2' transom . Maybe that would make it easier to remove .
Thanks
 

Attachments

  • photo239645.JPG
    photo239645.JPG
    161.6 KB · Views: 0
  • photo239646.JPG
    photo239646.JPG
    173.9 KB · Views: 0
  • photo239648.JPG
    photo239648.JPG
    139.4 KB · Views: 0

JAMN' Mantis

Seaman Apprentice
Joined
Feb 2, 2016
Messages
31
No Title

So as everyone may have guessed the transom is shot .I posted a couple of pictures
there will be more as I go
Water eat a whole in the port side lower and turned it to dust
the rest seems pretty solid , I am removing the whole transom it is just hard where the wood is dry
I am using an angle cutter a pry bar and a fat chisel . This will take a while
and ideas for this removal to make it easier , or anything I should look out for
Thanks
 

Attachments

  • photo240079.JPG
    photo240079.JPG
    189.9 KB · Views: 0
  • photo240080.JPG
    photo240080.JPG
    187.7 KB · Views: 0
  • photo240081.JPG
    photo240081.JPG
    191.3 KB · Views: 0

Woodonglass

Supreme Mariner
Joined
Dec 29, 2009
Messages
25,924
Use a circular saw set to depth, cut a grid in the wood about 2" squares. You'll be amazed how easy those squares will knock off with a hammer and chisel.
 

JAMN' Mantis

Seaman Apprentice
Joined
Feb 2, 2016
Messages
31
Thanks for the info .You were right .The wood came out rather easily .
The Transom is now removed .
My question is what is the best wood to use for the transom and the stringers
I have some solid wood that may be useful . It is a pine I think ,But I got 16'x3' pieces leftover from who knows where .
or do I need something different ,and do I use the same wood for the stringers and the transom?
Let me know what everyone thinks
Thanks
 

proshadetree

Lieutenant Commander
Joined
Jul 19, 2008
Messages
1,887
I used 1/2 or 3/4 ply for mine. Dried standing on end for a few weeks. That is the center of a bayliner transom. You also have a left and right section that needs to be checked, or i did on my 88 Capri.
 

JAMN' Mantis

Seaman Apprentice
Joined
Feb 2, 2016
Messages
31
The Left and right side is fine . It was just where the water was sitting in the bilge for years , before I got the boat
eat a hole in the lower transom ,so I removed all of the center and all of the deck
Soon I will get back and grind all the edges down and start to cut new wood
Still unclear if a solid wood might be better . Marine grade plywood is to be free of voids and have waterproof glue
A solid wood has no voids and has no layers to glue together .
 

JAMN' Mantis

Seaman Apprentice
Joined
Feb 2, 2016
Messages
31
I am getting my materials together for my new deck in the boat .
Can anyone tell me how to figure out how much resin and PB that I would need to do the replacement ?
It is a 19' Bayliner I am replacing the whole deck and center transom .Would it be a gallon or many gallons ?
 
Top