Aluminum boat transom restoration especially angle across the top

uncndl1

Cadet
Joined
Jan 19, 2016
Messages
10
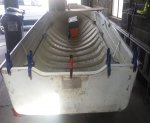
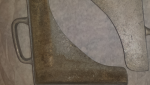
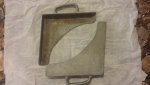
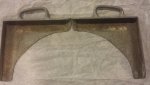
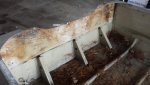
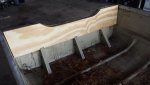
I'm hoping someone here has had to replace their wood transom and has some insight into my question. I was given a 1970 Wards seaking 14 aluminum utility boat that measures 13 ft., 10 inches and has a beam of 62 inches. The catalogue says it is an extra heavy-duty semi-V boat with a 900-lb. capacity. All the wood is shot in the transom and the seats. I took apart the transom, and half of it disintegrated into a pile of garden mulch. All that was left to make a pattern was a half thickness of the transom pattern. I've copied that pattern, and then fashioned new exterior plywood together with information found here. My question specifically is in regards to the angle across the cap, or from front to back so to speak. As the 0.080 aluminum transom that the wood attaches to is angled, I'm wondering if I should cut off the top of my new wooden transom and flatten it somewhat? Any advice greatly appreciated. Since I do not have a complete piece to copy from, it seems to me that the right and left transom corner caps do not fit properly when I do a dry fit of the new piece. I'll re-size some photos and add them for you. Best regards, Kris
 

Attachments

  • MyTransom.jpg
    MyTransom.jpg
    375.3 KB · Views: 2
  • astart1.jpg
    astart1.jpg
    44 KB · Views: 2
  • astart2.jpg
    astart2.jpg
    41.8 KB · Views: 2
Last edited:

bonz_d

Vice Admiral
Joined
Apr 22, 2008
Messages
5,274
Should be just fine as-is. No need to worry about an angle across the top of the plywood. Seal it up and fasten it in.
 

gm280

Supreme Mariner
Joined
Jun 26, 2011
Messages
14,592
uncndl1, Looks like you did a very nice job copying the original. I would add that you need to seal the wood transom before installing it for a final. The raw wood will soak up water quickly without any sealer. And as far as the angle on the top goes, don't worry about it. I haven't seen a boat with a angled flat top of a transom. They seem to have a 90 degree angle in respect to the transom. So not an issue. Did the original transom have any type top metal seal across it? If you could fashion such a metal cap, that would help tremendously indeed.

I would use WOG's concoction that he lists on here. A lot of folks used this and love it.
OTWS.jpg
 

oldhaven

Chief Petty Officer
Joined
Aug 30, 2015
Messages
568
The transom on my aluminum Starchief uses right angle cuts all around except for where the transom corner caps fit. Here a slight angle will allow the caps to sit down level with the gunwales. I intend to do this with a belt sander after dry test fit of the transom, since this will not be an area that will be visible. Of course you have to seal that raw edge before buttoning things up. From the pictures, I am not sure if your corner caps fit in a different way then this, so this angled area may not be necessary for you.
 

uncndl1

Cadet
Joined
Jan 19, 2016
Messages
10
I appreciate all the above comments and ideas. I have two cans of the old timers formula already mixed and ready to go for sealing. I have some screw holes that I need to fill before sealing that were used to hold the sheets of plywood together to fashion the 1 1/2" transom. I've ordered Epoxy (Marine Tex Mighty Repair Kit)
which I'll use to fill all of those small holes. Once all the holes are filled and the wood sealed, I'm thinking about prime and paint also. Do you think that would be over-kill? Yes, the metal transom cap is demolished and needs to be replaced also. I'll post pictures of what I came up with once it's all back together with a few more details.
 

gm280

Supreme Mariner
Joined
Jun 26, 2011
Messages
14,592
I appreciate all the above comments and ideas. I have two cans of the old timers formula already mixed and ready to go for sealing. I have some screw holes that I need to fill before sealing that were used to hold the sheets of plywood together to fashion the 1 1/2" transom. I've ordered Epoxy (Marine Tex Mighty Repair Kit)
which I'll use to fill all of those small holes. Once all the holes are filled and the wood sealed, I'm thinking about prime and paint also. Do you think that would be over-kill? Yes, the metal transom cap is demolished and needs to be replaced also. I'll post pictures of what I came up with once it's all back together with a few more details.

Ha, if you want to paint your new transom, go for it. Is it over kill, that is a self opinion.
 

uncndl1

Cadet
Joined
Jan 19, 2016
Messages
10
looks good to me nice job
Great information. I think I'll do another dry fit once sealed up proper, and make sure those right and left caps fit. I'm thinking, as you that a belt sander and/or planer on that area might help the caps fit better. And yes, sealing up if any more wood is removed. I appreciate all the above advice, and will post pictures once finished up. By the way, my avatar is the old river boat I had when in the Pacific Northwest. It is a Starcraft 18, and served me well in the Tri-Cities area of the Columbia River. I sold it in Rhode Island to a nice kid that had always wanted a closed-bow Starcraft for off-shore fishing. My new/old sea king was probably made by Starcraft from what I hear based on the three transom brackets. Thanks again to all.
 

uncndl1

Cadet
Joined
Jan 19, 2016
Messages
10
I was able to do another test fit, and drill the holes. I must work more on the aluminum, especially to fill several holes properly before prime and paint. I can't get at that so have tackled the two end caps which are very corroded. CLR and scotch brite pads did clean it up somewhat, but not enough. Here's a few pictures of what I'm talking about. It's mostly on the underneath side. I'd like to clean it up more and then prime that area before sealing it with paint, but would like your input on how to handle the two end caps.
 

Attachments

  • TransomView.jpg
    TransomView.jpg
    196.5 KB · Views: 1
  • Tcap1.png
    Tcap1.png
    983.4 KB · Views: 1
  • Tcap3.jpg
    Tcap3.jpg
    313.8 KB · Views: 1
  • Tcap4.jpg
    Tcap4.jpg
    341.1 KB · Views: 1

jbcurt00

Moderator
Staff member
Joined
Oct 25, 2011
Messages
24,871
Its aluminum, and the bottom side wont ever be seen, why prime and paint?
 

Watermann

Starmada Splash of the Year 2014
Joined
Jan 12, 2013
Messages
13,753
On the transom angle, I know this from the old Starcrafts which have a 15 degree angle for the transom skin and that is transferred on the outside edges only on an OB boat transom, but not on the cut out for the motor. The IO's like my Chief the entire top of the transom is cut at the 15 degree angle otherwise the gunnels wouldn't fit either or the transom cap on the SCs. My Sea Nymph was the same way, the angle had to be cut on the outside edges so those caps would fit.

On those cast AL corner caps I use a scrub brush along with this for cleaning them JJV's Best.
 
Last edited:

uncndl1

Cadet
Joined
Jan 19, 2016
Messages
10
Thank you for your thoughts and ideas. My thinking was I would like to somehow seal it off from oxidizing further, and possibly wrecking havoc with the new transom. Maybe it's just over-kill? The top half is very smooth, and can't help but wonder how the bottom half was when new. It's very rough and yes, it won't show at all once re-installed, but I was thinking that by contact and future water getting up in there that it might be a good idea to seal it somehow with some self-etching primer and then some paint. At any rate, that's why I asked here for suggestions. Best regards
 

jbcurt00

Moderator
Staff member
Joined
Oct 25, 2011
Messages
24,871
Its a casting, it was always rough on the down side.

Aluminum oxidizes to protect itself

If you feel you must paint it. Clean it w jvv or any cleaner, rinse w vinegar, rinse w water dry and self etch primer and paint
 

64osby

Admiral
Joined
Jul 28, 2009
Messages
6,799
Bottom side will never be seen. The top side can be cleaned up with steel wool or a green scrubby if you want it shiny.
 

uncndl1

Cadet
Joined
Jan 19, 2016
Messages
10
Very good, thank you much for all your input. I'll post another picture once it's all back together. Best regards.
 
Top