1989 Chaparral Transom Repair

ripazka

Petty Officer 1st Class
Joined
Jul 30, 2016
Messages
246
Epoxy paint may or may not have UV protectant. Exp: Interlux VC performance is a bottom paint epoxy and has no UV, while Interlux Brightside is a top side epoxy and does have UV

Also true.
 

Baylinerchuck

Commander
Joined
Jul 29, 2016
Messages
2,726
So now its time to get the transom assembly back in place. I have seen some people use sealant on the transom gasket. I know the manual does not show using sealant but is it a good idea to do that? What sealant would be recommended if I decide to do that?

3M weather strip adhesive to hold the transom gasket in place. I was given the tip to use black RTV on the inside of the gasket ONLY. This was recommended to me as optional. I like the idea of a little extra protection.

Looking forward to more updates.
 

alldodge

Moderator
Staff member
Joined
Mar 8, 2009
Messages
40,712
What sealant would be recommended if I decide to do that?

My opinion: Use a new gasket and no sealant. If something is needed to keep the new gasket in place on the transom assembly then use bellows adhesive
 

Baylinerchuck

Commander
Joined
Jul 29, 2016
Messages
2,726
These are the products I used.


I guess opinions vary on what to use if anything. I wish I could remember which member recommended these products. I can tell you that you will need something to hold the rubber seal in place. Given the fact it's in essence a giant o-ring, without bonding it to the gimbal housing, it won't form to the gasket channel's shape on its own.
 

rad1026

Chief Petty Officer
Joined
May 1, 2006
Messages
443
okay, I get it. I have some weatherstrip adhesive I usually use to hold the outdrive gasket and o-rings in place. Thanks guys. I'm hoping to get the engine back in this weekend. We will see.
 

rad1026

Chief Petty Officer
Joined
May 1, 2006
Messages
443
No Title

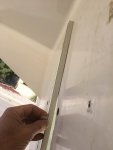
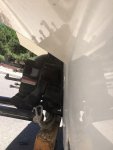
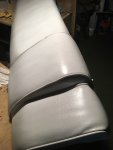
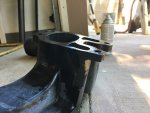
I did some quick transom flatness and thickness measurements last weekend. I was tired and in a hurry and was not happy with the results. I though the flatness of the outside of the transom was out of spec. I was ready to grind down the outside of the transom and fill and sand and flatten the surface, then gel coat. Before I ordered the materials to make up a sanding type putty I spent some time this weekend making some more precise measurements. There was a small indent around the edge of the transom mounting surface that was throwing me off. When I stretched a string across the keyhole and laid a flat edge along the actual mounting surface I was surprised to see how flat it was. The horizontal measurement was good also. So I brought out the gimbal assembly and dry fit it. I did have a very small gap in the middle of the mounting surface after both the top and bottom of the edges touched the transom. I took my feeler gauge out and measured the gap. Turned out to be exactly 1/16th inch. Wow, I was good to go.

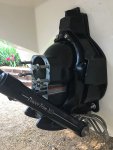
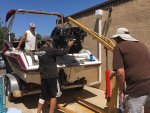
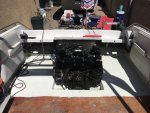
I can't tell you how many mistakes I made mounting the transom assembly. I misrouted the shift cable, I got the steering lever arm ground wire caught between the inner bracket and the mounting surface. I pinched the mounting gasket a little as I was torquing the bolts. I was in the boat, out of the boat so many times I finally just had to lay down on the sidewalk and straighten my back out. Man I was tired.

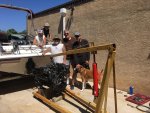
My big mistake was in preparation. I really thought I was going to have to do a lot more work to flatten the surface, so I wasn't really prepared to mount things. I should have taken my time, pulled up the manual, made sure I had everything I needed. I wound up getting stressed, the sun was beating down on me, and the last thing I want to do is get frustrated and mad at my boat. Anyway, all went well, the transom is back together and the engine will go in this next weekend.

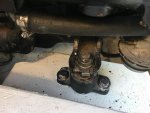
Here is a straight edge and my dry fit.
 

Attachments

  • photo265606.jpg
    photo265606.jpg
    109.7 KB · Views: 6
  • photo265607.jpg
    photo265607.jpg
    162 KB · Views: 6

rad1026

Chief Petty Officer
Joined
May 1, 2006
Messages
443
No Title

And here is the mounted inside and outside. I realized looking at this I need to get the small bolts in above where the wires come through and need to get the ground wire under the mounting bolt. It was a rough day.
 

Attachments

  • photo265609.jpg
    photo265609.jpg
    202.1 KB · Views: 4
  • photo265611.jpg
    photo265611.jpg
    204.6 KB · Views: 4

alldodge

Moderator
Staff member
Joined
Mar 8, 2009
Messages
40,712
Don't know if its an optical elusion but that appears to be a good size gap. Normally the outside does not need any kind of work. Installing a new transom might need feathering on the inside though. Working by your self is rough
 

rad1026

Chief Petty Officer
Joined
May 1, 2006
Messages
443
The inside was very flat Dodge. Yeah, I'm not sure what you are seeing, the gap was very small. It was hard to get a good picture of it.
 

alldodge

Moderator
Staff member
Joined
Mar 8, 2009
Messages
40,712
Cool, I took a piece of piece of 3/4 ply and cut a notch in it the thickness of the transom and used it to verify
 

rad1026

Chief Petty Officer
Joined
May 1, 2006
Messages
443
I did have a question. I put a level on the back deck of the boat and then across the two engine mounting tabs on the inside transom plate and leveled the transom plate to the back deck. I didn't how else to level the transom plate. Is that going to be good?
 

rad1026

Chief Petty Officer
Joined
May 1, 2006
Messages
443
Thanks for the link Dodge. That will help in the upcoming process. I read at length and did not see anything about leveling the transom plate. When I used the level on the boat deck the bubble was not centered, the boat was not level. So I marked and matched the bubble position on the transom plate between the engine mounting tabs.

I also noticed that when aligning the engine the manual says insert and remove the alignment tool until it slides in and out easily. It doesn't say anything about rotating the engine 90 degrees and aligning again until the alignment tool slides easily throughout rotation of the engine. I have read a bunch of times where the engine should be rotated when performing an alignment, but the manual doesn't say anything about that.
 

rad1026

Chief Petty Officer
Joined
May 1, 2006
Messages
443
No Title

in the mean time I have been trying to help my poor old weathered vinyl. I don't have any tears or real wear, its just faded. I found this stuff, "rub and restore" and figured I would give it a try. I should have taken a before picture. I need to do another coat, but so far it looks really good. Its going to be some work to do the entire boat.
 

Attachments

  • photo265669.jpg
    photo265669.jpg
    179.2 KB · Views: 4
  • photo265670.jpg
    photo265670.jpg
    142.1 KB · Views: 4

alldodge

Moderator
Staff member
Joined
Mar 8, 2009
Messages
40,712
I also noticed that when aligning the engine the manual says insert and remove the alignment tool until it slides in and out easily. It doesn't say anything about rotating the engine 90 degrees and aligning again until the alignment tool slides easily throughout rotation of the engine. I have read a bunch of times where the engine should be rotated when performing an alignment, but the manual doesn't say anything about that.

In general if it goes in/out easy your good. The issue with rotating 90 degrees is IF its to low or high, the alignment bar can go in but be slightly out when rotated. Its best practice to rotate with new install to make sure
 

Baylinerchuck

Commander
Joined
Jul 29, 2016
Messages
2,726
I leveled the inner transom plate the same as you. I did jack up my trailer a little until the fiberglass lip above the engine was level. Once the transom plate is level so will be the rear of the engine. I built everything from the stringers up level with this lip above the transom. It made sense to me to install the transom plate in this manner as well.
 

rad1026

Chief Petty Officer
Joined
May 1, 2006
Messages
443
No Title

This weekend was three full days of working on the boat. I ran in to a snag that took most of the day on Saturday. You always think things are going to go fast, but rarely do they. I went to install the Y-pipe and noticed it was corroded and deteriorated around the mounting surface. I though for sure I was shut down until I could find a new Y-pipe. But I went over to good old Larry's house and did my best on a TIG welder to fill in the areas that were gone. I'm a backyard welder. Sometimes I can actually get good penetration and nice looking welds, sometimes I struggle, but I had never done aluminum. Started on a nice piece of flat aluminum to practice on and got the wire speed and voltage set and laid down some nice beads. I thought for sure this was going to take 10 minutes. When I got to the Y-pipe everything changed. Couldn't get a good ground, couldn't get any kind of bead at all. Finally after experimenting for about an hour I made progress by grinding the edges of the damaged areas and working my way inward from there. I think I did pretty good.

When I went to install the Y-pipe I laid down a bead of black RTV sealant on the inside of the o-ring just to make sure. I had lost one of the y-pipe bolts, so I got a new one, with a hex head, which worked just fine. Anyway, when I was tightening the lower bolts I pulled my wrench out to do the next bolt and must have caught the lip of the socket and pulled the socket off the extension and it fell in to the transom area. Oh my gawd what a pain it was to find that and get it out. It had fallen in the absolutely worst place. It fell in behind the hydraulic lines and I couldn't even see it at first. Stupid, time consuming, frustrating stuff. Finally got it out and that was about it for Saturday. Thought I would have the engine back in but that had to wait another day.
 

Attachments

  • photo266342.jpg
    photo266342.jpg
    260 KB · Views: 4
  • photo266343.jpg
    photo266343.jpg
    218.8 KB · Views: 4
  • photo266344.jpg
    photo266344.jpg
    315.6 KB · Views: 4
  • photo266345.jpg
    photo266345.jpg
    234.2 KB · Views: 4

rad1026

Chief Petty Officer
Joined
May 1, 2006
Messages
443
No Title

I had a good amount of help on Sunday dropping the engine in. I needed every hand I could get and all the neighborhood guys rallied to the call. Of course it took a lot longer then I thought it would. We initially set the front motor mounts on the engine and dropped the engine in and lined the rear mounts up. Dropped the bolts in the holes and then marked the front engine mounts for drilling. Then we lifted the engine back up and drilled the holes for the 4 front mount bolts. I was tightening the stainless steel bolts and nylon lock nuts when one of them just bound up. It was so strange, it wasn't misthreaded, it just bound up. I went to back it off and it just bound up so bad I had to get a big breaker bar to get that stupid nut off. So now it was back to Lowes for another bolt. Got a spare this time just to make sure. So we got the front mounts torqued down then the fiber washers and spring locks in place and tried to lower the engine down. The engine coupler output housing kept hitting the transom lip and we couldn't lower the engine down low enough to get past it because it was hitting the front engine mount studs. We tried repositioning the chain to drop the rear of the engine down but that wasn't working. So we wound up removing the front engine mounts and putting them back on the engine in order to lower it down. Finally got it in to place and got the fiber washers and spring lock lined up. Whew, took forever. Then we aligned the coupler with the alignment tool. I had the adjustment nuts out 6.5 turns from the bottom of the stud, that is where they were when I removed the engine. We lowered the adjusting nuts two full turns and set the engine back down. The alignment tool slid in nice, so we kept going. Got the rear engine bolts torqued to spec and the front mounts bolted back down. Checked the alignment again and it was perfect. Slid in like butter, all spline marks even, how lucky. Torqued down the front engine mount bolts and checked the alignment again and it remained like butter. I was a tired but happy guy.

Super happy with the engine mounts and the way the engine lined up. Wow, the engine is out of my garage after 15 months of storage. New oil, new plugs, rotor, cap. New remote oil filter set up.
 

Attachments

  • photo266346.jpg
    photo266346.jpg
    170.9 KB · Views: 4
  • photo266347.jpg
    photo266347.jpg
    340.5 KB · Views: 5
  • photo266348.jpg
    photo266348.jpg
    319.8 KB · Views: 6
  • photo266349.jpg
    photo266349.jpg
    260.4 KB · Views: 6
  • photo266350.jpg
    photo266350.jpg
    271.9 KB · Views: 5

rad1026

Chief Petty Officer
Joined
May 1, 2006
Messages
443
Yesterday I pulled all the wiring out and got the shift and throttle cables set. Set the trim pump in and got the hoses connected. I haven't secured any of the wire harness yet, or secured the pump but everything is in place. Then I installed the outdrive, man did it slide in smooth.

I'm off the next two weekends. Out to Havasu and then down to my local lake. Kills me I'm not taking the boat with me yet, but I'm close now.

Back to cleaning and sanding the deck, getting ready for paint.
 
Top