Bass Tracker TX-17 - Removing bottom wood

nguyenjs

Cadet
Joined
Feb 12, 2016
Messages
22
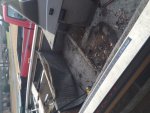
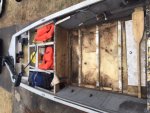
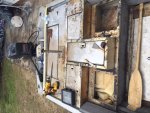
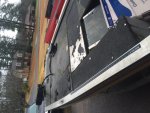
Hey, I am rebuilding a Bass Tracker TX-17. The boat has been sitting out for 8 years and the wood is weak and bolts are rusted to being broke.

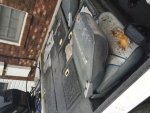
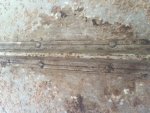
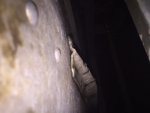
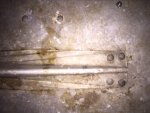
Before I do any damages, the last thing I have left to remove is the side panel and the bottom wood. My problem is do you know if I should be trying to remove the side panel or the wood first? I've taken out the screws from the side panel, but it is not budging to move where the edge of the wood is.

Also, some of the screws on the wood have rusted and now the screw head have been stripped.

That why I would like to know what to do first. Please help and thanks! This is my first boat and I'm new to everything.
 
Last edited:

fishin98

Chief Petty Officer
Joined
Nov 28, 2009
Messages
521
A picture would be nice...my thoughts...are your going to replace the wood??? Can you work a visegrip on to the head of the screw?
 

nguyenjs

Cadet
Joined
Feb 12, 2016
Messages
22
I'm on mobile at the moment but I'll upload a picture when I can get to a computer. I am assuming I need to take the wood floor out first to get to the side panels? I am replacing the wood but planning to spray bed liner instead of recarpeting it
 

nguyenjs

Cadet
Joined
Feb 12, 2016
Messages
22
No Title

I am planning to remove the console and flooring tomorrow. Do you know how many screws I will be dealing? This is going to be a pain just due to the fact these bolts have rusted up. I am probably going to either grind the head down or use plyers to get the screws out.
 

Attachments

  • photo237904.JPG
    photo237904.JPG
    119.9 KB · Views: 1

gm280

Supreme Mariner
Joined
Jun 26, 2011
Messages
14,590
I am planning to remove the console and flooring tomorrow. Do you know how many screws I will be dealing? This is going to be a pain just due to the fact these bolts have rusted up. I am probably going to either grind the head down or use plyers to get the screws out.

Obviously I don't think anybody can answer your "how many screws" question. It is what it is. However, you know now to not use regular steel screws going back together again. So dig in, remove everything and you will be ready to build her new again. But keep posting pictures so we can see what you are dealing with at the time, for any possible answers. JMHO!
 

nguyenjs

Cadet
Joined
Feb 12, 2016
Messages
22
No Title

Thanks for the insight gm. Here's a couple updated pictures from today's work. I was able to get the console out and flooring out in 30 degrees weather. Took me a few minutes to get the steering cables out after figuring I needed to push the pin down. The flooring was definitely a nail biter since most the screws broke off on me. So I'll be grinding the glue and screws next and replacing those old foam from the bay. You mentioned not using steel screw, do you know what screws I should be using when putting it back together?
 

Attachments

  • photo237964.JPG
    photo237964.JPG
    131.1 KB · Views: 3
  • photo237965.JPG
    photo237965.JPG
    152.4 KB · Views: 2

nguyenjs

Cadet
Joined
Feb 12, 2016
Messages
22
No Title

While I'm up posting, here's the before pictures before working on it
 

Attachments

  • photo237966.JPG
    photo237966.JPG
    132.4 KB · Views: 0
  • photo237967.JPG
    photo237967.JPG
    127.6 KB · Views: 0
  • photo237968.JPG
    photo237968.JPG
    130 KB · Views: 2
  • photo237969.JPG
    photo237969.JPG
    123.1 KB · Views: 2

nguyenjs

Cadet
Joined
Feb 12, 2016
Messages
22
A picture would be nice...my thoughts...are your going to replace the wood??? Can you work a visegrip on to the head of the screw?


For the most part, that what I had to do unless it broke off while unscrewing it.
 

gm280

Supreme Mariner
Joined
Jun 26, 2011
Messages
14,590
nguyenjs, Yes I have a couple of ways you can install the new floors. You can either use long reach rivets OR stainless steel screws. Others on here may have additional ideas as well.

When you post your pictures, can you post them correct side up? It is hard to look at them without turning our computers sideways to try and get a better angle to see. JMHO!
 

nguyenjs

Cadet
Joined
Feb 12, 2016
Messages
22
I'll see if I can get them right side up. It happens when I attach them using the website. It's in the right orientation from my computer.

I have a question about replacing the bottom board. I was thinking about changing it to use an aluminum sheet instead of wood. Have you any had any experience with? Can I put the aluminum sheet directly over the ribs, if so what's a good thickness I should get or should I have it over a treated/coated wood board? I am looking to purchase the flooring this week. I am also going to spray the aluminum with rhino or SEM products.
 
Last edited:

gm280

Supreme Mariner
Joined
Jun 26, 2011
Messages
14,590
I have never used sheet aluminum like that, but it really would depend on the distances between the ribs and the weight of the aluminum sheet and thickness. If you can get aluminum sheet that would not weigh more then plywood and the distances between the ribs was not so far that walking on it would sag the floor, then I can't see why it wouldn't work. Cost is going to determine that for sure. But if the cost isn't too bad, I can see it working in the right situation. JMHO
 

jbcurt00

Moderator
Staff member
Joined
Oct 25, 2011
Messages
24,861
Ask your flotation foam question again, here in your rebuild topic.

Thanks
 

nguyenjs

Cadet
Joined
Feb 12, 2016
Messages
22
No Title

I am looking to do the pour foam in between the ribs to replace these old ones as well. I calculated I needed about a little over 4 cubic feet worth to fill it up, so if I am right, two quarts each part. Let me know if you plan to use anything different. Should I even care about the foam like AFlowers was mentioning as well? I wanted something to hold up the sheet metal I plan to use on the flooring.
 

Attachments

  • photo237964.JPG
    photo237964.JPG
    131.1 KB · Views: 0

nguyenjs

Cadet
Joined
Feb 12, 2016
Messages
22
No Title

I desperately need your opinions. After a few days of rain, the hull was able to get some water built up. I started to notice that there was a drip puddle coming from the bottom of the hull. It only looks like a few rivets that would need to be replaced, but it is solid aluminum rivets and I don't have the right tool to take it out. Since there are only a few rivets, could I get some sealants and be done with it? Also, would using Flex Seal help as well?
 

Attachments

  • photo239136.JPG
    photo239136.JPG
    44.3 KB · Views: 0

nguyenjs

Cadet
Joined
Feb 12, 2016
Messages
22
No Title

I ordered some Marine Tex sealant to seal the rivets of the middle of the hull from the inside, but rained a couple days ago. It was still leaking from the bottom hull. I believe it towards the stern of the hull, but the aluminum would be a big hassle disassemble with. Can I just seal it from the bottom and the first picture be filled with a pack sealant? Please help!
 

Attachments

  • photo240060.JPG
    photo240060.JPG
    50 KB · Views: 0
  • photo240062.JPG
    photo240062.JPG
    121.6 KB · Views: 0

Frey0357

Petty Officer 1st Class
Joined
Mar 13, 2014
Messages
313
Hello Nguyenjs. Most of the sealant materials for sealing leaky boats are meant to be applied from the inside of the boat, as they don't have UV protection (so painting the hull would likely be needed then). Personally, I suggest doing this the right way and sealing from the inside of the hull, or re-bucking the rivets (or replacing works too!) and then applying sealant. It is important to do this the right way now rather than investing time and money to only find out that your boat looks fantastic with new flooring and carpet but is still leaking.

Just my 2 cents worth! Great pics for explaining your boat issue!

Frey
 
Top