1968 Starcraft Restoration

Tnstratofam

Commander
Joined
Aug 18, 2013
Messages
2,679
The question JB quoted,

If I was sure the only leak was one rivet and even if the floor is just riveted in I wouldn't tear it out to Gluvit. I'd fix the one leaker with a closed end blind (CEB) rivet and some 5200. The key being the bold part of that.


^^^^ This is a good idea and I have done this repair on our SS to a few missing rivets that a po replaced with sheet metal screws. The deck on our boat is only a few years old, and I didn't want to gut the boat to replace a handful of leaking screws. I used closed end blind rivets with hand riveters and applied 3M 5200 to the rivets when I installed them. Now our boat stays completely dry even after being on the water for 10 hours.

The only caveat I will add is that I had a pretty good idea where my leaks came from, and if my repairs hadn't stopped our leaks I was ready to pull the deck to get to the hull to do a propper leak test.
 

Bowe

Cadet
Joined
Jan 24, 2016
Messages
22
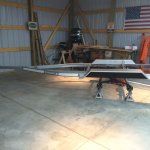
I agree completely with the blind rivet solution. I can actually get to both the rivet that were leaking, but still like this approach. Tomorrow I'm constructing a lift/swing hoist to lift the boat off the trailer. Need to get it up in the air so that I can work on the trailer and the bottom of the boat. will take some pictures tomorrow.
 

Weep'n Willy

Master Chief Petty Officer
Joined
Jun 12, 2012
Messages
831
You got yourself a mighty fine boat that is worthy of a resto and when completed will not only bring you many years of enjoyment but also the admiration of those that cast eyes upon it. These forums are a great source of information with many insights on assisting you along the way. During your adventure be sure to just sit back, stare at her, and as I call it "observe and debate" what direction you want to proceed and how to accomplish it. I know I had many of these sessions during my resto and the end result was even better than I had envisioned. Good luck!!
 

Bowe

Cadet
Joined
Jan 24, 2016
Messages
22
I took the boat off the trailer. Media blasted the trailer and painted it with Eastwood Rust Encapsulator out of my primer paint sprayer. Replaced the bunks, rollers, wheel bearings, hubs and wiring. Also made some nicer looking brake light holder and welded them on. I'm happy with the trailer.
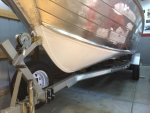
With the trailer complete and the boat still lifted, I sanded the entire bottom of the boat down to bare aluminum with 80 grit, filled all the seams with West Systems boat epoxy and replace the 2 leaky rivets. Then proceed to primer and paint the bottom of the boat. After months of searching and research, I decided to go with Supermarine paint. I used their etching primer and the Ironside urethane paint. It went on fairly smooth and I was using the roll and tip method somewhat successfully. Overall the bottom looks OK. Now that I did it once, I'm hoping I can do a good job on the sides and the top.
A few pics.
 

TruckDrivingFool

Lieutenant Commander
Joined
Jul 30, 2007
Messages
1,818
Gonna have to lift it up and slide a tarp under her to keep from messing that pretty trailer up.

Looking good is what I'm saying. :)
 

classiccat

"Captain" + Starmada Splash Of The Year 2020
Joined
Dec 20, 2010
Messages
3,405
Belated welcome to the Starmada! :welcome:

Nice work indeed!

Good strategy to perfect your painting technique on the part of the hull that only the fish see! :thumb:
 

Bowe

Cadet
Joined
Jan 24, 2016
Messages
22
No Title

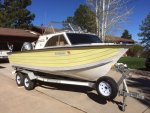
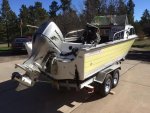
Thought I would share a few updated pictures. The boat painting is complete. I used the roll and tip method and I think it came out OK. Certainly spraying it would have been better, but the fish will never notice the difference;-) My wife hasn't complained much about the time and money spent, so it was best I let her pick the colors. I was a little concerned about the yellow (fighting lady yellow) but I actually really like it now.
I mounted and rigged the Honda BF 90 and build a new dash with Honda gauges and controller. At this point just putting it all back together. I still need to buff out some of the paint, aluminum and stainless. It's on its way to a canvas shop this weekend for travel cover and camper/bimini tops.
Hope everyone thinks I did it justice:)
 

Attachments

  • photo243141.JPG
    photo243141.JPG
    133.7 KB · Views: 4
  • photo243142.jpg
    photo243142.jpg
    82.6 KB · Views: 4

oldhaven

Chief Petty Officer
Joined
Aug 30, 2015
Messages
568
Your wife has great color sense. That's very nicely done and the whole boat looks top notch. You made a lot of progress in a sort time there. I was wondering what a big modern 4 stroke would look like on a Chief, and I don't think it looks out of place at all. Congratulations and be sure to take some pictures at first launch.

Ron
 

Watermann

Starmada Splash of the Year 2014
Joined
Jan 12, 2013
Messages
13,753
Hey Bowe you sure skipped ahead, from what I can see in the pics she looks great! So hook us up with some more and bigger pics please!

fetch


fetch
 
Last edited:
Top