Popular Mechanics 1962 PM38 Build [SPLASHED 2017]

pekstrom

Chief Petty Officer
Joined
Dec 31, 2015
Messages
490
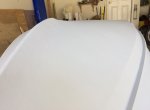
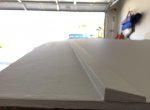
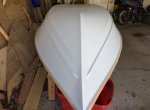
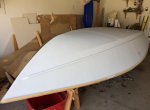
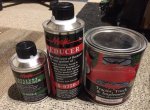
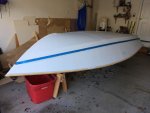
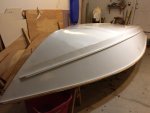
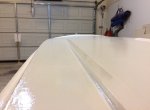
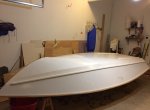
Looks like we're in for a warm (for the season) weekend this week so hopefully I'll be able to finish sanding and re-priming the bottom. Perhaps I'll even have time to make a trip to the TSC store in my area for the bottom paint supplies. I haven't done much these past couple of weeks due to the temperatures. Hoping I can flip her over soon!
 

pekstrom

Chief Petty Officer
Joined
Dec 31, 2015
Messages
490
Alright! The bottom is all white and purdy again. Time to go shopping for the bottom paint now. If the weather stays warm maybe she'll be flipped around in another week or two. It was well worth the extra work because while there are still a few small blemishes, I don't think they'll be noticeable when she's all painted and ready.
 

gm280

Supreme Mariner
Joined
Jun 26, 2011
Messages
14,590
Okay, you know the rules, it didn't happen without pictures.
 

pekstrom

Chief Petty Officer
Joined
Dec 31, 2015
Messages
490
No Title

Okay, you know the rules, it didn't happen without pictures.

Well I guess I better upload some here then. :lol: I have just focused on the bottom below the spray rails so far. Turned out to be a good plan because I ran out of primer just as I finished the second coat. It is much smoother now and a lot of the little indentations I had earlier are gone now. I suspect that what's left will get filled in by the paint as I continue. The edge in the back that is visible in the picture showing the skid rail I'll fix when she's right side up. I still need to do some more epoxy and cloth work back there that gravity makes quite difficult at the moment.
 

Attachments

  • photo258784.jpg
    photo258784.jpg
    277.6 KB · Views: 0
  • photo258785.jpg
    photo258785.jpg
    275.7 KB · Views: 0
  • photo258786.jpg
    photo258786.jpg
    158.4 KB · Views: 0
  • photo258787.jpg
    photo258787.jpg
    171.9 KB · Views: 0

gm280

Supreme Mariner
Joined
Jun 26, 2011
Messages
14,590
Well I guess I better upload some here then. :lol: I have just focused on the bottom below the spray rails so far. Turned out to be a good plan because I ran out of primer just as I finished the second coat. It is much smoother now and a lot of the little indentations I had earlier are gone now. I suspect that what's left will get filled in by the paint as I continue. The edge in the back that is visible in the picture showing the skid rail I'll fix when she's right side up. I still need to do some more epoxy and cloth work back there that gravity makes quite difficult at the moment.


Okay, very nice indeed. Once you get everything else finished, i think you are going to really enjoy your nicely home-made boat.

Only one thing I need to say though. You stated that there are some "little indentations" and they should fill in when painting. Sorry, but that isn't going to happen. If you can feel or see anything that you don't presently like, correct it now. Because paint will not fill in most anything. Preparation is the key to a nice paint finish. The better the prep work, the better the finish will look. I had to learn that the hard way myself. And since you are doing such a great job, make sure YOU like the primer finish before painting. Just some helpful info. :thumb:
 

pekstrom

Chief Petty Officer
Joined
Dec 31, 2015
Messages
490
Okay, very nice indeed. Once you get everything else finished, i think you are going to really enjoy your nicely home-made boat.

Only one thing I need to say though. You stated that there are some "little indentations" and they should fill in when painting. Sorry, but that isn't going to happen. If you can feel or see anything that you don't presently like, correct it now. Because paint will not fill in most anything. Preparation is the key to a nice paint finish. The better the prep work, the better the finish will look. I had to learn that the hard way myself. And since you are doing such a great job, make sure YOU like the primer finish before painting. Just some helpful info. :thumb:

Thank you for the kind words.

You are correct. I'm glad I decided to fix the issues I noticed after the first couple of primer coats. They would have been fairly obvious when looking at her. What I have now are so small and not very many that they won't be noticeable when I'm done. And I'm ok with that at this point, I like how she looks now. And I do appreciate the advice and helpful information provided here for sure. It has helped me get her to this point. When I started I wasn't sure I'd be able to pull it off. But seeing her now, I actually think I will. :lol:
 

jbcurt00

Moderator
Staff member
Joined
Oct 25, 2011
Messages
24,863
Just keep an eye on how the 1st coat of paint lays down. If you're still happy w the way any small imperfections look after the 1st coat, great.

Fillimg small imperfections is what high build primer is intended tobdo, but even it isnt a fix all


Hull looks great so far.

Good luck w whats left.
 

pekstrom

Chief Petty Officer
Joined
Dec 31, 2015
Messages
490
No Title

Exciting times! I finally made it up to the TSC store so now I have the paint supplies for the bottom coats. Just need to sand the last primer coat, wash her off and then I can start the bottom coats.
 

Attachments

  • photo258859.jpg
    photo258859.jpg
    157.7 KB · Views: 0

pekstrom

Chief Petty Officer
Joined
Dec 31, 2015
Messages
490
No Title

Alright, I got the first coat on her today. The second coat is going to have to wait until tomorrow. It looks pretty good though. I like the glossy sheen it has. It will look really nice in contrast to the darker blue (TotalBoat's Flag Blue) I'm going to use on the sides. The roll-n-roll method was pretty nifty too. When I saw all the little bubbles after rolling the paint on I was wondering how well I would get them all out. After rolling lightly with the damp roller, they were just gone. Very cool.
 

Attachments

  • photo259051.jpg
    photo259051.jpg
    69.4 KB · Views: 0
  • photo259052.jpeg
    photo259052.jpeg
    234.3 KB · Views: 0
  • photo259053.jpeg
    photo259053.jpeg
    235 KB · Views: 0

ssdale

Starmada Splash of the Year 2016
Joined
Nov 4, 2011
Messages
285
Congrats on getting to what many consider the most rewarding part of a boat project- new paint. Just makes you want to keep looking at it! :wink::thumb:
 

pekstrom

Chief Petty Officer
Joined
Dec 31, 2015
Messages
490
Thanks everyone for the cheers and kind words!

The second coat is on! It went about as well as the first one. And it looks awesome (if I may say so myself)! I'm really liking how this is turning out. It needs at least one more coat, possibly two. A picture doesn't really show anything different from the ones above so I'll just leave it at that. The gloss white (for the top/inside) and flag blue (for the sides) paints are on their way as well. I just hope the warmer weather sticks around so I can keep making progress.
 

pekstrom

Chief Petty Officer
Joined
Dec 31, 2015
Messages
490
No Title

Alright, I changed my mind. The following two pictures show the second coat on. Not sure they are that much different from the previous ones but anyway, here they are. :lol: If you look closely on the skid rail you'll see a black dot. That's a bug that now will get to ride along with the boat for the rest of its life. One of the downsides of not having a nice paint booth like archbuilder has. :facepalm:
 

Attachments

  • photo259176.jpg
    photo259176.jpg
    342.6 KB · Views: 0
  • photo259177.jpg
    photo259177.jpg
    170.8 KB · Views: 0

Scott Danforth

Grumpy Vintage Moderator still playing with boats
Staff member
Joined
Jul 23, 2011
Messages
47,496
almost every one of my paint projects has a perma-passenger. if you look closely at the wrinkle finish on my oil pan, you will find a mosquito in the layers of wrinkles.
 
Top