Popular Mechanics 1962 PM38 Build [SPLASHED 2017]

archbuilder

Vice Admiral
Joined
Sep 12, 2009
Messages
5,697
Thanks pekstrom, Miss Morgan was a lot of fun to build....and actually even more fun on the water! On the motor, if you sand through the paint, you will want to use some self etching primer. Otherwise the paint won't stick very well to the aluminum. I think you can get some in a rattle can. If not automotive paint stores carry it.
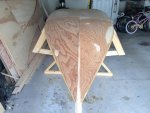
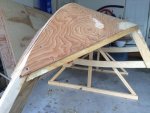
 

pekstrom

Chief Petty Officer
Joined
Dec 31, 2015
Messages
490
No Title

We had a half-day at work yesterday so was able to pick up the rest of the marine plywood I needed on the way home. I also got the itch to finish the bottom bow so they are now attached. Gravity sure wasn't on my side though. That glue is runny! I sure hope I got enough of it between the pieces! Later today I am going to sand down the edges so they are flush with the chines and then start working on the sides. The good thing about this part is that the plywood sections cover large sections so it feels like the project moves a bit faster. :) Before I know it I'm going to need that trailer so I can turn her right-side up.

Hope everyone (in the U.S.) has a nice Memorial Day weekend!
 

Attachments

  • photo244837.jpg
    photo244837.jpg
    107.6 KB · Views: 1
  • photo244838.jpg
    photo244838.jpg
    109.8 KB · Views: 1

pekstrom

Chief Petty Officer
Joined
Dec 31, 2015
Messages
490
No Title

So how did I spend my Memorial Day? Well, I did make a nice BBQ rib dinner for the family. :) And I also worked on the boat. I worked on cutting out the sides of the hull. First the front halves, trimming them to fit nicely along the chines and against the bottom edges. I then moved on to the rear halves and adjusted them to fit nicely to the bottom edges and the transom sides as well. Then I cut out the two supports for the midship butt joints. Everything is held in place by a few temporary screws at this point. I need to get some more 3/4 inch screws before I can work on permanently attaching them. I used my little planer quite a bit while working on the fit of each piece. I first made one section, got it to fit and then used it as the template for the next mirror section. For example I made the starboard front section, made it fit and then used it as the template for the port front section. This worked well and the second panel needed fewer adjustments. There is excess material at the top of the sides (the top edges when turned right-side up). That is by design as I don't have the exact templates. I'll just trim that off once I have the sheer rails in place and know exactly what to trim off.

Well, that's it for today.
 

Attachments

  • photo245044.jpg
    photo245044.jpg
    128.1 KB · Views: 2
  • photo245045.jpg
    photo245045.jpg
    126.2 KB · Views: 2

pekstrom

Chief Petty Officer
Joined
Dec 31, 2015
Messages
490
Yeah, she looks much more like a real boat now. It is kinda strange after all this time just having the skeleton of her and now, in a fairly short period of time she has transformed like this. I got a bit of work left before I'll be ready to flip her over so a few more weeks probably. Also debating if I should get me a trailer to set her on or just rig something while I work on her.
 

Woodonglass

Supreme Mariner
Joined
Dec 29, 2009
Messages
25,924
I've seen several projects like this. Most of em have a bunk trailer to sit them on once flipped.
 

TruckDrivingFool

Lieutenant Commander
Joined
Jul 30, 2007
Messages
1,818
It is kinda strange after all this time just having the skeleton of her and now, in a fairly short period of time she has transformed like this.

She's looking good Pek, always nice to get those visual leaps n bounds in a project.

Seem's to me that a cradle would be less of a hindrance to further work than a trailer, just my ?2.
 

pekstrom

Chief Petty Officer
Joined
Dec 31, 2015
Messages
490
Woodonglass yeah, I have found an entry-level bunk trailer at Academy Sports that should be a good fit at a reasonable price. So that's what I am considering. But to TruckDrivingFool's point, perhaps I'd be better off arranging some sort of cradle support while I work on the insides and the deck...
 

pekstrom

Chief Petty Officer
Joined
Dec 31, 2015
Messages
490
Oh, Woodonglass, I have looked at HomeDepot in my area at those Spax screws and can only find interior grade screws. Is that what you use as well or does your store carry exterior ones?
 

Woodonglass

Supreme Mariner
Joined
Dec 29, 2009
Messages
25,924
Either way will work. I'd recommend you design the cradle with casters for portability.
 

Scott Danforth

Grumpy Vintage Moderator still playing with boats
Staff member
Joined
Jul 23, 2011
Messages
47,497
Oh, Woodonglass, I have looked at HomeDepot in my area at those Spax screws and can only find interior grade screws. Is that what you use as well or does your store carry exterior ones?

Lowes and Menards also carry Spax screws.
 

Willyclay

Captain
Joined
Sep 8, 2006
Messages
3,240
1 vote for the cradle. I have experienced a lightweight aluminum boat flipping off my trailer when placing my 200lb. body outboard of the bunks. Tie-down straps were needed to continue. Be safe!
 

Woodonglass

Supreme Mariner
Joined
Dec 29, 2009
Messages
25,924
Oh, Woodonglass, I have looked at HomeDepot in my area at those Spax screws and can only find interior grade screws. Is that what you use as well or does your store carry exterior ones?
Yup, That's what I use. They are ZINC coat and Case Hardened Steel. Once They're installed and covered with resin and cloth there's no way they're gunna rust out or be adversely affected. No Worries about using them!!! Of course that's just an Old Dumb Okie's Opinion!!!:eek:;)
 

pekstrom

Chief Petty Officer
Joined
Dec 31, 2015
Messages
490
Yup, That's what I use. They are ZINC coat and Case Hardened Steel. Once They're installed and covered with resin and cloth there's no way they're gunna rust out or be adversely affected. No Worries about using them!!! Of course that's just an Old Dumb Okie's Opinion!!!:eek:;)

Ok, very cool. I may pick me up some then and give them a try. The ones I have used so far I have to special order and it is a bit of a pain.

I also like the idea of some type of cradle to support the boat while I'm working on her after flipping her right-side up. Since she is a flat bottom I may go simple and get me some 4x4 or something and wrap some scrap carpet I have to add a softer layer in between. Thanks all for your ideas and suggestions.
 
Last edited:

pekstrom

Chief Petty Officer
Joined
Dec 31, 2015
Messages
490
So since I am coming up on epoxy resin time soon, what kind would y'all recommend? I see iBoats have several different ones available. I'm also wondering how much I'll need? I'm thinking I should do two coats on the outside and one or two on the inside. And of course lay glass tape over all the joints and edges on the outside. Anyone have any recommendations?

I did get one of the sides all glued and put all the screws in place. I am hoping to complete the other side on Friday. If that plan holds I may actually flip her over on Sunday. :) I'm thinking of doing that so I can work on the things I need to finish in the bow under the foredeck and also the sheer rail so I can trim off the excess plywood. Then the foredeck and the bench. After that I'm thinking of flipping her over again and start applying the epoxy on the outside.
 
Last edited:

archbuilder

Vice Admiral
Joined
Sep 12, 2009
Messages
5,697
You might look up Redbarnboats on youtube. The guy who does the videos designs and builds a lot of small boats. Most are rowing and kayacks, but the construction is pretty much what you are doing. His videos are a little dry, but he shows a lot of techniques that might help you out. If I recall, he uses system three products. I don't use epoxy much, but I have had good luck with both system 3 and west systems.
 

pekstrom

Chief Petty Officer
Joined
Dec 31, 2015
Messages
490
Ok, the other side is now in place as well. Lots of glue and screws to hold it in place. I have started filling in with some glue mixed with saw dust where needed. Also covered the screws with wood filler. Lots of sanding coming up. I have a few minor things left before I can flip her over. Thanks archbuilder and Woodonglass for the links and pointers to the videos and articles. I will take a closer look at them over the weekend. I have glanced at them and it looks like there's lots of good information there.
 
Top