First rebuild

Randy Bell

Cadet
Joined
Sep 15, 2015
Messages
24
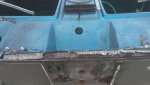
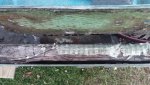
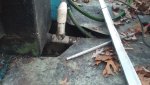
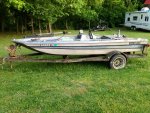
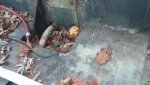
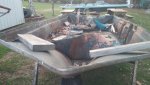
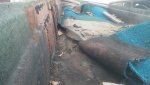
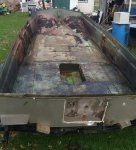
As you can see she needs some lovin. I suppose I should start at the beginning, it is a 1977 Venture 15.5ft bass boat. We acquired it this summer with intentions of making it useable again. The transom is shot, the deck has a big split in front of the bilge, and the deck has a crack in it.

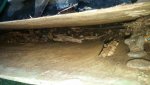
I have it ready to split, everything is unhooked and separated just waiting for manpower to pull the upper off. My question is I have seen a few of the rebuilds done on here and all had wood underneath the deck, so far I have only seen to places besides the transom that have wood, and they seem sound.

Did they make them with just fiberglass on the deck? How much different is the rebuild going to be?

Thanks guys
 

Attachments

  • photo234413.jpg
    photo234413.jpg
    295.5 KB · Views: 4
  • photo234414.jpg
    photo234414.jpg
    304 KB · Views: 7
  • photo234415.jpg
    photo234415.jpg
    264.6 KB · Views: 0
  • photo234416.jpg
    photo234416.jpg
    145.5 KB · Views: 0

gm280

Supreme Mariner
Joined
Jun 26, 2011
Messages
14,592
Frist thing Randy, I have to say, I really do like the lines on that hull. If I could come across such a Bass boat, I would take it (price being right though). Okay now back to your boat rebuild. :focus:

Obviously that transom if totally shot, no questions asked about that. Secondly, I really have no idea what you will find once it is opened up. I don't know how they made such a boat. So I would be prepared for the worst and know that anything and everything made of wood or wood/fiberglass, is going to be rebuilt. But I also can see a very nice finished Bass boat if you decide to do it properly.

It is going to take a huge amount of time, work and some money to make it nice again. So if you are really set to supply those needs, then post some more pictures and lets get going. Clean everything that you can out of the hull. And as it already seems, you have the top cap and bottom hull ready to separate.

I suggest before you get too far into this, that you take tons of pictures from every angle you can think of. And that is the top, sides, front, back, bottom, inside and out. And then also take tons of measurements as well. I like making a little drawing and posting the different measurement on that drawing for future needs. You will not believe how many times you will refer to those pictures and measurements.

And I would either built a dedicated cradle OR beef up the trailer to support the sides once you remove the top cap. Because once the top cap comes off, the hull has a tendency to splay out. And you don't want to rebuilt the hull and then can't get the top cap back on it again. :facepalm:


So post away and ask those questions. :thumb:
 

Randy Bell

Cadet
Joined
Sep 15, 2015
Messages
24
Thank you we did buy it with knowing it was going to need redone, so we didn't get hurt on the deal. I do have quite a bit of pics so far, but a lot more will be needed once I get more into it.

I was checking it out tonight and the sides don't seem to flexible yet, the top is resting on the bow and stern corners for now. I didn't get a lot of measurements yet and I was concerned that it may have spread already, but it doesn't appear so. I will drawl up a diagram and mark the measurements before the top comes off.

I know it will take a while to do because time is one thing that is in short supply. Thanks for the help
 

Randy Bell

Cadet
Joined
Sep 15, 2015
Messages
24
No Title

Ok I got out there and got the boat cleaned out today!
 

Attachments

  • photo234631.jpg
    photo234631.jpg
    47.2 KB · Views: 0
  • photo234632.jpg
    photo234632.jpg
    219.2 KB · Views: 0
  • photo234633.jpg
    photo234633.jpg
    91.1 KB · Views: 0
  • photo234634.jpg
    photo234634.jpg
    78 KB · Views: 0
  • photo234635.jpg
    photo234635.jpg
    247.2 KB · Views: 0
  • photo234636.jpg
    photo234636.jpg
    273.1 KB · Views: 0

Randy Bell

Cadet
Joined
Sep 15, 2015
Messages
24
No Title

With it cleaned out measurements were taken.
 

Attachments

  • photo234637.jpg
    photo234637.jpg
    138.6 KB · Views: 0

Randy Bell

Cadet
Joined
Sep 15, 2015
Messages
24
Does anyone know how to get the bilge pump out? I got it to turn a little, but the outlet keeps it from continuing. I can't see any screws or brackets holding it down.
 

jbcurt00

Moderator
Staff member
Joined
Oct 25, 2011
Messages
24,871
The pump body should have some tabs/ears that fit into the lower part (probably looks like a grate). It is not plainly obvious..
 

GA_Boater

Honorary Moderator Emeritus
Joined
May 24, 2011
Messages
49,038
Most bilge pumps nave a tab on both sides and you depress both tabs and lift it straight up. If you have a twist and lift but the hose is stopping you from twisting enough, take off the hose.
bilge r.PNG
 

Randy Bell

Cadet
Joined
Sep 15, 2015
Messages
24
I can't find any place with screws or tabs like the one you showed. The outlet hits the inside of the well keeping it from turning, I don't know if the pump will come off the grate if I pry on it.

I tried to upload the close up of it but it says something about exceeding the limit, I have it downsized like the rest of the photos!

I am afraid to get to aggressive and damage the hull. The pump can be replaced simple enough.
 

Randy Bell

Cadet
Joined
Sep 15, 2015
Messages
24
No Title

I had to down size it again to get the right size. They have it tight in the corner.
 

Attachments

  • photo234731.jpg
    photo234731.jpg
    134.2 KB · Views: 0

Randy Bell

Cadet
Joined
Sep 15, 2015
Messages
24
No Title

Woodonglass, Here are the pics! I found wood under the fiberglass on the floor, and most of the way forward it is shot.
I haven't cut any holes to see what the stringers look like, but I am betting they have to go too!
 

Attachments

  • photo234637.jpg
    photo234637.jpg
    138.6 KB · Views: 0
  • photo234732.jpg
    photo234732.jpg
    104 KB · Views: 0
  • photo234733.jpg
    photo234733.jpg
    115.8 KB · Views: 0
  • photo234734.jpg
    photo234734.jpg
    378.4 KB · Views: 0
  • photo234735.jpg
    photo234735.jpg
    257.1 KB · Views: 0

gm280

Supreme Mariner
Joined
Jun 26, 2011
Messages
14,592
Randy, looks like you are well on you way now. The bilge pump is two part with the upper section has to be removed from the lower section first. Then there should be screws or something like that holding the lower part to the hull. So remove the upper cartridge part first. Even if it gets busted up if you plan on replacing it. I would if it were mine. And you can even cut off the thru-hull fitting as well. As for the flooring section, yes that has to come out as well if there is any rot. So more to demolish it seems. But I seriously like that boat and will be watching your progress for sure. :thumb:
 

snowman246

Petty Officer 2nd Class
Joined
Oct 13, 2015
Messages
193
I like these types of builds....lots of demo!!! If you can't get the top of the pump off-sawzall it off or get a BFH...big freaking hammer. Then access the screws and remove.
 
Last edited:

snowman246

Petty Officer 2nd Class
Joined
Oct 13, 2015
Messages
193
Sorry, I forgot to mention I like the lines of the boat as well. Once I'm done with my project boat, I'll try and find an old bass style like yours. I'll keep up with your thread also
 

Woodonglass

Supreme Mariner
Joined
Dec 29, 2009
Messages
25,924
It appears the Bilge Pump has little flexible finger tabs on the bottom that clip the top section to the bottom section. You'll need to bend them out and pry the top section up to remove it as gm280 suggests there will be screws holding the bottom section to the hull located UNDER the top section once it's removed. IF you can easily get the tabs pried loose then busting the top IS a viable option.:thumb:
 

Randy Bell

Cadet
Joined
Sep 15, 2015
Messages
24
Thanks guys! If the weather straightens up I will get the pump out this weekend! Suggestions on what I should measure? I don't want to miss any that could be important!
 

gm280

Supreme Mariner
Joined
Jun 26, 2011
Messages
14,592
Randy, when we talk about taking measurements, what we are suggestion is to measure across the boat about ever 12" or so increments from the transom to the bow and plot those measurements on a drawing for future use. When you remove the top cap, the hull has a tendency to splay out. And if you don't support that flaring out on the sides and rebuilt it that way, when you go to reinstall the top cap, it will not fit anymore. And that would be a huge issue to fix if you even could. So make even a hand sketch and label each measurement on it and then build something to support the side to stop that flaring out as well.

I actually stretched a center line down the center of the hull and measured from that center point to each side in 6" increments to help rebuild the floor and other things as well.. And plotted those measurement on the drawing. Not really hard to do. JMHO!
 

Randy Bell

Cadet
Joined
Sep 15, 2015
Messages
24
Actually mine has stayed put since pulling the top off, may be do to the stepped sides. The sides are stiff even up near the middle, I took measurements every 3ft, but will go back and get more. There is only about 8ft of deck side-to-side the rest is in-between the center V. Two 8x4 sheets of marine grade ply should cover it.

I will have to get the deck off to know how the stringers are laid out, and what it will take to replace. It shouldn't be to bad on cost no bigger than it is.
 

Randy Bell

Cadet
Joined
Sep 15, 2015
Messages
24
So I have been out working on the boat today, I found out a few things. The pump was a live well aerator, and went through the bottom of the hull. I took everyone's advice and broke the grate and the pump came off, found 3 nuts holding the grate down onto inlet stem.

I removed a bunch of what used to be the transom, I used a cut off wheel to cut the fiberglass covering loose and dug out most of the rotten wood, I was able to salvage about 6" of it on the right side( starboard side I think) that had the angle for the new one. I did see the original glassing on that side was very thin and had gaps toward the bottom. Probably why that section was not totally gone.

The floor has a strange layout, the outer sides of the hull comes in about 6" you can see the seam for the decking. I cut a 12" square out in the rear section, the wood was water soaked and the foam was wet on top, I took a short piece of pvc pipe and took a core out of the foam. It was wet at the bottom, then dissipated?

By that time my fingers were numb it is only 36 here so I called it quits for tonight. The floor was 1/2" and the transom is two sections of 3/4".

How do you do the pour in foam? This is stuck to the bottom of the decking and shows the grain of the plywood when removed, is it put in after the flooring or how can you get it that full to the decking?

Thanks
 
Top