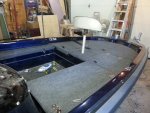
1980 Terry bass boat restoration...it begins!

gm280

Supreme Mariner
Joined
Jun 26, 2011
Messages
14,605


Yesterday i started hauling out all the harware i ve been gathering up the last few months, and already i realized i need different thru hull fittings so ill order those today.

The two halfs are apart again, and Im hooking up all my hoses etc before she goes together FOR THE LAST TIME.........:D

Absolutely a magnificent job there. It looks amazing. Very well finished. I looks new. :thumb:
 

BackyardKrazy

Petty Officer 3rd Class
Joined
Sep 11, 2015
Messages
90
Thanks guys, Im getting pumped up to get it finished now. ran some hoses tonight for the live well and bilge pump, easier to get at while its apart.

I used PPG basecoat clearcoat. Its going to be a freshwater boat only, but even if it did hit the ocean it'd be fine. The clear I used is premium stuff ;)
 

frobotz

Petty Officer 2nd Class
Joined
Mar 8, 2016
Messages
105
Very nice, my first boat was a terry bass boat. it was rough but wish it could have looked as good as this one does. Nice work.
 

tallcanadian

Captain
Joined
Sep 7, 2006
Messages
3,245
Boat looks great. Sorry I haven't been in touch, I've stopped receiving emails again. Great job. It will be nice to see it on the water.
 

BackyardKrazy

Petty Officer 3rd Class
Joined
Sep 11, 2015
Messages
90
Boat looks great. Sorry I haven't been in touch, I've stopped receiving emails again. Great job. It will be nice to see it on the water.


No prob TC, but I was wondering where you have been!!

Question for ya, i bought the 1 1/4 black rub rail from Stright Mackay, and ill need to butt two ends together on the boat on each side. Did you have any clean way of doing this , like having a cap to go over the ends perhaps? i asked them when I ordered it and they didnt have anything for it. I may just put some of our black structural adhesive on the touching ends while im installing it.
 

tallcanadian

Captain
Joined
Sep 7, 2006
Messages
3,245
If you look in Mermaid Marine's catalogue, you will see pvc moulding end caps. I used those on my boat. And they are black as well.
 

Carpenter2486

Petty Officer 2nd Class
Joined
May 14, 2011
Messages
144
boat looks great! il be looking into this paint for my project,, i " DIG " the shine.
 

BackyardKrazy

Petty Officer 3rd Class
Joined
Sep 11, 2015
Messages
90
I got the front carpet down this weekend, the rub rail installed and some of the new hardware.

it took me a day to strip this boat down and its taking WEEKS to reassemble it!!!! :facepalm:
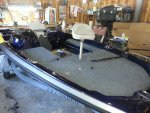
20160320_162042.jpg

20160320_162025.jpg

In this one you can see i installed a rod strap on the deck, i cant wait to utilize that!

I came across a serious dilemma.... the seats i bought are nice, but have too much padding on the bottom. So when I sit in them my knees literally hit the dash... So I had to come up with a solution that was easy but would work without ruining the new paint. The reason the seats sat so high was the body had cargo( I assume) under each seat.

Long story, i broke my new phone already so the pics of the problem I dont have at the moment, but here is the area I am describing:
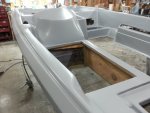
seat_issue.jpg

I circled it in red (faintly...)

it was lifting the seat up 3-4". I needed it gone......

So I cut it out and built inserts the seat can sit on
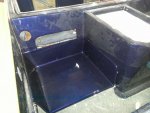
20160318_184850.jpg
 

BackyardKrazy

Petty Officer 3rd Class
Joined
Sep 11, 2015
Messages
90
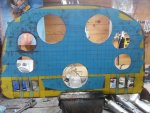
next i decided to work at my dash/gauge face plate. here it is "in production" LOL

20151120_190352.jpg

cutting that out was not fun....

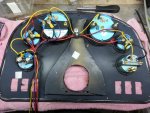
Again a good pic of the front after paint is on my old phone and I will upload something When i get another pic. But here is the wiring on the backside so far 20160320_195135.jpg


I figured it'd be easier to wire as much as possible on the work bench rather than lay on my back reaching up to do it.
 

BackyardKrazy

Petty Officer 3rd Class
Joined
Sep 11, 2015
Messages
90
next i decided to work at my dash/gauge face plate. here it is "in production" LOL


cutting that out was not fun....

Again a good pic of the front after paint is on my old phone and I will upload something When i get another pic. But here is the wiring on the backside so far


I figured it'd be easier to wire as much as possible on the work bench rather than lay on my back reaching up to do it. As you might notice, i miss measured the hole sizes.... after 2 hrs of cutting and hand filing I found out the holes were too big. So I cut some vaccum hose and tucked it around the hole edge, actually worked perfect and it looks good on the outside!

i'm telling people that was the plan, for sure!!
 
Top