1977 holiday 14ft refurb

Timpg

Cadet
Joined
Sep 19, 2015
Messages
22
Hi everyone! I was recently given a 1977 starcraft holiday 14ft boat from my Father in law. This boat and trailer has been sitting in a barn for the last 35 years and is in desperate need of a little TLC. I am a complete novice when it comes to working on boats but I love a good project and am highly motivated to get this baby on the water by July 4th 2016. I'm sure I'm going to have a ton of questions in the very near future and I thank you all in advance for helping me out. When researching this boat I found a refurbishment of this exact same boat on this site by ChrisP929. You can see his restoration here: http://forums.iboats.com/forum/boat...toration-has-officially-begun?_=1442749919953. It came out awesome! I hope this looks as good.

Here are some "as received" pics.

Again, thanks in advance. Look forward to working with you all!


image2.JPG image2.JPG
image3.JPG
image4.JPG
image5.JPG
image6.JPG image7.JPG
image8.JPG
 

Attachments

  • image1.JPG
    image1.JPG
    134.9 KB · Views: 3

g0nef1sshn

Lieutenant
Joined
Feb 24, 2015
Messages
1,291
Looks like all you need is some carpet and a motor! Whats your plans for it? Complete tear down and rebuild and paint?
 

Shakedownscott

Petty Officer 2nd Class
Joined
Jul 12, 2011
Messages
179
That's a great looking boat, looks in pretty good shape too. I think that would make a great first boat project.
 

fishin98

Chief Petty Officer
Joined
Nov 28, 2009
Messages
521
Nice looking project boat.....Looks like it has all kinds of possibilities, as mentioned before what kind of motor do you plan on putting on it?
 

TruckDrivingFool

Lieutenant Commander
Joined
Jul 30, 2007
Messages
1,818
Wow a FIL that likes his SIL? I didn't think that was possible. :)

Nice starting point can't wait to see how it comes out.
 

Timpg

Cadet
Joined
Sep 19, 2015
Messages
22
Hi all,

My plans are a complete inspection, tear down, repaint, and rebuild. As for as a motor goes, I would love to put 50HP on it as the plate suggests is the max however the lake we will mostly be taking it to has a 25HP limit. So... 25HP it is. I've been keeping a lookout for a nice used one. I pulled the floor on the boat yesterday and discovered this:

IMG_8337.JPG

I counted 4 mouse nest, so that explains the smell :) The plywood is in decent shape however, I'm not sure I would ever get the mouse smell out and I am thinking about riveting in some supports as shown in ChrisP929 restore, and then put down an aluminum sheet floor which will then be padded and carpeted. I was thinking about using a .125 gauge aluminum but I'm not exactly sure where to get it. Any thoughts?

I've since cleaned out the foam and pressure washed it, then I filled it up with water to check for leaks. Sure enough the front hull as some leaks along the seam. Here are some pics:
IMG_8427.JPG IMG_8428.JPG

IMG_8429.JPG

I did some research (I'm addicted to google) and it doesn't seem like that big of a deal and is pretty common for aluminum boats. I was going to go to Bass Pro shops tomorrow and buy some 2 part epoxy that supposedly seal it up. You all have any thoughts on this? I'm also going to buy some carpeted platforms from harbor freight tomorrow and take the boat off the trailer and into the garage. Then I can start work on the trailer too. Does anyone have any tips for getting the boat off the trailer and onto the ground without serious harm to the boat or myself?

Thanks,

Tim
 

Attachments

  • IMG_8337.JPG
    IMG_8337.JPG
    140.7 KB · Views: 1

jigngrub

Fleet Admiral
Joined
Mar 19, 2011
Messages
8,155
Rodent urine and feces are conduits for some pretty nasty diseases, I would trash the plywood, foam, and anything else that may have come into contact with that stuff.

The 2 part epoxies called Gluvit and Coat-it work well for stopping seam leaks in aluminum boats, follow all of the prep directions printed on the can before applying.

The caulking on your keel isn't supposed to be there, it was someone else's attempt at fixing the leaking seams and rivets. You'll want to remove that caulk before painting your boat.
 

Timpg

Cadet
Joined
Sep 19, 2015
Messages
22
Jigngrub- it looks like caulk in the pictures but it is hard as steel. A weld maybe?
 

jigngrub

Fleet Admiral
Joined
Mar 19, 2011
Messages
8,155
Jigngrub- it looks like caulk in the pictures but it is hard as steel. A weld maybe?

It maybe 3M 5200 or another sealant that has cured rock hard, or it may be a weld but the way it has cracked the paint up on it I'm going with a dried hard sealant. You can find out if it's a weld or not with some sand paper, and you'll be sanding the boat down later for paint anyway.
 

bonz_d

Vice Admiral
Joined
Apr 22, 2008
Messages
5,274
With using a 25hp outboard you are going to want to try and keep it as light weight as possible. Might want to look at adding 2 more aluminum stringers down the length of the boat and the deck it with 5/8" ply as opposed to using 3/4" that will save a little bit of weight. It's not a lot but in this case every little bit will help.
 

fishin98

Chief Petty Officer
Joined
Nov 28, 2009
Messages
521
. I agree with other posts .....gut the boat, do not save any foam or wood.....great time to re wire....reseal all the seams. Look for a fairly recent 2str 25 MERC, OMC, Yamaha, Nissan and the like FORGET about motors from the 60's,70's,80's, and early to mid 90's. Snoop around dealers that sell package boats, people buy the boat package, then want to upgrade to a bigger motor, dealers have great prices on these motors as they don't want them taking up space . Measure your transom height, 20" or more will probably require a long shaft motor.
 
Last edited:

Timpg

Cadet
Joined
Sep 19, 2015
Messages
22
great advice fishin98, I'll definitely start snooping around the dealers. Sounds like a really good way to get a nice used motor.
 

Timpg

Cadet
Joined
Sep 19, 2015
Messages
22
0


0


0

Okay, removed the windshield, steering wheel, lights and cleats and got her flipped over and on rolling platforms. Time to grind out the seam and re-seal with 3M 5200. After that is the sanding and painting... has anyone every used any chemical strippers to remove the old paint down to bare metal? I've heard about this stuff called "aircraft paint remover" here is the link on amazon http://www.amazon.com/dp/B000VI13L6/ref=nosim?tag=finishingcominc. I've also read that once you get it stripped you need to prime the aluminum within an hour or the metal begins to oxidize and then the primer wont stick? The more I read up on aluminum painting the less comfortable I feel with it. I would really like to do a flawless paint job on this... any advice?
 

64osby

Admiral
Joined
Jul 28, 2009
Messages
6,799
http://forums.iboats.com/forum/owners-groups-by-manufacturer/s/starcraft-boats

There have been many tin boats that have been worked on and have complete threads on the process.

I would suggest you take a few hours or days to look at some of the fantastic work that has been done in the Starcraft section. There are also many tin boats that have been restored in the restoration section.

Google can also be your friend when trying to search specific questions. You can also post questions like you have done.

Aircraft stripper works great, needs very good ventilation and PPE. It is also expensive. Just about all strippers have been tried here with various results.
 

Timpg

Cadet
Joined
Sep 19, 2015
Messages
22
Okay, so its been awhile since my last post but I have been doing prep work on the bottom of the boat and doing my required research on how to paint paint aluminum. So I stripped off all the paint off the bottom of the boat which was probably way over-kill in hind sight, but there was quite a bit of pitting and I would really like to do a bang up paint job. so here is my game plan, please feel apply feedback liberally.

I have already ground out the leaking seam on the hull as pictured above and I resealed using 3m 5200. That stuff is awesome.

I am just about done sanding the entire exterior with 120 grit using a dremel multi-max sanding head. I should be done with this by the end of the week. I then plan on vaccuming off the dust and spraying and wiping off a 50/50 water vinegar solution until reasonably clean. Then I am going to to lay down a coat or 2 of rustoleum self etching primer. After my that I plan on gently "scuffing" the self etching primer by hand with 100 grit, and then priming with Interlux prekote (White) using the roll and tip method. After that I want to putt on interlux brightsides white with a 4" sea green stripe also using the roll and tip. I was planning on adding interlux thinner 333 but no hardener, but am willing to reconsider if necessary. I know that prekote and brightside are topside paint and I am really looking for someone to either reassure or talk me out of using this. This boat will be trailered to and from the lake and stored indoors when not in use. The longest I expect it to be in the water is possibly for a one week period if we rent a cabin with a dock.

If you think I should absolutely use a below water line paint, what do you suggest? I don't like the idea of using anti fouling paint as I don't want to have to go through the painting process on an annual basis. please let me know what you think.
 
Last edited:

Timpg

Cadet
Joined
Sep 19, 2015
Messages
22
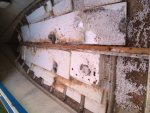
Okay, so I was on the fence whether I wanted to continue documenting the restoration on this site, but I finally decided to keep posting for two reasons. 1) This thread is ultimately for me so that I can look back and admire my progress and the final product and 2) to help someone else either presently or 10 years in the future. That said I need to catch up the thread to my current progress: So far I've ground out the old seam that was leaking in the pictures about and resealed with 3M 5200. Then I sanded, sanded, and the sanded some more:
IMG_8999.JPG
fetch
IMG_9004.JPG

I then had a nice Christmas with the family:
IMG_9082.JPG

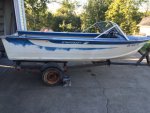
I then got the boat primed with Rustoleum Self etching primer rattle cans.

IMG_9168.JPGIMG_9169.JPGIMG_9170.JPG

I then won biggest Burbot at the Burbot bash ice fishing tournament in Flaming Gorge Wyoming:

IMG_9242.JPGIMG_9249.JPGIMG_9263.JPGCapture.PNG

Got in a car accident on the way home because my buddy Brandon drives in the snow like a 16 year old Chinese girl

IMG_9287.JPG

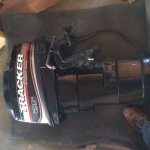
I bought a motor (2001 Mercury 25HP 2 stroke)

fetch


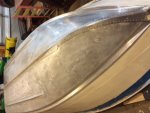
Since the weather got colder in Ohio I don't want to put the top coat on until spring and I decided to flip the boat over and work on the inside.
I put gluv-it epoxy on the inside bottom on all the rivets. That stuff is amazing by the way, I highly recommend it to anyone for anything...

I then spray painted the inside with Rustoluem spray paint (easier to touch up in the future) and I was able to use the old floor as a template to cut the new floor. I used 5/8 marine grade plywood from Menards at $70 a sheet. Used 1.5 sheets on the floor and I have 1/2 a sheet for use for the boat interior... I did a crap ton of research on using something other than wood for the floor.... take my advice and save yourself hours of research... for the price, you really can't beat plywood. I think the 5/8 is perfect for thickness, any less would be flimsy, any thicker would add unnecessary weight.


IMG_9364.JPGIMG_9366.JPG


Next I'm taking the dash out (or should I say cutting it out) and going to cut and dry fit all of my new toys in the new dash... by the way... I realize I went WAY overkill on the electronics on the boat, and for the record, I don't care. I'm an electronics guy by trade and gadgets make me happy. I wont spoil the surprise now but I've got BIG plans for this boat. If that peaks your interest, this link is one of my many inspirations for this restoral:

http://forums.iboats.com/forum/boat-...ation-pictures
 

Attachments

  • IMG_9183.JPG
    IMG_9183.JPG
    36 KB · Views: 1
  • IMG_8996.JPG
    IMG_8996.JPG
    37.4 KB · Views: 1
Last edited:

jbcurt00

Moderator
Staff member
Joined
Oct 25, 2011
Messages
24,863
Tim
Pix didnt post

Neither did the ones back in post #13
 
Last edited:

jbcurt00

Moderator
Staff member
Joined
Oct 25, 2011
Messages
24,863
Are the pics there now?

All but the new to you Merc are embedded in your post. And its 1 of the 2 attched pix that has to be opened to be viewed.

EDIT: got it cleaned up a bit. No duplicate pix.
 
Last edited:

jbcurt00

Moderator
Staff member
Joined
Oct 25, 2011
Messages
24,863
Whats the plan for sealing the plywood deck and covering it?

5/8in ply is a good choice.

What did you use for flotation foam?

The bottom of the hull looks goos so far.

Congrats on a nice Christmas and winning the tournament.

Look forward to seeing the electronics going in.

Welcome back.
 
Top