O'Day Mariner Sailboat Restoration

alldodge

Moderator
Staff member
Joined
Mar 8, 2009
Messages
40,741
Sure would be nice if boat manufactures would at least believe their boats will not last forever and will need to be repaired
 

tpenfield

Moderator
Staff member
Joined
Jul 18, 2011
Messages
17,705
Sure would be nice if boat manufactures would at least believe their boats will not last forever and will need to be repaired

Yup, but I can see why they do the sort of things that make them harder to fix . . . makes it easier and better at the factory. The boat is 40 years old, so it certainly has held up to a reasonable life expectancy.

The folk lore on the Mariner web site was that it was impossible or at least not practical to separate the boat halves, but the reasoning was somewhat vague. But, I think the keel trunk is what the issue/show stopper really is about separating the boat halves. Of course, I don't mind a challenge and usually can find solutions along the way.

I think that I am going to cut the top of the keel trunk at the cockpit, just enough to open it up, but not to the point it would be a tough fix.
 

tpenfield

Moderator
Staff member
Joined
Jul 18, 2011
Messages
17,705
lol time to break out the chainsaw...

Yea, I know . . . seriously :) However, my chainsaw is on the fritz right now, so I'll just have to deal with the boat as is.

After giving my predicament some thought, I came up with a plan to separate the boat halves without any serious cutting. I do know that serious is a relative term though. :D

Anyway, I have sketched out a way that I think will work, be minimally invasive and easy to 'fix' when it is time to put the boat back together.

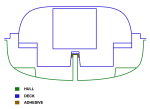
Here is a cross-section of my boat in the area of the cockpit and keel trunk. The green is the hull assembly, the purple is the deck/cockpit assembly, and the brown is the culprit adhesive that is holding the two boat halves together.

MarinerKeelSep1.png

The top of the keel trunk within the cockpit has a 1/2" plywood core for hardware mounting, etc. Shown by the red rectangle in the pic below . . .
MarinerKeelSep1B.png

My plan is to cut the cockpit keel trunk just below the core material . . . This will open up the hidden adhesive area as well as the keel trunk itself.

MarinerKeelSep2.png

I can then make downward cuts along the exposed keel trunk to separate remaining adhesive holding the two pieces of boat together.

MarinerKeelSep2B.png

This will hopefully result in the boat halves breaking free and I can lift the deck assembly up off of the hull.

MarinerKeelSep3.png

On the return trip, I would replace the top piece that I cut away from the cockpit prior to re-assembly, and join the boat halves much in the same way the factory builds new Mariners.

So, that is the plan at this point. I probably will have some time next weekend to make the cuts. If it all goes well, I'll have to figure out how to get both boat 'pieces' in the garage for the winter, so I can continue the restoration work.
 

Attachments

  • MarinerKeelSep1.png
    MarinerKeelSep1.png
    85.1 KB · Views: 5

Scott Danforth

Grumpy Vintage Moderator still playing with boats
Staff member
Joined
Jul 23, 2011
Messages
47,530
You just need a mouse with a chainsaw
mouse_with_a_chainsaw__by_odett_one-d36q4hn.jpg


all seriousness aside. have you thought of just making these cuts from the top
fetch


then when done, epoxy the cuts and cap with a piece of teak?
 
Last edited:

tpenfield

Moderator
Staff member
Joined
Jul 18, 2011
Messages
17,705
Good thought . . . My only thought is that I can 'see' more of what I will be cutting into if I cut the top off first.

I have contacted a couple of people involved with Mariner production and restoration for guidance. We will see if they have any additional or different direction on this.
 

tpenfield

Moderator
Staff member
Joined
Jul 18, 2011
Messages
17,705
Quick Update:

I talked to some folks involved with Mariner sailboat manufacturing - One guy that was part of the O'Day factory (back in the day) and another who currently makes the boat (Stuart Marine).

No cases of separating the deck and hull in recent memory, but it looks like I will need to do some cutting. The boat halves were bonded together at the keel trunk with "Hull & Deck Putty", which is apparently a polyester resin putty reinforced with milled fibers. Possibly also bonded at the transom too.

Probably best to cut that stuff.
 

Scott Danforth

Grumpy Vintage Moderator still playing with boats
Staff member
Joined
Jul 23, 2011
Messages
47,530
back to the mouse with a chainsaw? or cut the cap off your keel trunk?
 

tpenfield

Moderator
Staff member
Joined
Jul 18, 2011
Messages
17,705
back to the mouse with a chainsaw? or cut the cap off your keel trunk?

Yes, a mouse could probably get into the limited space. However, we've had a feral cat living in the tool shed for the past year or so, and the local mouse population has dwindled. Still some squirrels running around though :D

Anyway, I think I was one of the first people to rip apart a 33 foot Formula and looks like I'll be the first to did-assemble an O'Day Mariner :rolleyes:

BTW - there is a guy on the Formula Boat Owner's forum that is having the same set of issues that I had with my F-330SS. His situation is a bit worse and will need a new tank. AllDodge and I are trying to coach him along.
 

kcassells

Fleet Admiral
Joined
Oct 16, 2012
Messages
8,598
As usual TP....Making History and records for alot of other people to help save them the headaches. Lots of pics and good luck!
KC
 

tpenfield

Moderator
Staff member
Joined
Jul 18, 2011
Messages
17,705
Thanks. I am also reminded of the time I cut a rather large hole in the deck of my 24 foot Formula cuddly to build a custom anchor locker. That was about 6 years ago and I was much more impulsive back then :D
 

tpenfield

Moderator
Staff member
Joined
Jul 18, 2011
Messages
17,705
Before I start cutting, I took a few pictures from underneath the cockpit sole to see about the clearance around the keel trunk. Good news is that there is a fair amount of clearance at the rear of the keel trunk. As you can see in the picture below, the 'sheet block mounting plate' is at the back of the keel trunk cover in the cockpit. It looks to be another couple of inches until there is the 'hull & deck putty' which is holding the 2 boat havles together at this point and the subject of the cutting.
IMG_9229B.jpg

Here are a couple more pictures . . . The 'putty' looks like it does not extend down the sides of the keel trunk too much, if at all. So, that is a good thing.
IMG_9231B.jpg

Here is the mounting plate for the sheet block. This boat has what is known as 'mid-boom sheeting' and the tackle (block) that controls the boom/sail in this configuration is under a high load, because of less mechanical advantage as the alternate form - which is the sheeting at the end of the boom. Therefore the backing plate (which is threaded) is an important thing, so that the sheet block does not rip out of its fastening.
IMG_9232.jpg

I'll be able to make the cut just ahead of the mounting plate, which will leave it undisturbed and retaining its strength.

There is also a support a little further aft along the cockpit sole with some 'putty' holding it to the underside of the cockpit. That will need a cut as well.
IMG_9235.jpg

Here is the cut line for the cockpit keel trunk cover. The depth of the cut is planned to go below the internal wood block within the cap portion of the cover and not too far into the putty areas below it.
IMG_9246B.jpg

My sawz-all does not seem to fit in the confined space between the settee and the keel trunk cover. I'm going to use a portable skill saw to make most of the cut, then a hand saw and probably a coping saw to finish it off.

just waiting for the portable saw to charge up . . . :rolleyes:
 

tpenfield

Moderator
Staff member
Joined
Jul 18, 2011
Messages
17,705
Looks like a sabre saw is going to be my best bet . . . I cannot get the skill saw oriented properly and still be able to see to make the cuts. I have an old sabre saw, but it is at the summer house. Probably will be heading out to the store(s) in the morning for a new saw.

Tool selection ideas welcome. . . not sure an oscillating tool is going to be the right thing.

The glass is about 1/4" and I have to cut through 2 sides of it at once as well as the 'putty' that is in between. So, it has to have some good cutting power behind it.
 

proshadetree

Lieutenant Commander
Joined
Jul 19, 2008
Messages
1,887
4 inch grinder with a masonry wheel might be an option. Also the small thin cutoff wheels are fairly effective at doing cuts like that.
 

tpenfield

Moderator
Staff member
Joined
Jul 18, 2011
Messages
17,705
Update . . .

I got a new jig saw this morning and did the cutting.
IMG_9254.jpg


Did not take too long, but I made my cut marks a little too deep and took the top of the keel trunk off :rolleyes:
IMG_9257.jpg


Upon inspection, I noticed a strip of brass/bronze that was embedded into the top of the keel trunk. Not sure why it is there . . . it is above the water line.
IMG_9258B.jpg


Then it was a matter of making the downward cuts. Not too much was holding the 2 boat halves together in that area, mostly mid-way along the keel trunk.
IMG_9261.jpg


Here is the cockpit sole separated from the keel trunk after the cuts have been made. I saved the area of the sheet block mounting from the cut, so it should be fine going back together.
IMG_9262.jpg
IMG_9269.jpg


I then pounded a wedge into the cockpit sole support that is behind the keel trunk to break the bond there. Then it was a matter of lifting the deck assembly at the bulkhead to see if the boat halves would separate. I used the hydraulic jack and some blocks to lift the deck up. It weighs a fair amount . . . maybe 500 lbs :noidea:
IMG_9270.jpg


There was a bit of cracking and groaning as I lifted and the remaining bonds broke loose. The boat halves seemed to separate fairly well. Here is the daylight that is now visible at the rubrail IMG_9271B.jpg


Here is the cockpit lifting an inch or so at the keel trunk. IMG_9273.jpg


There is still some adhesive (more deck putty) holding the boat halves at the transom (somewhere), and the access is slightly less than horrible. So, I will give that some more thought. A common practice among Mariner owners who need access to the inside of the transom is to cut an access hole in the back face of the cockpit liner and but a deck plate in its place.

Snow is on the way, so I buttoned things up for the weekend.

Next steps will be to sort out the transom adhesion and then prop the deck up on the rub rail for lifting off, etc.
 
Last edited:

mickyryan

Rear Admiral
Joined
Apr 18, 2016
Messages
4,210
neet project just read thru, like these lil sail boats I thought of making one but with a inboard engine just to be sure I was never stranded anywhere.
 

tpenfield

Moderator
Staff member
Joined
Jul 18, 2011
Messages
17,705
I've run out of wind a few times on my previous sailboat. I got a Johnson 4.5 HP ready and waiting to go on the stern of this boat. Just got to get one of those lift-up brackets.
 
Top