O'Day Mariner Sailboat Restoration

alldodge

Moderator
Staff member
Joined
Mar 8, 2009
Messages
40,750
The pads should reduce the clunk, my comment would be to make them smaller a round like a door knob bumper placed on a wall. Thought behind it is less resistance when bringing back up/down and if something got in the cavity, it would pose less of an issue if any
 

fhhuber

Lieutenant
Joined
Jun 19, 2014
Messages
1,365
I like the idea of the pads on the aft part of the keel.

As for not meeting the racing rules: Doesn't matter if you aren't going to race it.
 

tpenfield

Moderator
Staff member
Joined
Jul 18, 2011
Messages
17,710
I like the idea of the pads on the aft part of the keel.

As for not meeting the racing rules: Doesn't matter if you aren't going to race it.

Yea, with racing, I think the rules come into play only if you win :D
 

tpenfield

Moderator
Staff member
Joined
Jul 18, 2011
Messages
17,710
thanks guys, I did a bit of calculating for how much tolerance at the pivot bolt would result in the end play of +/- 0.4".

It comes out to be about 0.008" ( 8 thousands of an inch) which is not much for a bolt/bushing setup that goes through the large hole that you see in the keel.
 

Scott Danforth

Grumpy Vintage Moderator still playing with boats
Staff member
Joined
Jul 23, 2011
Messages
47,542
I would use a few delrin or starboard pads. They will need to me mechanically bonded, as there is not much in the way of adhesives that work.

You could put a few strips of stainless, some in the keel, some in the keel locker. Let these take up the gap. Stainless can be adhered with 5200
 

tpenfield

Moderator
Staff member
Joined
Jul 18, 2011
Messages
17,710
OK, a bit of a problem . . .

The top part of the of the keel trunk has an inside dimension of about 1.07", based on my several measurements. So, a lot more taper inside the keel trunk than I had imagined and it almost tapers down to the thickness of the keel itself. The bottom of the keel trunk measured 1.585" wide and the top portion measured about 1.07"

So, if I added the pads to the keel it would wedge in the upper portion of the keel trunk when the keel was raised. Definitely something that I want to avoid.

On to "Plan B" . . . I could add the pads to the lower portion of the keel trunk rather than the keel. This may actually work out better as I can make the tolerances tighter than I could if I had to accommodate the taper of the keel trunk.

Doing the math, I have the keel at 1.02 and the base of the keel trunk at 1.585. which nets out to 0.565 of clearance or about 0.280 of clearance each side. If I add a 0.25" thick pad on each side, it should be fine . . . maybe even a bit tight if I consider the adhesive may add some thickness.

I'm glad I measured the keel trunk before continuing to work on the keel. :rolleyes:
 
Last edited:

fhhuber

Lieutenant
Joined
Jun 19, 2014
Messages
1,365
I will bet...

The taper is associated with expected flex of the OEM "grommets" + the amount of movement allowed by the hole through the keel vs the pivot bolt dia. Then as things aged the movement increased, allowing the swing keel to bang from side to side.

I just saw a swing keel boat for sale.. the keel has banged the sides of the trunk so hard that it has cracked the fiberglass inside the trunk.
 

Scott Danforth

Grumpy Vintage Moderator still playing with boats
Staff member
Joined
Jul 23, 2011
Messages
47,542
Ted,

If you PM me dimensions and your address, I can send you some 1/4" delrin pads that run about .020 thicker (.270)
 

tpenfield

Moderator
Staff member
Joined
Jul 18, 2011
Messages
17,710
Scott,

I'd need to fasten the Delrin as adhesives may not work (right?). I'm just thinking about how I would do this. Here is the keel trunk as viewed from inside the boat.

IMG_6701.jpg

The pivot bolt is at the forward area of the keel and right behind the bolt are lead bars (as additional ballast) that are glassed to the sides of the keel trunk. I think there is a total of 220 lbs of lead +/-. I'm guessing that the keel trunk is about 3/16" thick in that area, maybe 1/4". So I would be drilling a hole for the fastener through the side of the keel trunk and into the lead ballast.

Probably what I should do is drill an over-sized hole, then fill it with epoxy and let it cure. Then drill the hole for the fastener so it would be fully within the epoxy and not going into the lead at all. Sort of something like this in the picture below . . .

Delrinfastening.png

Thoughts?
 

Scott Danforth

Grumpy Vintage Moderator still playing with boats
Staff member
Joined
Jul 23, 2011
Messages
47,542
ted, I can get you round stainless or delrin pucks that would require a single 5/16" bolt to secure. slather the backside with 5200 (just like a thru-hull fitting)

The puck would be 1.5 or 2" in diameter

Stainless would last forever, however may scuff your freshly epoxied keel

the delrin could be simply just glued, however the only thing I found is 3M 4693, and it may let loose after a while.
 

tpenfield

Moderator
Staff member
Joined
Jul 18, 2011
Messages
17,710
I'm thinking the delrin or similar along with adhesive and some smaller screws that I can countersink.
 

fhhuber

Lieutenant
Joined
Jun 19, 2014
Messages
1,365
Scott,

I'd need to fasten the Delrin as adhesives may not work (right?). I'm just thinking about how I would do this. Here is the keel trunk as viewed from inside the boat.


The pivot bolt is at the forward area of the keel and right behind the bolt are lead bars (as additional ballast) that are glassed to the sides of the keel trunk. I think there is a total of 220 lbs of lead +/-. I'm guessing that the keel trunk is about 3/16" thick in that area, maybe 1/4". So I would be drilling a hole for the fastener through the side of the keel trunk and into the lead ballast.

Probably what I should do is drill an over-sized hole, then fill it with epoxy and let it cure. Then drill the hole for the fastener so it would be fully within the epoxy and not going into the lead at all. Sort of something like this in the picture below . . .


Thoughts?

I'd think this is essentially right... except... I would do the oversize drilling, then epoxy dowel in the hole so you have the wood for the screw to bite into.

Just easier putting a screw into wood than putting a screw into epoxy.

Then a model airplane trick:
Assemble, Take it back apart... soak the dowel with thin Cyanoacrylate glue. Reassemble after the glue dries. (put the screw back in early and you may never get it out to replace the Delrin... if it ever needs it) Now the wood will never rot.
 

tpenfield

Moderator
Staff member
Joined
Jul 18, 2011
Messages
17,710
The weather has turned warmer . . . at least for today. 2 days ago it was -9 F . . . now it is pushing 50 F :rolleyes: So, I may get to do some work on the keel trunk this evening. My plan is to sand the inside of it so that I can remove 40 years of water stains and apply a barrier coat.

In other news, I am sanding the keel in preparation for barrier coat as well. If I can get a coat on one side tonight, then tomorrow, I can get the other side done, before the weather turns cold again.

The temperature that I can keep my garage at has been a limiting factor lately. Normally in the winter, it stays in the 40-45 F range, but with the cold snap it was about 38 F, which makes heating things up for epoxy & painting all that much harder.
 

tpenfield

Moderator
Staff member
Joined
Jul 18, 2011
Messages
17,710
Weekend update:

I did some finish work on the keel and began work on the hull.

Put in a piece of plastic tubing to act as a grommet for the keel cable. Additionally, I had noticed earlier that the was a 'extra' hole in the keel and I was not sure it had a purpose. I had covered the hole with the fiberglass wrap. It turns out that the hole is for a keel lock pin, for when you want to take the load off of the keel cable while the keel is in the fully raised position. So, I drilled out the keel lock pin hole and will finish off with some epoxy paint. I'm not sure that I will ever use a keel lock, but I figured it would be easier to make way for it now.

Here is a picture of the keel cable whole and the grommet (on the left) and the keel lock pin hole (right) IMG_7331.jpg


Here is the matching hole for the locking pin in the keel trunk . . . I never noticed the hole until I learned about the lock pin. IMG_7342.jpg


I also cleaned up the hardware for the keel pivot bolt. There is a large bronze bolt with a bronze bushing along with rubber washers, etc. IMG_7330.jpg


Here is the hardware in sequence. One of the ricks with this design is to keep the pivot bolt from leaking, since it is below the water line. There are a variety of techniques to keep it from leaking. I may just try some sealant in a couple of key places along the bolt assembly. IMG_7332.jpg


I also took a look at the keel trunk from below the boat, and it appears that there are some cracks at the base. So, I'll have to do a bit of patch work as I prep the hull for painting, etc. IMG_7327.jpg


I started to do some sanding on the hull in preparation for barrier coat and anti-fouling paint. There is a 'boot stripe' around the water line of the hull and my plan is to raise the boot stripe by a couple of inches, allowing the barrier coat and AF paint to be a little bit higher on the hull. This should help in reducing or even preventing marine growth slightly above the waterline. so, I put my masking tape (blue) at the top of the boot stripe and will make a new boot stripe at the top of the existing boot stripe (which will be painted over). IMG_7339.jpg


My plan is to get the hull bottom coated and painted, then put the boat back on the trailer so I can bring it outside for a good washing before starting to work on the topside prep work.
 
Last edited:

fhhuber

Lieutenant
Joined
Jun 19, 2014
Messages
1,365
Keel lock is used when the boat is on the trailer. You don't want that thing swinging down while you are driving down the highway. Vibrations/bumps on the road can unlock the cable.
 

tpenfield

Moderator
Staff member
Joined
Jul 18, 2011
Messages
17,710
Keel lock is used when the boat is on the trailer. You don't want that thing swinging down while you are driving down the highway. Vibrations/bumps on the road can unlock the cable.

Yes, that is what I figured. My Catalina 22 having such a heavy keel (500 lbs) relied on the trailer cross member to rest on rather than a pin of some sort. It does not look like you could get much of a pin in the hole provided . . . maybe 1/4" size pin or less . . . :noidea:

I'm not sure with trailer riding and bumps as you mention, the pin would hold up without some bending . . . then it probably would not come out (at least not easily) if it became bent.

I think that I may just try to use a trailer cross member and roller to rest the keel during trailering.
 

tpenfield

Moderator
Staff member
Joined
Jul 18, 2011
Messages
17,710
Hull Painting Update:

The gelcoat is pretty well shot on this boat and not something that will just buff up with compounding, etc. Some places have worn down through the gelcoat due to exposure and wear. I recall that when I power washed the boat last Fall, the water came off of the boat a chalky white. So, my plan is to re-coat the boat.

I have been thinking about a new color scheme for the boat and looking at some paint samples and different kinds of paint. I do not have the facilities, nor the experience, to do a gelcoating. Although I did re-paint my 1981 Honda Prelude once :). So, my plan is to do a topside paint on the hull sides, deck, cockpit and even the cabin interior. My preference is to use a 2-part polyurethane paint for the base color and then use either a 2-part or even a 1-part polyurethane for the accent striping. I also plan to change the color scheme from Green to Blue, as the sail cover is blue, and I'm not thrilled with the green as a color choice.

I got some Interlux paint samples at the boat show recently and have been trying to match up the paint choice as closely to the original color of the boat. It looks like 'Oyster White' in the 'Perfection' paint line is a close match, as the original hull is an off-white color versus a bright white. I will probably use a 'Medium Blue' in the Britesides' line for the accent color. So, it will be a 2-part base and a 1-part accent.

Below the water line will be the barrier coat and a bright white anti-fouling paint.

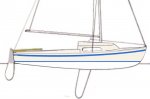
I also plan on making the top accent stripe a bit wider to add more color to the hull. Currently, the green top stripe is/was about 3/4" and the lower boot stripe is about 2". My plan is to make the top stripe about 3" and the boot stripe about 1". I also thought that I would add a darker blue pinstripe to the top of the 3" wide stripe.

I put together picture of what the boat would look like and will give it some thought. Comments welcome :)

1976marinerColors3C2.jpg

My plan is also to preserve/replicate the O'Day logo at the stern of the hull. Painting this will be a chore, I'm sure. I plan on using a "roll and tip" method for the hull, deck and cockpit, and may use just a roller on the cabin interior. I want to avoid the hassle of setting up my garage or elsewhere for spray painting.

Thoughts on the scheme and/or painting methods ???
 

Attachments

  • 1976marinerColors3C2.jpg
    1976marinerColors3C2.jpg
    78.2 KB · Views: 1

Scott Danforth

Grumpy Vintage Moderator still playing with boats
Staff member
Joined
Jul 23, 2011
Messages
47,542
I know a couple of people that do decals in their home garage. I could pass on their information. your pucks of delrin are round, will be going out today.
 
Top