


- Joined
- Jul 18, 2011
- Messages
- 18,954
We don't often see sailboat restoration work on this forum, but since I'll be restoring my newly acquired O'Day Mariner sailboat (Sail #3224), I thought I would run a thread for those who may be interested.
The boat is a 1976 model and has the "2+2" design which means the cabin has aft berths in addition to the standard v-berth in the bow that earlier models had. . . not that you would ever want to sleep on a boat of this size . . . My plan is to use this boat on days when the powerboat is just not in the cards, or just to get a few hours of relaxation.

Description - The boat is 19 feet in length, has a 24 foot mast and is known as a 'fractional' rig. The boat has a small cabin and weighs about 1300-1400 lbs. It has an fully retractable iron centerboard that acts as the keel, along with lead ballast that is glassed into the base of the keel trunk. Total ballast is about 400 lbs. The centerboard itself supposedly weighs about 170 lbs
History - I bought the boat from a guy who sailed it in New Hampshire, so fresh water. Based on some of the previous registration lettering, it also looks like the boat spent some of its life in New York.
The boat is fully functional and I did give it a test launch and sail just to see that everything was in working order. However, after 40 years, it is in need of some cosmetic, mechanical and structural restoration. Overall it looks like the boat will need work in the following areas
Centerboard/Keel

The centerboard (CB) is a bit rusty, since it is iron, but still has the original shape. So, it looks like it will be a good candidate for refurbishment with epoxy and glass fairing to protect it from rusting and enhance the sailing performance.
Gel Coat

The logo/name plates are in decent condition, but the gel coat is chalky and has a few nicks and voids where it has worn off. So, I plan of repairing the nicks and some dock rash as needed, then re-coat the entire boat ( I may use a 2-part paint instead of gel coat). I'll also put barrier coat on the bottom of the hull, below the water line, and finish it off with anti-fouling paint.
Other areas that will need attention are:
Teak Wood Trim - old, worn and broken in spots. I plan on going with some custom made vinyl pieces.
Foam Flotation - Wet in some areas and mostly degraded. So, I plan on removing the old foam and replacing it with new foam. (see my previous thread on this topic)
Transom Fixtures - there is a boarding ladder that attaches to the stern, but it requires the rudder to be removed, which is not practical. So, I plan on changing that setup. Also the auxiliary engine mount needs some TLC.
Cockpit and Cabin - needs a little freshening up. The cockpit has some cracks in the floor, which I originally thought was core moisture and rot, but upon inspection, I realized it is a design shortcoming (not a wood core). So, I'll make a modification there to prevent further cracking. BTW - there is very little wood in this boat, which is a good thing.")
Mast Raising System. I will make rigging to easily step and secure the mast. Right now it is a 2-person job.
Trailer - the boat came with a nice galvanized trailer that needs a little bit of work on the rollers and the lights, as well as some new tires.
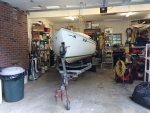
So, that is the plan and with the boating season coming to an end around these parts, I have brought the boat 'home' and put it in the garage, (which it barely fits) so I can do a fair amount of work during the Fall and winter.

I'll be posting updates as I go, and probably asking some questions or looking for some opinions on various matters.
The boat is a 1976 model and has the "2+2" design which means the cabin has aft berths in addition to the standard v-berth in the bow that earlier models had. . . not that you would ever want to sleep on a boat of this size . . . My plan is to use this boat on days when the powerboat is just not in the cards, or just to get a few hours of relaxation.
Description - The boat is 19 feet in length, has a 24 foot mast and is known as a 'fractional' rig. The boat has a small cabin and weighs about 1300-1400 lbs. It has an fully retractable iron centerboard that acts as the keel, along with lead ballast that is glassed into the base of the keel trunk. Total ballast is about 400 lbs. The centerboard itself supposedly weighs about 170 lbs
History - I bought the boat from a guy who sailed it in New Hampshire, so fresh water. Based on some of the previous registration lettering, it also looks like the boat spent some of its life in New York.
The boat is fully functional and I did give it a test launch and sail just to see that everything was in working order. However, after 40 years, it is in need of some cosmetic, mechanical and structural restoration. Overall it looks like the boat will need work in the following areas
Centerboard/Keel
The centerboard (CB) is a bit rusty, since it is iron, but still has the original shape. So, it looks like it will be a good candidate for refurbishment with epoxy and glass fairing to protect it from rusting and enhance the sailing performance.
Gel Coat
The logo/name plates are in decent condition, but the gel coat is chalky and has a few nicks and voids where it has worn off. So, I plan of repairing the nicks and some dock rash as needed, then re-coat the entire boat ( I may use a 2-part paint instead of gel coat). I'll also put barrier coat on the bottom of the hull, below the water line, and finish it off with anti-fouling paint.
Other areas that will need attention are:
Teak Wood Trim - old, worn and broken in spots. I plan on going with some custom made vinyl pieces.
Foam Flotation - Wet in some areas and mostly degraded. So, I plan on removing the old foam and replacing it with new foam. (see my previous thread on this topic)
Transom Fixtures - there is a boarding ladder that attaches to the stern, but it requires the rudder to be removed, which is not practical. So, I plan on changing that setup. Also the auxiliary engine mount needs some TLC.
Cockpit and Cabin - needs a little freshening up. The cockpit has some cracks in the floor, which I originally thought was core moisture and rot, but upon inspection, I realized it is a design shortcoming (not a wood core). So, I'll make a modification there to prevent further cracking. BTW - there is very little wood in this boat, which is a good thing.
Mast Raising System. I will make rigging to easily step and secure the mast. Right now it is a 2-person job.
Trailer - the boat came with a nice galvanized trailer that needs a little bit of work on the rollers and the lights, as well as some new tires.
So, that is the plan and with the boating season coming to an end around these parts, I have brought the boat 'home' and put it in the garage, (which it barely fits) so I can do a fair amount of work during the Fall and winter.
I'll be posting updates as I go, and probably asking some questions or looking for some opinions on various matters.
Attachments

Last edited:


