Transom Replacement on 1997 Larson 206

nelsond2

Cadet
Joined
Sep 9, 2012
Messages
11
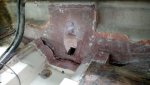
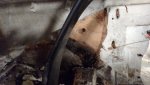
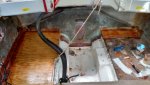
So, I just completed a 9 week project to replace a rotted transom on my bowrider. I took a lot of pics along the way and want to "give back" to this forum since I got so much information from reading posts here. Hopefully it'll help someone else out in the future. I decided to go with Coosa board instead of replacing with wood. Mostly because I never want to do this again, but also the price difference was just not that much. There didnt seem to be a thread that showed a transom replacement with Coosa board, so maybe this'll be helpful.

This is my first post to the forum and the first time I've created a new topic/thread on any forum, so bear with me if I take a little time to get it done.
 

nelsond2

Cadet
Joined
Sep 9, 2012
Messages
11
I have had some leaks since I purchased the boat in 2012. Been chasing down/repairing leaks since then trying to figure out the various sources. The gimbal boot got a tear in it the first weekend out and just about sunk the boat as the float switch on my bilge pump was not wired up. I had it replaced and added the wiring necessary to power up the float switch. Then found that the sealant around the plug was leaking. So re-sealed it. Then the water pump on the motor began weeping, so got a new one. Replaced all hoses and still had a significant amount of water coming in but could not find the source. So, not the best move, but, I just ignored it and depended on my bilge pump. This year I actually spent some time seeing how much water I was getting and the results scared me enough to investigate it further. I took it to a boat mechanic who pulled the foot to inspect the gimbal boot. He said everything appeared fine with it and suggested it was the transom. I of course lived in denial and convinced myself that the water was coming from a bad gimbal plate seal or possibly the seal at the exhaust Y pipe/gimbal plate. I got a quote of $1000 to pull/replace the motor to check these and was told that the waiting list was about 5 weeks at all the local shops. So I decided to just dive in and pull the motor myself and see what I found. Picture 443.jpg
 

nelsond2

Cadet
Joined
Sep 9, 2012
Messages
11
Once the engine was out of the way, I stuck the outdrive back on and with the exhaust Y pipe still in place, I stuck it back in the water to see if I could see a leak around the exhaust gasket or the gimbal plate seal. I was able to see everything much easier with everything out of the way and the water was actually coming from underneath the fiberglass cloth "tabbing" at the bottom of the transom. I didn't know anything about the actual construction of the boat at this point and had no idea what a bad thing that was.

So I removed the exhaust and started pulling at the loose fiberglass and prodding at the wood underneath. The wood was obviously rotting and soaking wet, but it still had some structural integrity (at least thats what I was telling myself).

Picture 456.jpg Picture 451.jpg Picture 455.jpg
 

nelsond2

Cadet
Joined
Sep 9, 2012
Messages
11
After reading a lot on here, I found out just how bad this could potentially be and so I started digging further. I removed the wiring harness and tilt/trim pump. Removed the carpeted panels that cover the transom sides and found a nice surprise.
Picture 462.jpg
Someone has been here before. That aluminum plate was definately not original equipment. The four bolts at the bottom are the ladder mounts about 6" below the waterline. Notice the rust on the nuts and washers. The floor in front of this area was spongy and soft. I removed the plate and found this....
Picture 466.jpg Picture 464.jpg

At this point, I decided I was in over my head. I removed the transom plate and the rest of the wiring/hoses and took it to a local fiberglass shop. This was the end of June, 2015 right in the middle of summer. The guy at the shop was very helpful and honest with me. He said he really had quite a back log and it would be the first of August before he could get to me. He quoted me $3000 to replace the transom with wood. That was just the transom work. He was going to replace it just down to the floors on either side of the bilge (basically the exposed transom area at this point). I asked what he though about me trying to do it myself. He was encouraging, just warned me that it was a LOT of work. Said if I did decide to try it that I could come to him with any questions.
 

nelsond2

Cadet
Joined
Sep 9, 2012
Messages
11
After about a week of searching and reading on this forum, I decided that I could do this. I didnt really have much to lose since I would have been just waiting on him to get to me anyway. So I started tearing into the transom. Crowbars, small circular saw, hammers, chisels, an oscillating tool and a grinder with a 40 grit flapper wheel and about 20 hours of work and I had the bulk of the transom removed.
Picture 481.jpg Picture 494.jpg

The stringers in my boat were foam and not wood, so I was fortunate. I did drill some holes along the bottom of the stringers to allow any moisture that was in them to weep out. I realize that there may still be moisture in there, but it sat in the hot July/August temps and hopefully got a lot of it out. I cut about 2" of the stringers off with a sawzall at the back to allow me to slide the new transom in without any interference. Removed the floors and foam on both sides far enough to let me do the tabbing and ground all of the transom down to solid material (no wood). Sorry I dont have a lot of pics of this process, but it was just nasty. It really is pretty obvious once you start into it.
 

Attachments

  • Picture 494.jpg
    Picture 494.jpg
    56.6 KB · Views: 18
  • Picture 481.jpg
    Picture 481.jpg
    55.3 KB · Views: 15
  • Picture 481.jpg
    Picture 481.jpg
    55.3 KB · Views: 17

nelsond2

Cadet
Joined
Sep 9, 2012
Messages
11
I had measured the old transom and made a template of it the best I could. I knew at this point I was going with Coosa board. It is actually made about an hour and a half from my house and a distributer there sold me a sheet of 3/4" for about $250 with tax. I needed 1.5" thickness, so I cut two pieces and epoxied them together with West epoxy. Here are pics of the wooden template I made and a picture of me laminating the Coosa board together.
Picture 505.jpgPicture 508.jpg

I placed the transom into the boat and marked the keyhole. I then marked it to cut inside about an inch all the way around.
 

JASinIL2006

Vice Admiral
Joined
Feb 10, 2012
Messages
5,548
Very intersting! My '97 Larson's problems started at the ladder mount, too. Hard to believe anyone thought that was a good way to mount a ladder...

Looking forward to seeing the rest of your posts.

Jim
 

nelsond2

Cadet
Joined
Sep 9, 2012
Messages
11
Now it was time to glue the transom in. I got everything as prepared as I could and got some friends to come help. We practiced a couple of times to make sure we had a plan. This was probably my most anxious moment. It was about 100 degrees that day so we started early and I knew we'd have to work fast to keep the epoxy from setting up before we had everything in place. We mixed up the epoxy and added colloidal silica until it was peanut butter consistency. I used a notched trowel to apply it to the back of the boat, making sure to cover every inch. Then placed the transom and bolted some 2x4 clamps that we'd made. Measured the thickness at the transom and it was a hair over 2" thick all around. I then took the epoxy that had squeezed out and filleted what I could get to around the clamps.
Picture 538.jpg Picture 542.jpg

After a couple days to let everything cure completely, I removed the clamps and finished filleting. To fill in the stringers that I had cut out I cut some scrap pieces of Coosa board to the same shape as the stringer and epoxied them in place to fill the gap. Then I smoothed/filleted this area.
Picture 553.jpg
I tabbed around the entire bottom and top of the transom about 4-6" and then covered the entire transom with 1406 biax and epoxy.
Picture 563.jpg
 

nelsond2

Cadet
Joined
Sep 9, 2012
Messages
11
We then cut out the keyhole to the full size of the cutout on the back of the boat. I used a 2" hole saw to cut the reliefs for the steering arm at the top. This was done freehand since I didnt have a jig. I was pretty nervous about this, but it worked out great. I installed new flooring up to the transom (1/2" plywood completely coated in epoxy. Then tabbed the floor to the sides of the boat and to the transom with 1406.
Picture 565.jpg
 

Attachments

  • Picture 565.jpg
    Picture 565.jpg
    62.5 KB · Views: 17

nelsond2

Cadet
Joined
Sep 9, 2012
Messages
11
Then I used cleaned and sanded the bilge and applied Total Bilge paint to coat the entire bilge and transom. Picture 598.jpg

I used a drill jig to drill the holes for the transom plate, installed some carpet over the floors and began re-assembly.
Picture 602.jpg Picture 603.jpgPicture 606.jpg Picture 614.jpg Picture 615.jpg

The lag bolts broke off when I removed one of the motor mounts, so I filled the holes with epoxy and "clocked" the mounts about 5-10 degrees when I re-installed them.
 

nelsond2

Cadet
Joined
Sep 9, 2012
Messages
11
My goal was to have it back in the water by Labor Day. I made it with a week to spare. Put it in the water and no leaks. This was a huge project. I cant believe that I did it myself (actually with a ton of help from my Step-Dad and a few of my friends.) But I'm very glad I did it. I think this boat is stronger than when it was new and it will NEVER ROT! I learned so much about my boat from this and now I'm not intimidated by anything on it.

Hopefully the experts on here won't see anything that I did wrong as it is done now, but if this helps someone in the future with their project, then I'm glad I posted it.

Please feel free to message me if you have any questions on what I did.

Thanks!
 

madolive3

Petty Officer 2nd Class
Joined
Sep 2, 2011
Messages
120
Thank you for the great Post. I'll have to replace my Transom and Stringers soon, so this is regular reading for me.
 
Top