1974 Raycraft project

Lifemember

Cadet
Joined
Aug 30, 2015
Messages
11
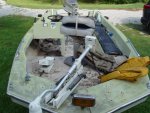
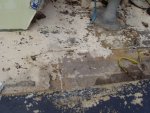
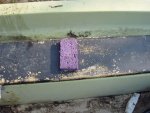
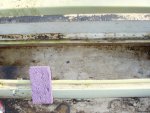
I have been given a 1974 Raycraft bass boat that belonged to my Better half's father who passed away in 1995. It has been passed around to the brothers and spent the last 10 years in storage both covered and uncovered. The motor does run and has good compression. I have restored cars for many years but never played with a boat. The floor is solid and does not sag although I noticed a crack in one area of the floor that I will need to investigate. The bad is a crack in the side of the boat that looks like someone hit something. I will start with a cleaning of the boat and inspection of everything. I have no idea how to fix this proble
m on the side and any thoughts on how to proceed would be appreciated.

Thanks in advance Dan


P1010037.JPG
 
Last edited:

52FordF2

Petty Officer 1st Class
Joined
May 31, 2013
Messages
372
With the dark streaks leaking from the crack, there may be some more investigating to do. To repair it you will need to open up the decking. Can you do any core sampling under the deck for rotten stringers, transom and such. The floor may feel solid but will still need to be removed. But don't worry you can do the repair and bring it back better than new. Other Gurus with better skills and Knowledge will probably chime in soon. Post up photo's of the entire boat.
 

Woodonglass

Supreme Mariner
Joined
Dec 29, 2009
Messages
25,924
That appears to be some major impact damage!!!:eek: For SURE you will need to do the repair from both the inside and the outside. You can do the repairs with basic fiberglassing skills which we can provide but you will need to do whatever's required to gain access to the hull from the inside of the boat. Post up some more pics of the boat on the inside so we can see what it looks like for both sides.
 

Lifemember

Cadet
Joined
Aug 30, 2015
Messages
11
No Title

After reading and going back too look around I notice this crack in floor and it has a little movement. The crack and soft area is straight in line with damage to hull. Not good!
 

Attachments

  • photo229347.JPG
    photo229347.JPG
    144.4 KB · Views: 1
  • photo229348.JPG
    photo229348.JPG
    143.1 KB · Views: 1
  • photo229349.JPG
    photo229349.JPG
    143.6 KB · Views: 1
  • photo229350.JPG
    photo229350.JPG
    147.1 KB · Views: 1

Lifemember

Cadet
Joined
Aug 30, 2015
Messages
11
P1010032.JPG P1010036.JPG P1010038.JPG P1010040.JPG P1010039.JPG


I am learning how to post pictures. I notice crack in floor and a little flex in it. This crack is in line with the Hull damage. Hull damage is below the sponge in the rod holder box.
 

Lifemember

Cadet
Joined
Aug 30, 2015
Messages
11
Went out this morning to inspect the side of the project. I chipped the cracked gel-coat away to see what was underneath. I found the brown stuff was coming from small pin holes in the fiberglass. I do not see any structural damage from a hit in this location. All over the bottom and sides of the boat are hairline cracks in the Gel-coat. This area is the worst looking of them. I checked the transom and it does not have ay flex when moving the boat motor tail up and down. The transom is the only area that does not have any hairline creaks. Will continue to clean boat and look for problem areas underneath dirt.
P1010041.JPG
P1010042.JPG
P1010043.JPG
 
Last edited:

Lifemember

Cadet
Joined
Aug 30, 2015
Messages
11
I checked the holes with an awl to see what the depth of the hole was. it did not go in at all. It looks like a defect in the fiberglass process.
 

Woodonglass

Supreme Mariner
Joined
Dec 29, 2009
Messages
25,924
Just shows to go ya, how pix can be deceiving!!!! Bottom line is you're gunna need to do some major "Hull Work" to make her look halfway decent. All that cracked gelcoat and holes and gouges will need to be repaired before Paint or Gelcoat can be re-applied.

LOTS of sanding in your future!!!!;)
 

Lifemember

Cadet
Joined
Aug 30, 2015
Messages
11
Just shows to go ya, how pix can be deceiving!!!! Bottom line is you're gunna need to do some major "Hull Work" to make her look halfway decent. All that cracked gelcoat and holes and gouges will need to be repaired before Paint or Gelcoat can be re-applied.

LOTS of sanding in your future!!!!;)

Could have been worse then a little sanding I guess. :) Was thinking of sanding, using some kind of filler for the pin holes, then painting it. I have the long weekend to think about what too tackle first. Need to spend the next two days getting MH ready for a little R&R.
 
Top