'76 MFG Fishin Caprice II Center Console Rebuild

Shakedownscott

Petty Officer 2nd Class
Joined
Jul 12, 2011
Messages
179
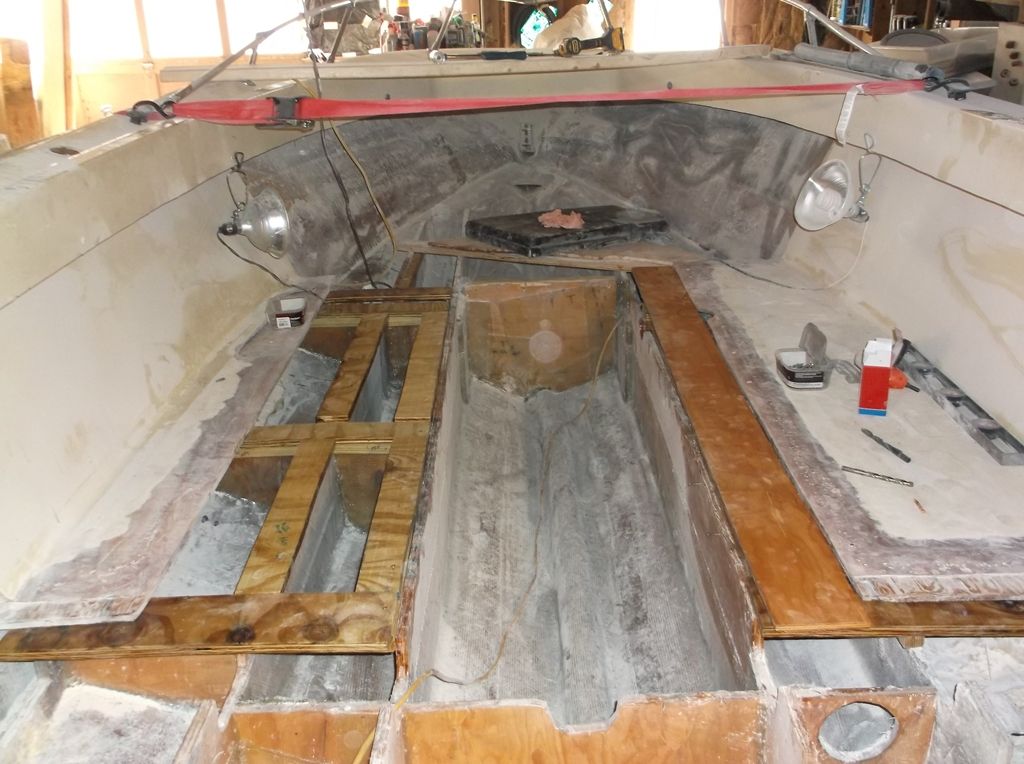
I have been slowly plugging away at the MFG project. Would like to have it closer to being done but its been a busy spring. After fitting in the fiberglass floor sections to make sure everything fit, I had to pull it back apart to cut out deck pieces and other pieces to put the flooring together.


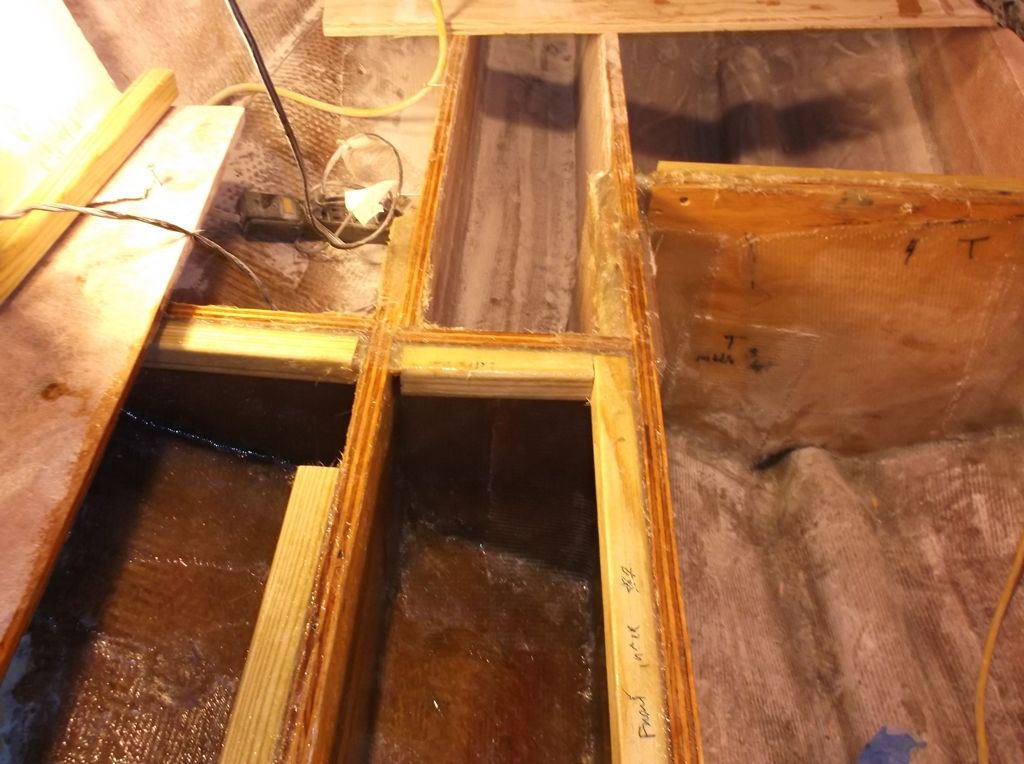
The boat originally had 3/4" plywood strips that went on top of the stringers, they were attached with strips of glass. I added cleats along the top of the stringers and secured them with stainless deck screws and PB.


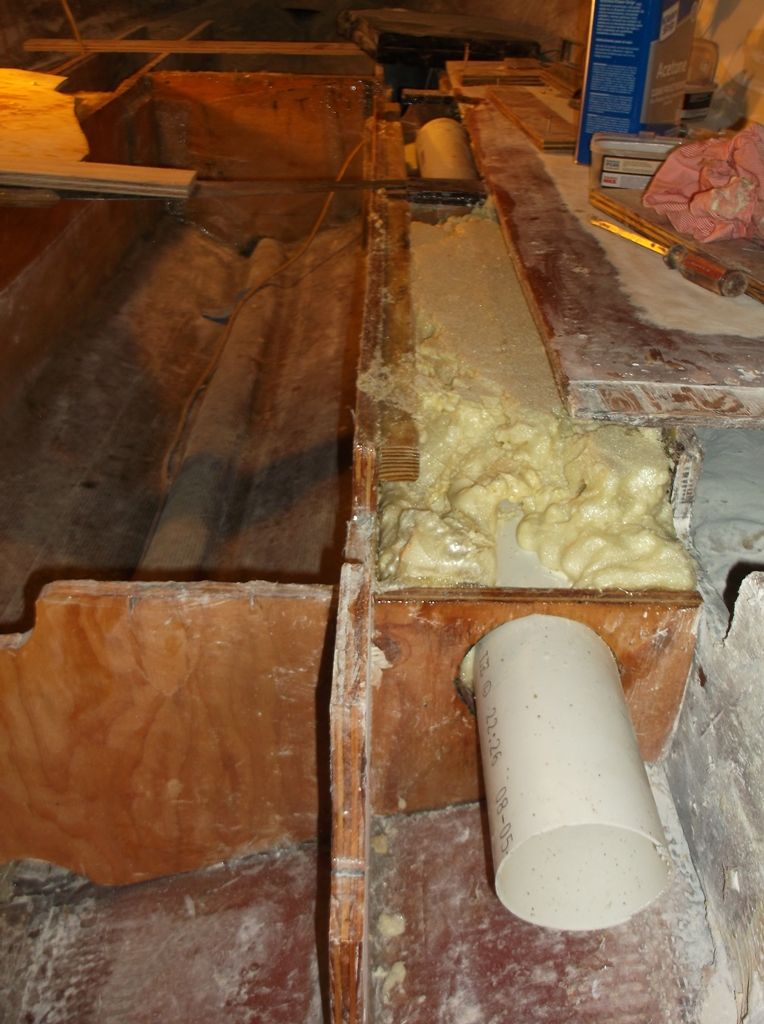
I then got to play with expanding foam. The foam was pretty easy and fun to use, you just have to move fast.


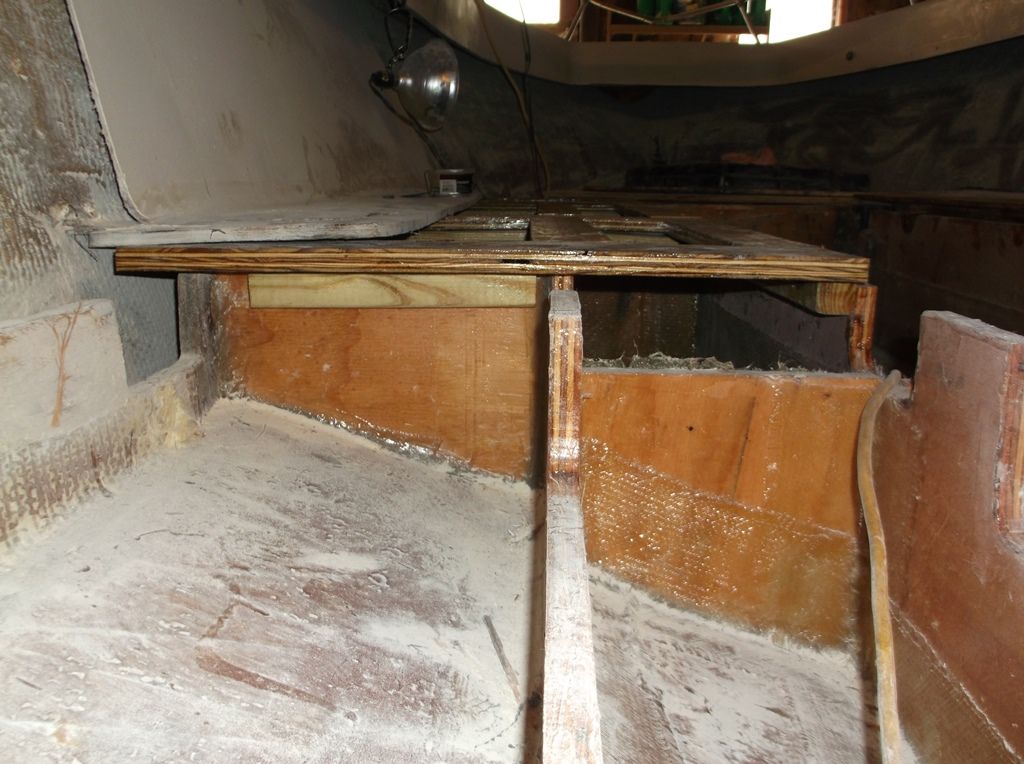
I then used PB and deck screws to attach the 3/4" strips and 1/2" decking. The screws and nailers really helped to clamp down the new and existing floor sections. This made it pretty easy to make even before the PB kicked.


Everything hardened up really nicely and is solid as a rock. Next is the front part of the deck, then I can put the casting deck and gas tank back in.
 

Shakedownscott

Petty Officer 2nd Class
Joined
Jul 12, 2011
Messages
179
Been working on removing some old carpet from the casting deck. Man, it was really glued on there. Still have quite a bit of glue to get off but its getting there.


Shakedownscott

Petty Officer 2nd Class
Joined
Jul 12, 2011
Messages
179
Got the front all set for the deck to be installed. Just need to add a bit more foam between the middle stringers. I am going to cut some pieces of 2" pink foam board for this area. The boat original had 3-4" of spray in foam but I want to keep the foam off the hull so this area will drain if water ever gets in there.


gm280

Supreme Mariner
Joined
Jun 26, 2011
Messages
14,589
Oh yes I can see that mix and pour foam. That stuff is interesting to use and watch expand. I remember my first pour. I was so worried about it expanding before I poured it, I probably mixed and poured in mere seconds. Then I realized that 45 seconds is a long time. Not nearly as frantic as I initially thought. I can see you are coming along nicely. Keep posting. I am interested to see her finished. :thumb:
 

Shakedownscott

Petty Officer 2nd Class
Joined
Jul 12, 2011
Messages
179
Thanks guys for the encouragement I really appreciate it. So far the foam has been the funest part of the rebuild. I still love watching it expand. I was the same way GM280, I expected it to turn into a volcano like on the brady bunch episode and go everywhere.
 

Shakedownscott

Petty Officer 2nd Class
Joined
Jul 12, 2011
Messages
179
I had a goal earlier in the year of having her on the water in time for the fall striper run. Coming to the realization that I don't think im gonna make it this year. Would need to finish it in about 4 weeks to be ready. I am sure if I used all of my vacation time from work I could make it, but then wouldn't have time for fishing. So revising my goal to hopefully have the transom installed before it gets too cold to glass outside. Then I can finish the smaller glassing work, rigging etc over the winter and have it ready for spring/summer next year. Still need to either rebuild the motor that came with it or get a different one.

Was able to get the deck installed, tabbed and glassed in.


During demolition, I left the transom and last foot or so of the stringers intact. This was to keep everything from flexing. With the frame I built I don't think this was necessary. If I had to do it again I would have removed the transom and started there first. At least now I have a better feel for the poly and PB, so I have some level of confidence when installing the transom
 

Shakedownscott

Petty Officer 2nd Class
Joined
Jul 12, 2011
Messages
179
Worked on the final bit of demo this weekend. Was able to get the stringers cut out and removed the glass from the inside of the transom. When originally built it only had one layer of csm over the transom. Made disassembly easy, pretty much could pull it out by hand. Have some more work to try and get the drain plug tube out, glued in pretty well. Still hoping I can get the transom out in one piece for a template.


Shakedownscott

Petty Officer 2nd Class
Joined
Jul 12, 2011
Messages
179
Ran into what looks like some pretty substantial damage to the bottom of the transom. I have been wondering whats under all of this putty for a while.


Started grinding at it last night and found that it is not just a surface wound, looks like it goes right thru the fiberglass.


On the inside there is a bunch of rubbery caulk holding the drain tube in place.


I am thinking the best way to attach this would be to grind out all of the filler from both sides. I am expecting to find a pretty good size hole when I am done grinding. How many layers of fiberglass should I put back to fill the hole.
 

sphelps

Supreme Mariner
Joined
Nov 16, 2011
Messages
11,432
2 or 3 I think would be good then a couple on the outside when the time comes ...
 

Woodonglass

Supreme Mariner
Joined
Dec 29, 2009
Messages
25,924
Yup I'd for sure use a minimum of 2 layers of 1708 on the inside AND the outside.
 

Shakedownscott

Petty Officer 2nd Class
Joined
Jul 12, 2011
Messages
179
Okay, thanks guys. Still going at cleaning it all out to see how big the hole is, I appreciate all of the advice, would not want to fix a hole through the hull like this without the help and knowledge you guys have.

I was slowed down trying to get the crumbling transom wood out in one piece to use as a template. Finally able to pull inner piece of plywood out in pretty good shape. Definitely should save some time laying out the new transom.
 

sphelps

Supreme Mariner
Joined
Nov 16, 2011
Messages
11,432
Making a template is pretty easy if you can't get the old one out in one piece .. Just get a piece of cardboard big enough to cover the height and width of the transom ... Stretch it across the transom on the outside of the boat and clamp in place ... Trace the profile of the hull and sides all the way around ... Lay the cardboard down flat then mark about a half inch inside your line on the bottom and sides .... Retrace that mark and cut on new line ... Test fit on the inside and make whatever adjustments needed ... Piece a cake !
 

Shakedownscott

Petty Officer 2nd Class
Joined
Jul 12, 2011
Messages
179
Thanks sphelps, that's a great idea. I never would have thought to do it that way. I would have tried to fit the cardboard on the inside, that would be a pain.
 

Shakedownscott

Petty Officer 2nd Class
Joined
Jul 12, 2011
Messages
179
Was able to get both pieces of the transom out in one piece, really wasn't glued in all that well. The original transom was 2 sheets of 3/4" plywood with one layer of csm over the top to seal it. No PB or other tabbing around the edges, made disassembly pretty straight forward.


With the transom out I was able to clean out the rest of the hole around the drain plug.


When I first brought this boat home it was cranked way up on the trailer and was sitting on the metal rail of the rear roller bracket.


This caused cracks at the bottom of the transom that go all of the way through on both sides.


Glad I have read many times on this forum that you can fix almost anything on a fiberglass boat. This looks pretty ugly, but I know with the help and advice from this site, I should be able to get it better than new.
 

gm280

Supreme Mariner
Joined
Jun 26, 2011
Messages
14,589
Okay, you are certainly moving right along. Interesting to see your transom plies came out so easily. Obviously the previous owner didn't install them quite right. They should have been PBed in place. However, now you have a perfect pattern to use for the new wood.

As far as the side cracks (valleys) not a problem. Once you grind everything flat and smooth, you can patch them and nobody will every know there were ever any cracks there. Fiberglass is so forgiving. Keep up the great work and post those pictures. :thumb:
 

Shakedownscott

Petty Officer 2nd Class
Joined
Jul 12, 2011
Messages
179
Thanks gm. There is a 1/8" or more layer of PB of some type all over the transom. It appears that it didn't stick to the wood that well, pretty much pryed right out. It is really stuck to the glass though.

Should I grind all of the original glue/PB from the transom glass or just make it smooth prior to putting in the new transom?
 

sphelps

Supreme Mariner
Joined
Nov 16, 2011
Messages
11,432
If it's glue I would grind it all off ... If pb grind it down to clean glass or pb .... Give it a good scrub with acetone ..
What ever it was looks like it didn't stick very well ..Do you have a good pic of the inside skin ?
 

Shakedownscott

Petty Officer 2nd Class
Joined
Jul 12, 2011
Messages
179
Not sure exactly what it is. Its not sticky like glue, its really hard like PB. Its a white color. Will see how well stuck it is to the transom.

Stuff grinds down real slow, hoping to leave most of it.
 
Top