what kind of wood for aluminum boat to mount the motor on?

kawaboy-zx11

Petty Officer 2nd Class
Joined
Mar 1, 2009
Messages
109
i want to get a new 2x10 for the back of my boat where the motor mounts, i was going to get treated wood, but i just googled it and it said treated wood will eat up aluminum. what kind of wood do you guys recommend for this? its a 14' starcraft aluminum with a 20hp motor. Thanks, Dennis
 
Last edited:

MTboatguy

Fleet Admiral
Joined
Jul 8, 2010
Messages
8,988
Two sheets of 3/4 in plywood laminated together then sealed for water is the best, do not use treated wood and I would not use a 2 by 10, simply use the plywood and do it properly.

Both Home Depot and Lowes sells what is called a handy panel, which is a 2 foot by 4 foot sheet of 3/4 inch plywood, that works fine for most 14 foot fishing boats, cut out two pieces in the shape you need for the transom, glue and screw together then seal it and you should be good to go for a number of years.
 
Last edited:

oldboat1

Fleet Admiral
Joined
Apr 3, 2002
Messages
9,607
+1. Pull out the old transom and use it as a template. I last did it about three years ago, and happens to be the same hull (14' Starcraft). Used double 3/4 A/C ply, sandwiched with 3M. In addition, I like to use a screw and glue method. Mine is as solid now as it was then (I keep the boat covered most of the time, but think as long as the aluminum molding is in place on top, there is not a whole lot of water getting in.) I've used epoxy in prior installations, and that is probably a little better as it seals surfaces (edge surfaces most important for water intrusion), as well as screw dimples. I just use drywall screws and try to seal them -- think the screws are important to help make sure there is no separation for water to get in.
 

Woodonglass

Supreme Mariner
Joined
Dec 29, 2009
Messages
25,924
Last edited:

oldboat1

Fleet Admiral
Joined
Apr 3, 2002
Messages
9,607
Great tip, Woodonglass.

Thinking about it, I enlarged the footprint some on that Starcraft -- brought the plywood down further to stiffen up the transom a little more. (But have to be careful not to get the lower edge into any water that might collect in the stern.) Kawaboy -- might want to consider that for mounting your 20.
 

kawaboy-zx11

Petty Officer 2nd Class
Joined
Mar 1, 2009
Messages
109
dang, i was really hoping i could just buy a 2x10 at menards and be done with it, so now i have to buy a bunch of chemicals too. i wonder what kind of wood they used when it was built at starcraft...i think it was made in 1983 and it held up till now, it looks like a regular 2x10.
 

MTboatguy

Fleet Admiral
Joined
Jul 8, 2010
Messages
8,988
If there is a 2 x 10 in there, I can 100% guarantee you, that Starcraft did not put it there, it has been put in by someone other than the manufacture. Startcraft has always used laminated plywood in their construction and sealed it, just like every other manufacture. The saying around boat restoration, do it right and do it once, then enjoy it for a long time.
 

kawaboy-zx11

Petty Officer 2nd Class
Joined
Mar 1, 2009
Messages
109
ok, here is picture of the original wood, oldboat1 mine has an aluminum brace reinforcement, you can see in the pic.
 
Last edited:

oldboat1

Fleet Admiral
Joined
Apr 3, 2002
Messages
9,607
Well now wait, you seem to be going from any old piece at Menards to deep in the weeds on hull construction....:rolleyes: It's hard to say what a prior owner might have done, if a prior fix. But anything you put in there (almost anything) would be safer than a rotted transom. The standard width should be 1 1/2, but hard to say what you have there. Truth is a Menards 2 x 10 cut to fit would probably do fine for you, but plywood would be stronger when flexed. A 20 will flex the transom, and Starcraft transoms probably aren't exactly overbuilt.
 

kawaboy-zx11

Petty Officer 2nd Class
Joined
Mar 1, 2009
Messages
109
well shoot, my pics didnt work :( but i do believe it is the original wood because it has the manufacturer plates riveted on there.
 

oldboat1

Fleet Admiral
Joined
Apr 3, 2002
Messages
9,607
whoa flurry of posts at once here, seems. my 10 to your 6, MTboatguy in the mix -- has it right I believe, but I can't confirm mfg facts myself. Will look at pics if you can get them posted.
 

MTboatguy

Fleet Admiral
Joined
Jul 8, 2010
Messages
8,988
well shoot, my pics didnt work :( but i do believe it is the original wood because it has the manufacturer plates riveted on there.

Having the manufactures plate riveted to the wood means nothing, when I redid my transom in my fishing boat, I refinished it just like the factory did and I riveted the manufactures plate to the new transom with the exact same rivets they used. Your boat is 32 years old, and unless you have owned it since day one, you have no way in the world to know what someone else did to it. Virtually every boat I have restored over the last 30 years, you would be very hard pressed to say they were not factory boats, when I restore something, unless it has a problem with the original design, I do it back to factory specifications down to the fasteners.

Don't take me wrong, it is your boat and it is your option to do it the way you want to, but you asked, so some of us posted the correct way to do it for the maximum amount of longevity, but in reality, it is your decision to make, you are the one that is going to be using it, not us. It is entirely up to you.
 

oldboat1

Fleet Admiral
Joined
Apr 3, 2002
Messages
9,607
I reinstall the mfg plates too. Think it's a good idea to just do the replacement, even if the wood really is original and seems pristine. A 6 hp motor is one thing, but a 20 has a lot of torque (like I said, I have the same hull with a '57 18).

[my hull is a '79.]
 
Last edited:

kawaboy-zx11

Petty Officer 2nd Class
Joined
Mar 1, 2009
Messages
109
yeah, i understand. i thought i was just going to have to cut a $8 piece of wood to fit and be done, i had no idea i had to buy lots of chemicals and glue wood together and stuff, just a much bigger and expensive project than i thought it was going to be.
 

MTboatguy

Fleet Admiral
Joined
Jul 8, 2010
Messages
8,988
Actually what we are talking about is not that big a job, you can buy all of the chemicals in quarts, really reasonable and the plywood is only going to cost about $20 at HD or Lowes, just a couple of hours to cut things to shape then seal overnight, put it back together, I could do it in in less than a weekend and then never have to do it again in my lifetime. The descriptions sound far more intimidating what the actual work is to do. Should be able to do everything for less than $50 and with the 2 x 10 you are still going to have to seal it properly, but the sealer will come off a 2 x 10 a lot easier than it will the plywood, because you will probably be looking at a piece of fir for the 2 x 10 and fir just does not take most sealers that well.
 
Last edited:

oldboat1

Fleet Admiral
Joined
Apr 3, 2002
Messages
9,607
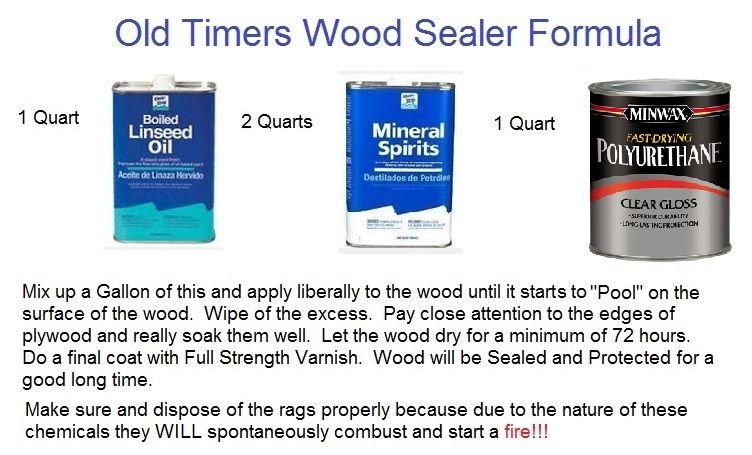
half a sheet of A/C ply, plus or minus, a tube of 3M 5200 -- or even construction adhesive, a bunch of drywall screws. Find something to brush on to seal (couple of coats of poly), and you're about done. If you can cut out a two by ten, you can do the plywood.
 

MTboatguy

Fleet Admiral
Joined
Jul 8, 2010
Messages
8,988
Ya, if you were going to use a 2 x 10, then you can get a way with 1 handy panel, which will run about $10 bucks. So in reality, it is only going to cost a few bucks more than what the 2 x 10 would have cost, because like I said, you would still have to seal the 2 x 10 and fir don't seal well.
 

kawaboy-zx11

Petty Officer 2nd Class
Joined
Mar 1, 2009
Messages
109
can someone post a link to the handy panel? i have a menards near my house, but when i put handy panel it does not come up.
 

TruckDrivingFool

Lieutenant Commander
Joined
Jul 30, 2007
Messages
1,818
Handy panel is just a 2'x4' or 4'x4' piece of plywood in your selected thickness. At Menards you will find them near the plywood end of the store in the isle with pegboard and the likes.
 
Top